Overview
The Rafay MCP (Model Context Protocol) Server changes that by bringing your infrastructure data directly into the AI assistant you already use.
Once configured, you can query clusters, pods, namespaces, workloads, and more using plain English and get real-time, structured answers without leaving your AI tool.
MCP is an open standard, which means the Rafay MCP Server works with any MCP-compatible AI assistant including Claude, Cursor, VS Code GitHub Copilot, and others.
Important
The MCP capability is not enabled by default. Contact Rafay Operations to have it enabled for your organization.
Why Use the Rafay MCP Server?
Natural Language Access to Infrastructure
Query clusters, namespaces, pods, workloads, and more using plain English. No need to remember exact console navigation paths or CLI commands just ask and get answers.
Faster Troubleshooting
Diagnose issues quickly by asking your AI assistant to debug a failing pod, check cluster health, or identify resources in an error state. The AI reasons over real-time data returned by the MCP server and surfaces actionable insights.
Works with Any MCP-Compatible AI Tool
Because MCP is an open standard, the Rafay MCP Server integrates seamlessly with Claude Desktop, Cursor, VS Code GitHub Copilot, Claude Code, and any other MCP-compatible client. Teams are not locked into a single AI tool.
No Context Switching
Developers and platform engineers can stay in their AI assistant of choice and interact with Rafay infrastructure without opening a separate browser tab or terminal window.
Consistent, Structured Responses
The MCP server returns structured data from the Rafay platform, which the AI tool organizes into clear, readable summaries making it easy to understand the state of your infrastructure at a glance.
Prerequisites
- Access to the Rafay Console with the MCP capability enabled for your organization
- An API key from the Rafay Console
- An MCP-compatible AI tool installed on your machine (e.g., Claude Desktop, Cursor, VS Code with GitHub Copilot)
Step 1: Download the MCP Server Binary
- Log in to the Rafay Console and navigate to My Tools
- Select MCP Server from the tools list
- Download the binary for your operating system and architecture
| Operating System | Architecture Options |
|---|---|
| Mac (OS X Yosemite or later) | Intel/AMD (x86_64), ARM64 |
| Windows (64-bit) | Intel/AMD (x86_64), ARM64 |
| Linux (64-bit) | Intel/AMD (x86_64), ARM64 |
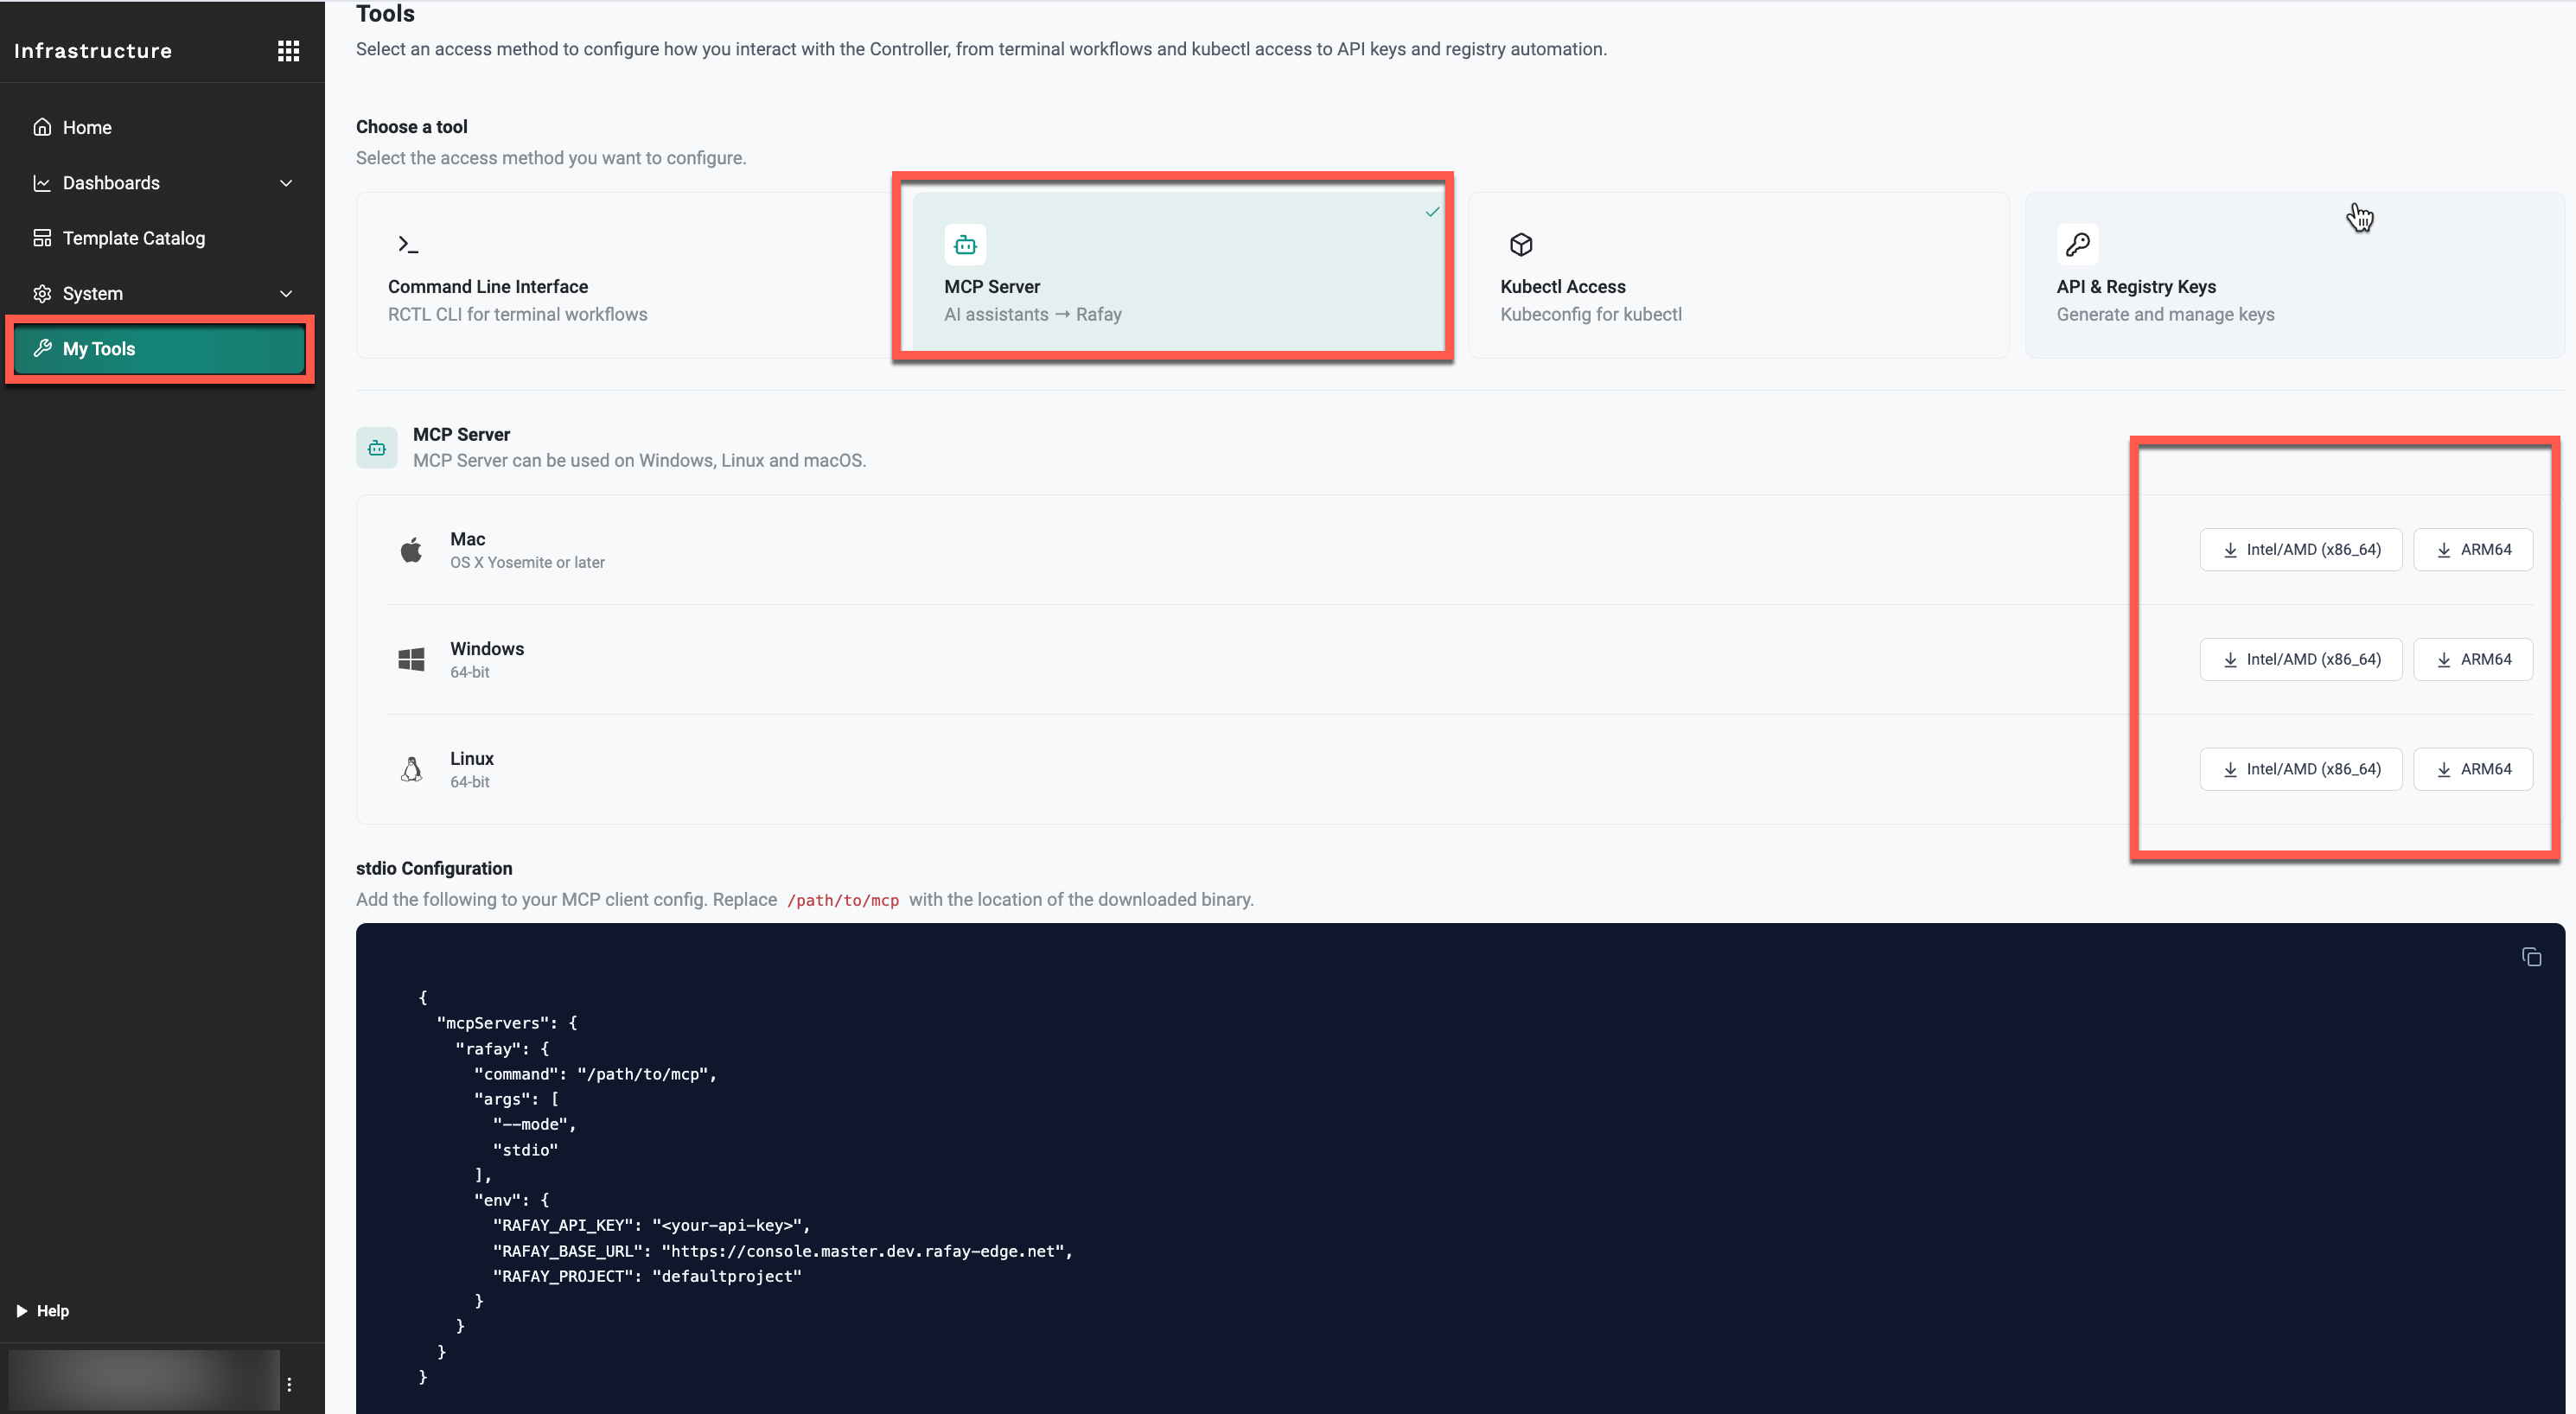
Once downloaded, extract the archive. The extracted folder contains:
- mcp: The MCP server binary
- README: Details on supported tools and resource types
- build.info: Build metadata
Note
Refer to the README file included in the download for the full list of supported tools and resources.
Step 2: Retrieve Your API Key
- In the Rafay Console, go to My Tools and select API & Registry Keys
- Click Manage Keys
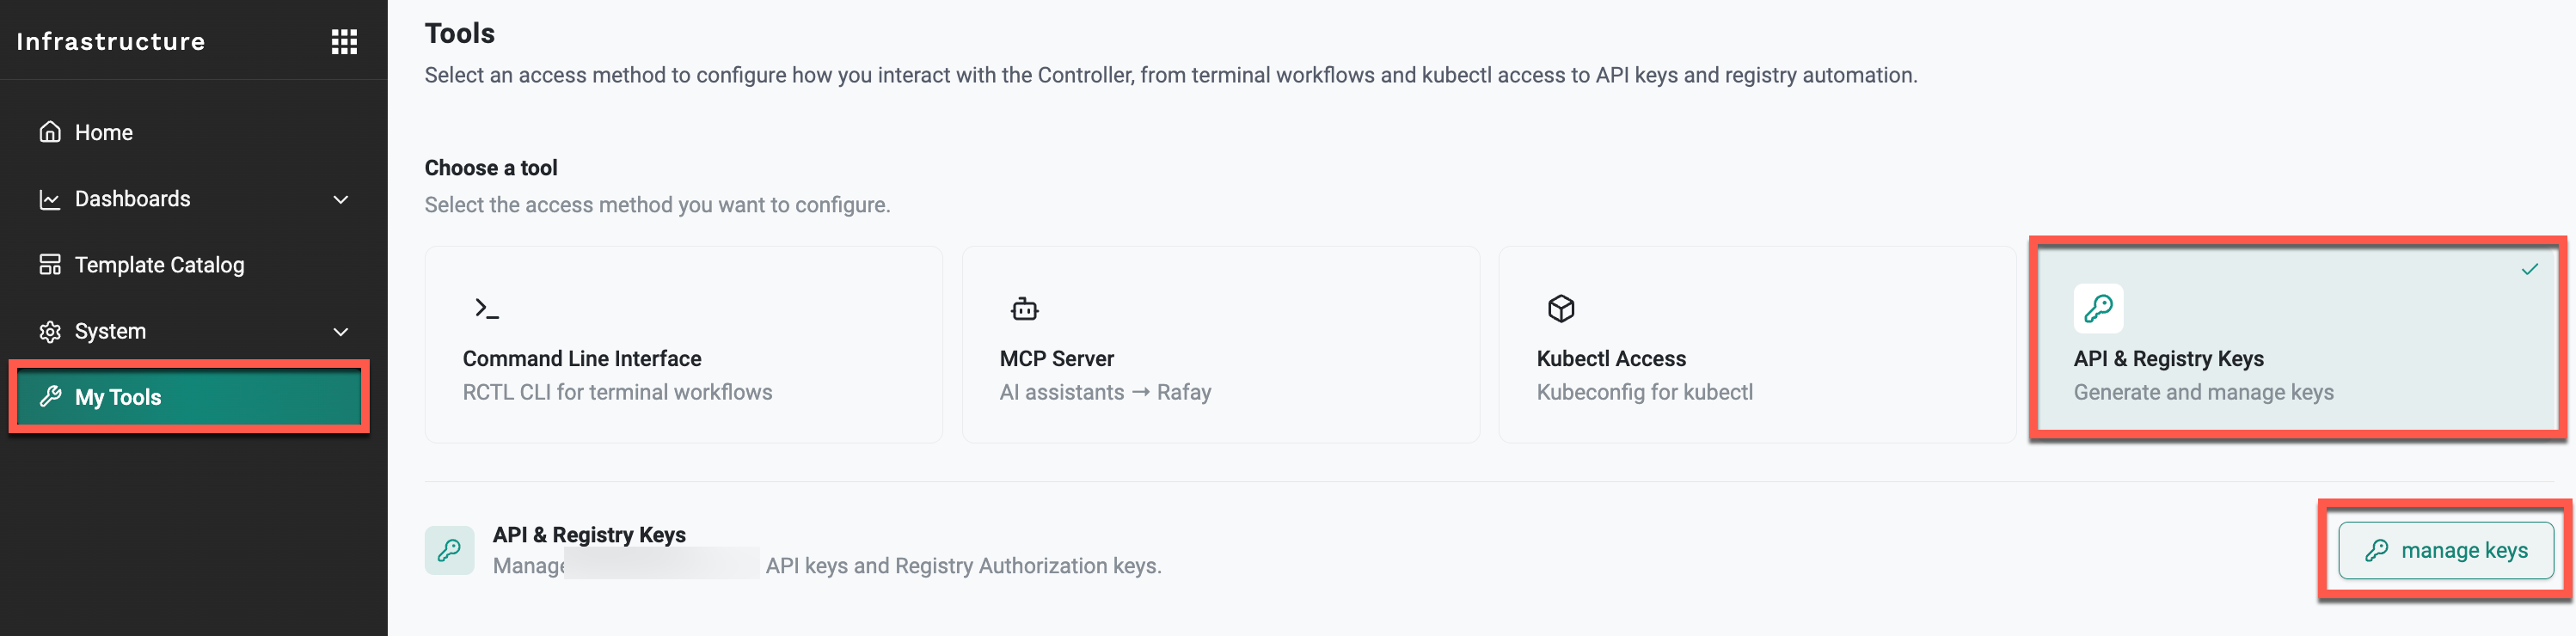
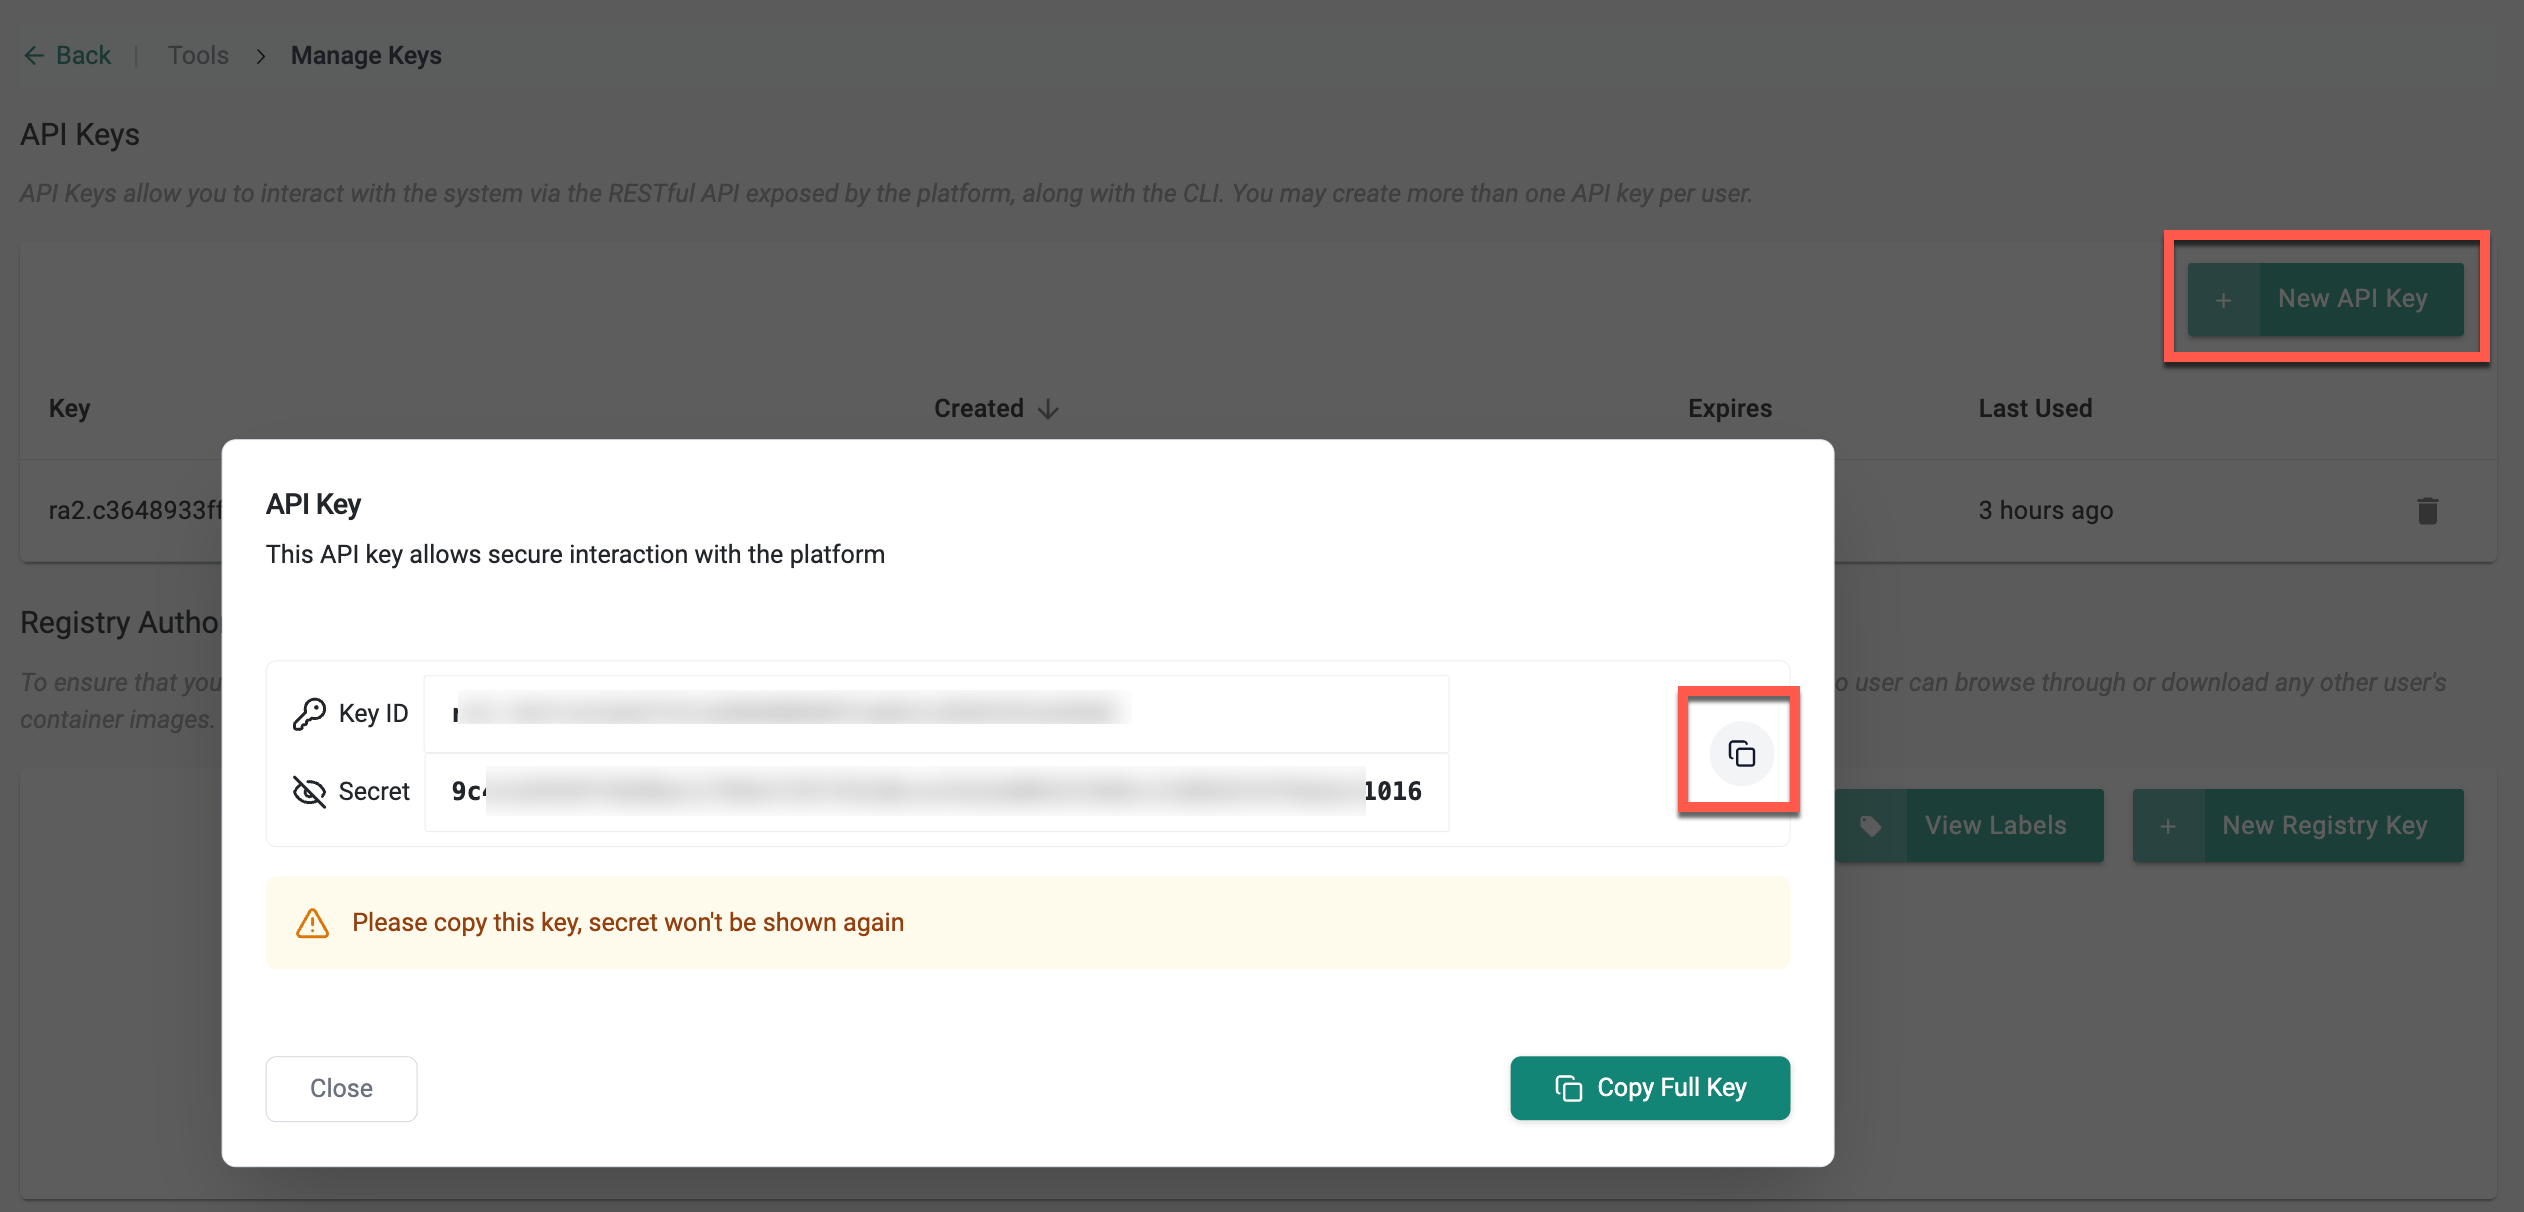
- Click New API Key to generate an API key
- Copy your API key you will need this to authenticate the MCP server
Enable Write Access
By default, Allow Write Access is disabled and the MCP server operates in read-only mode. To enable write operations such as creating, updating, deleting, publishing, and unpublishing resources, an Organization Admin must enable Allow Write Access under System → Settings → MCP Server.
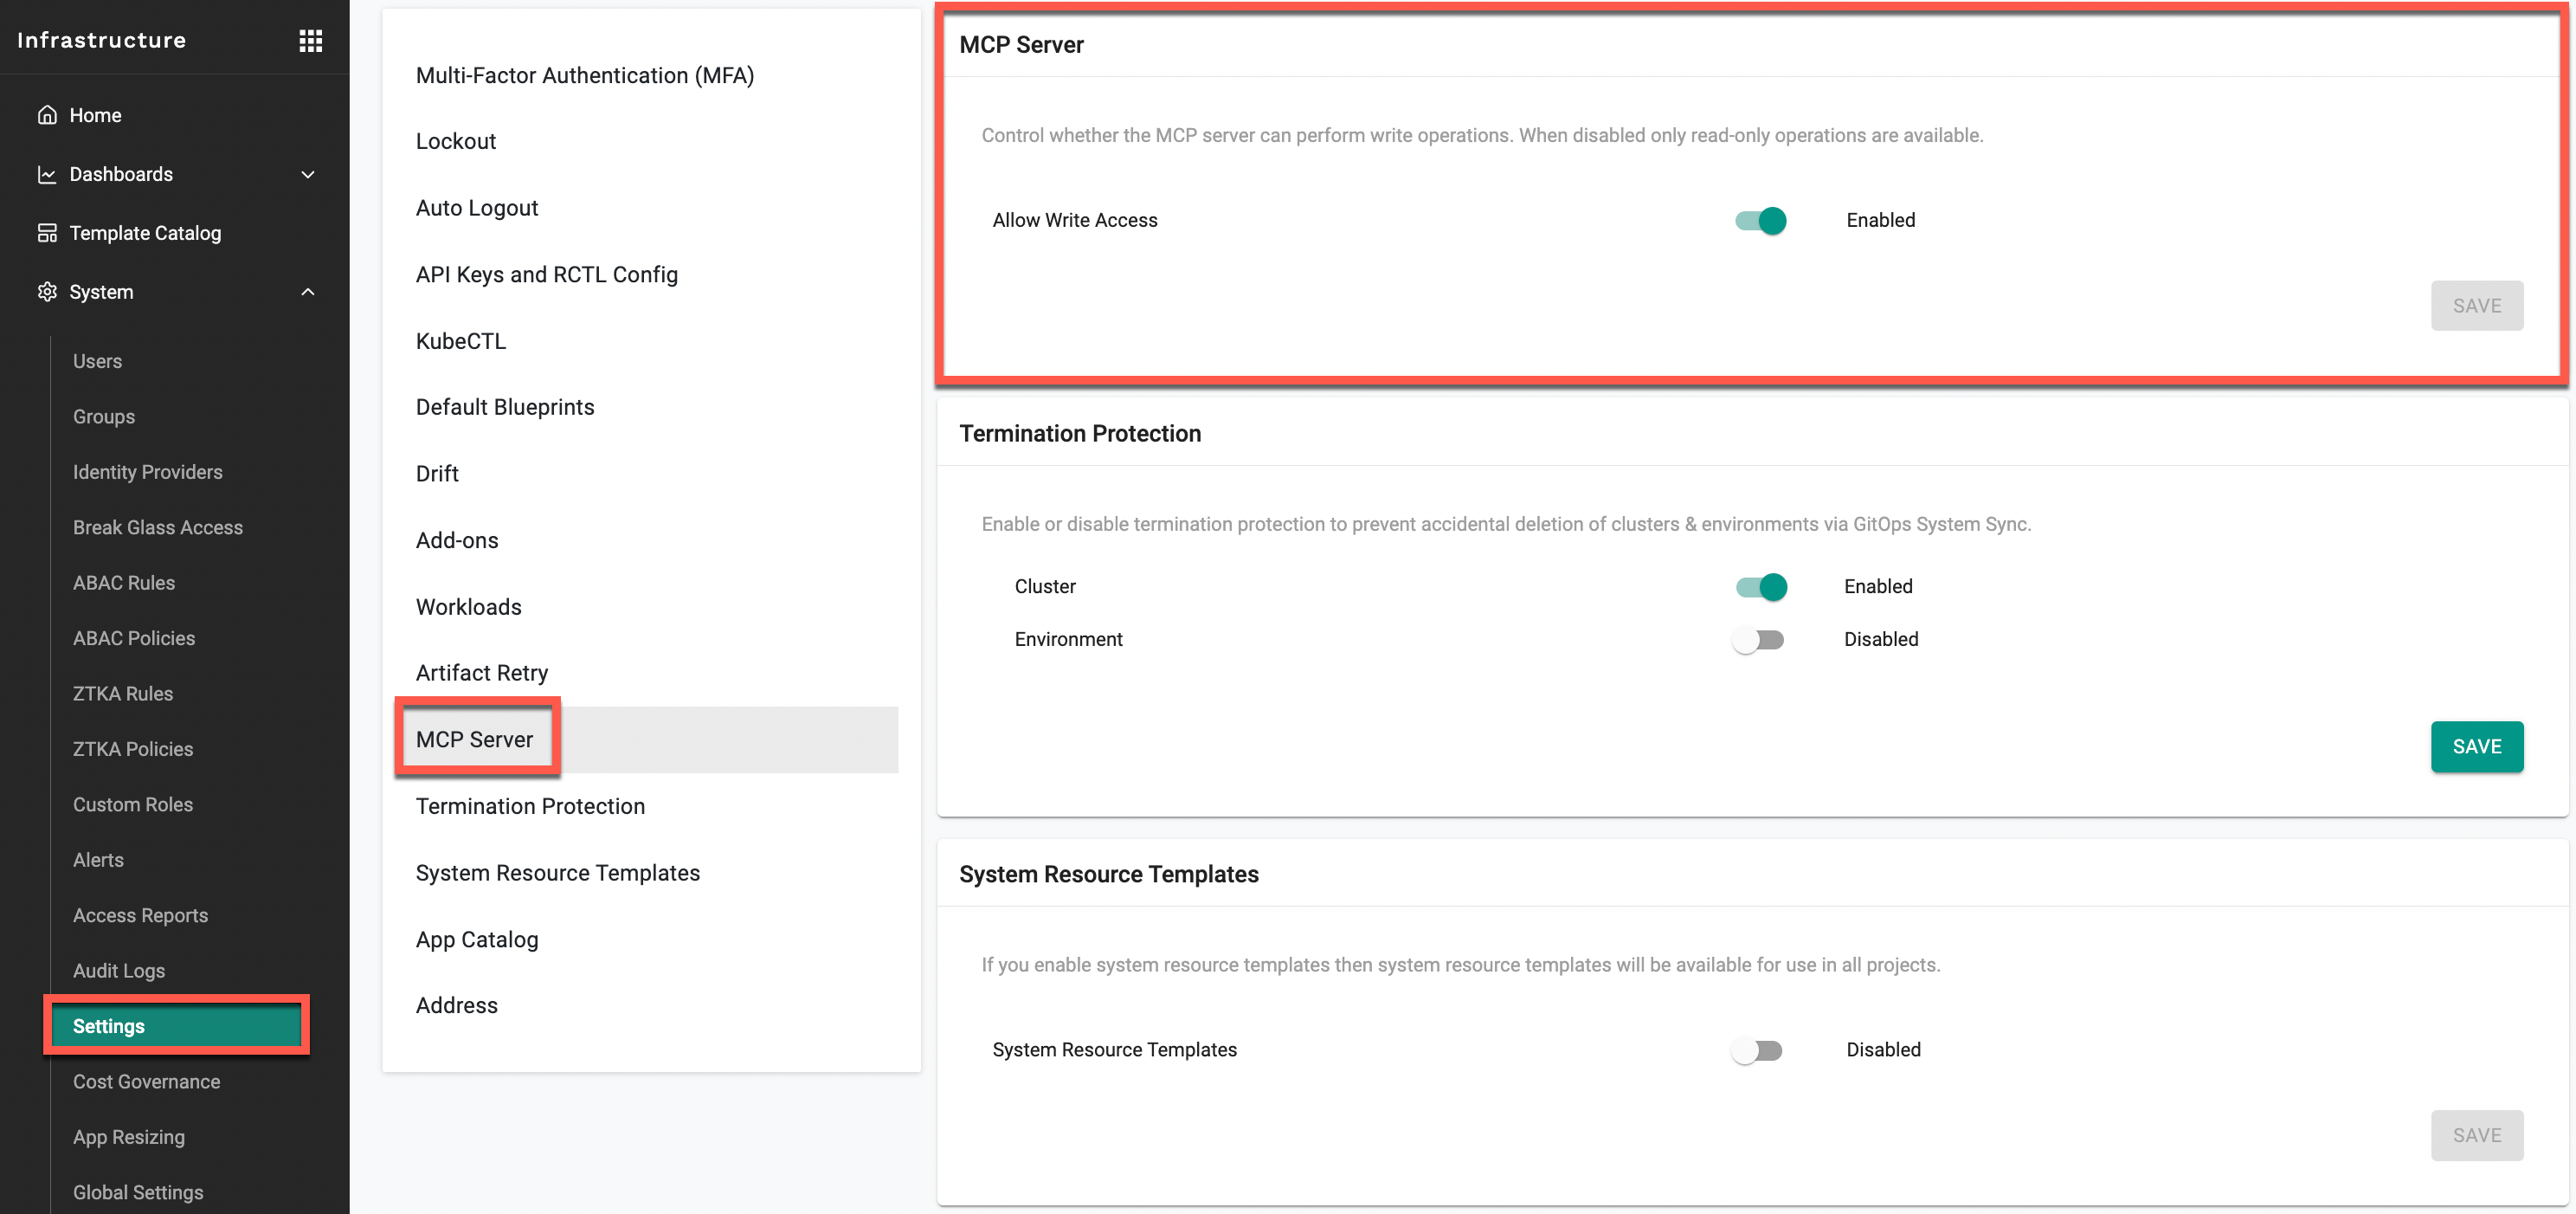
If Allow Write Access is disabled and you attempt a write operation, the MCP server returns:
Rafay MCP writes are blocked for this org.
Only an Organization Admin can enable write access. Until it is enabled, read operations continue to work and write requests are rejected.
Rate Limiting
The Rafay MCP Server enforces rate limits on API requests to protect platform stability. The current limit is 100 requests per API key per minute.
If you exceed this limit, the MCP server returns the following error:
rate limit exceeded (429): too many requests to the Rafay API, please retry later
Note
Wait briefly and retry your request. Sessions with many rapid queries for example, during intensive troubleshooting — may hit this limit. Space out requests or wait for the per-minute window to reset.
Step 3: Configure Your AI Tool
The Rafay Console provides a ready-to-use configuration snippet on the MCP Server download page. Copy the snippet and add it to your AI tool's MCP configuration file. Then update the following values:
| Parameter | Description |
|---|---|
command |
Full path to the downloaded mcp binary on your machine |
RAFAY_API_KEY |
Your Rafay API key retrieved in Step 2 |
RAFAY_BASE_URL |
Your Rafay Console URL (e.g., https://your-controller.example.com) |
RAFAY_PROJECT |
Default project name. Defaults to defaultproject if not changed |
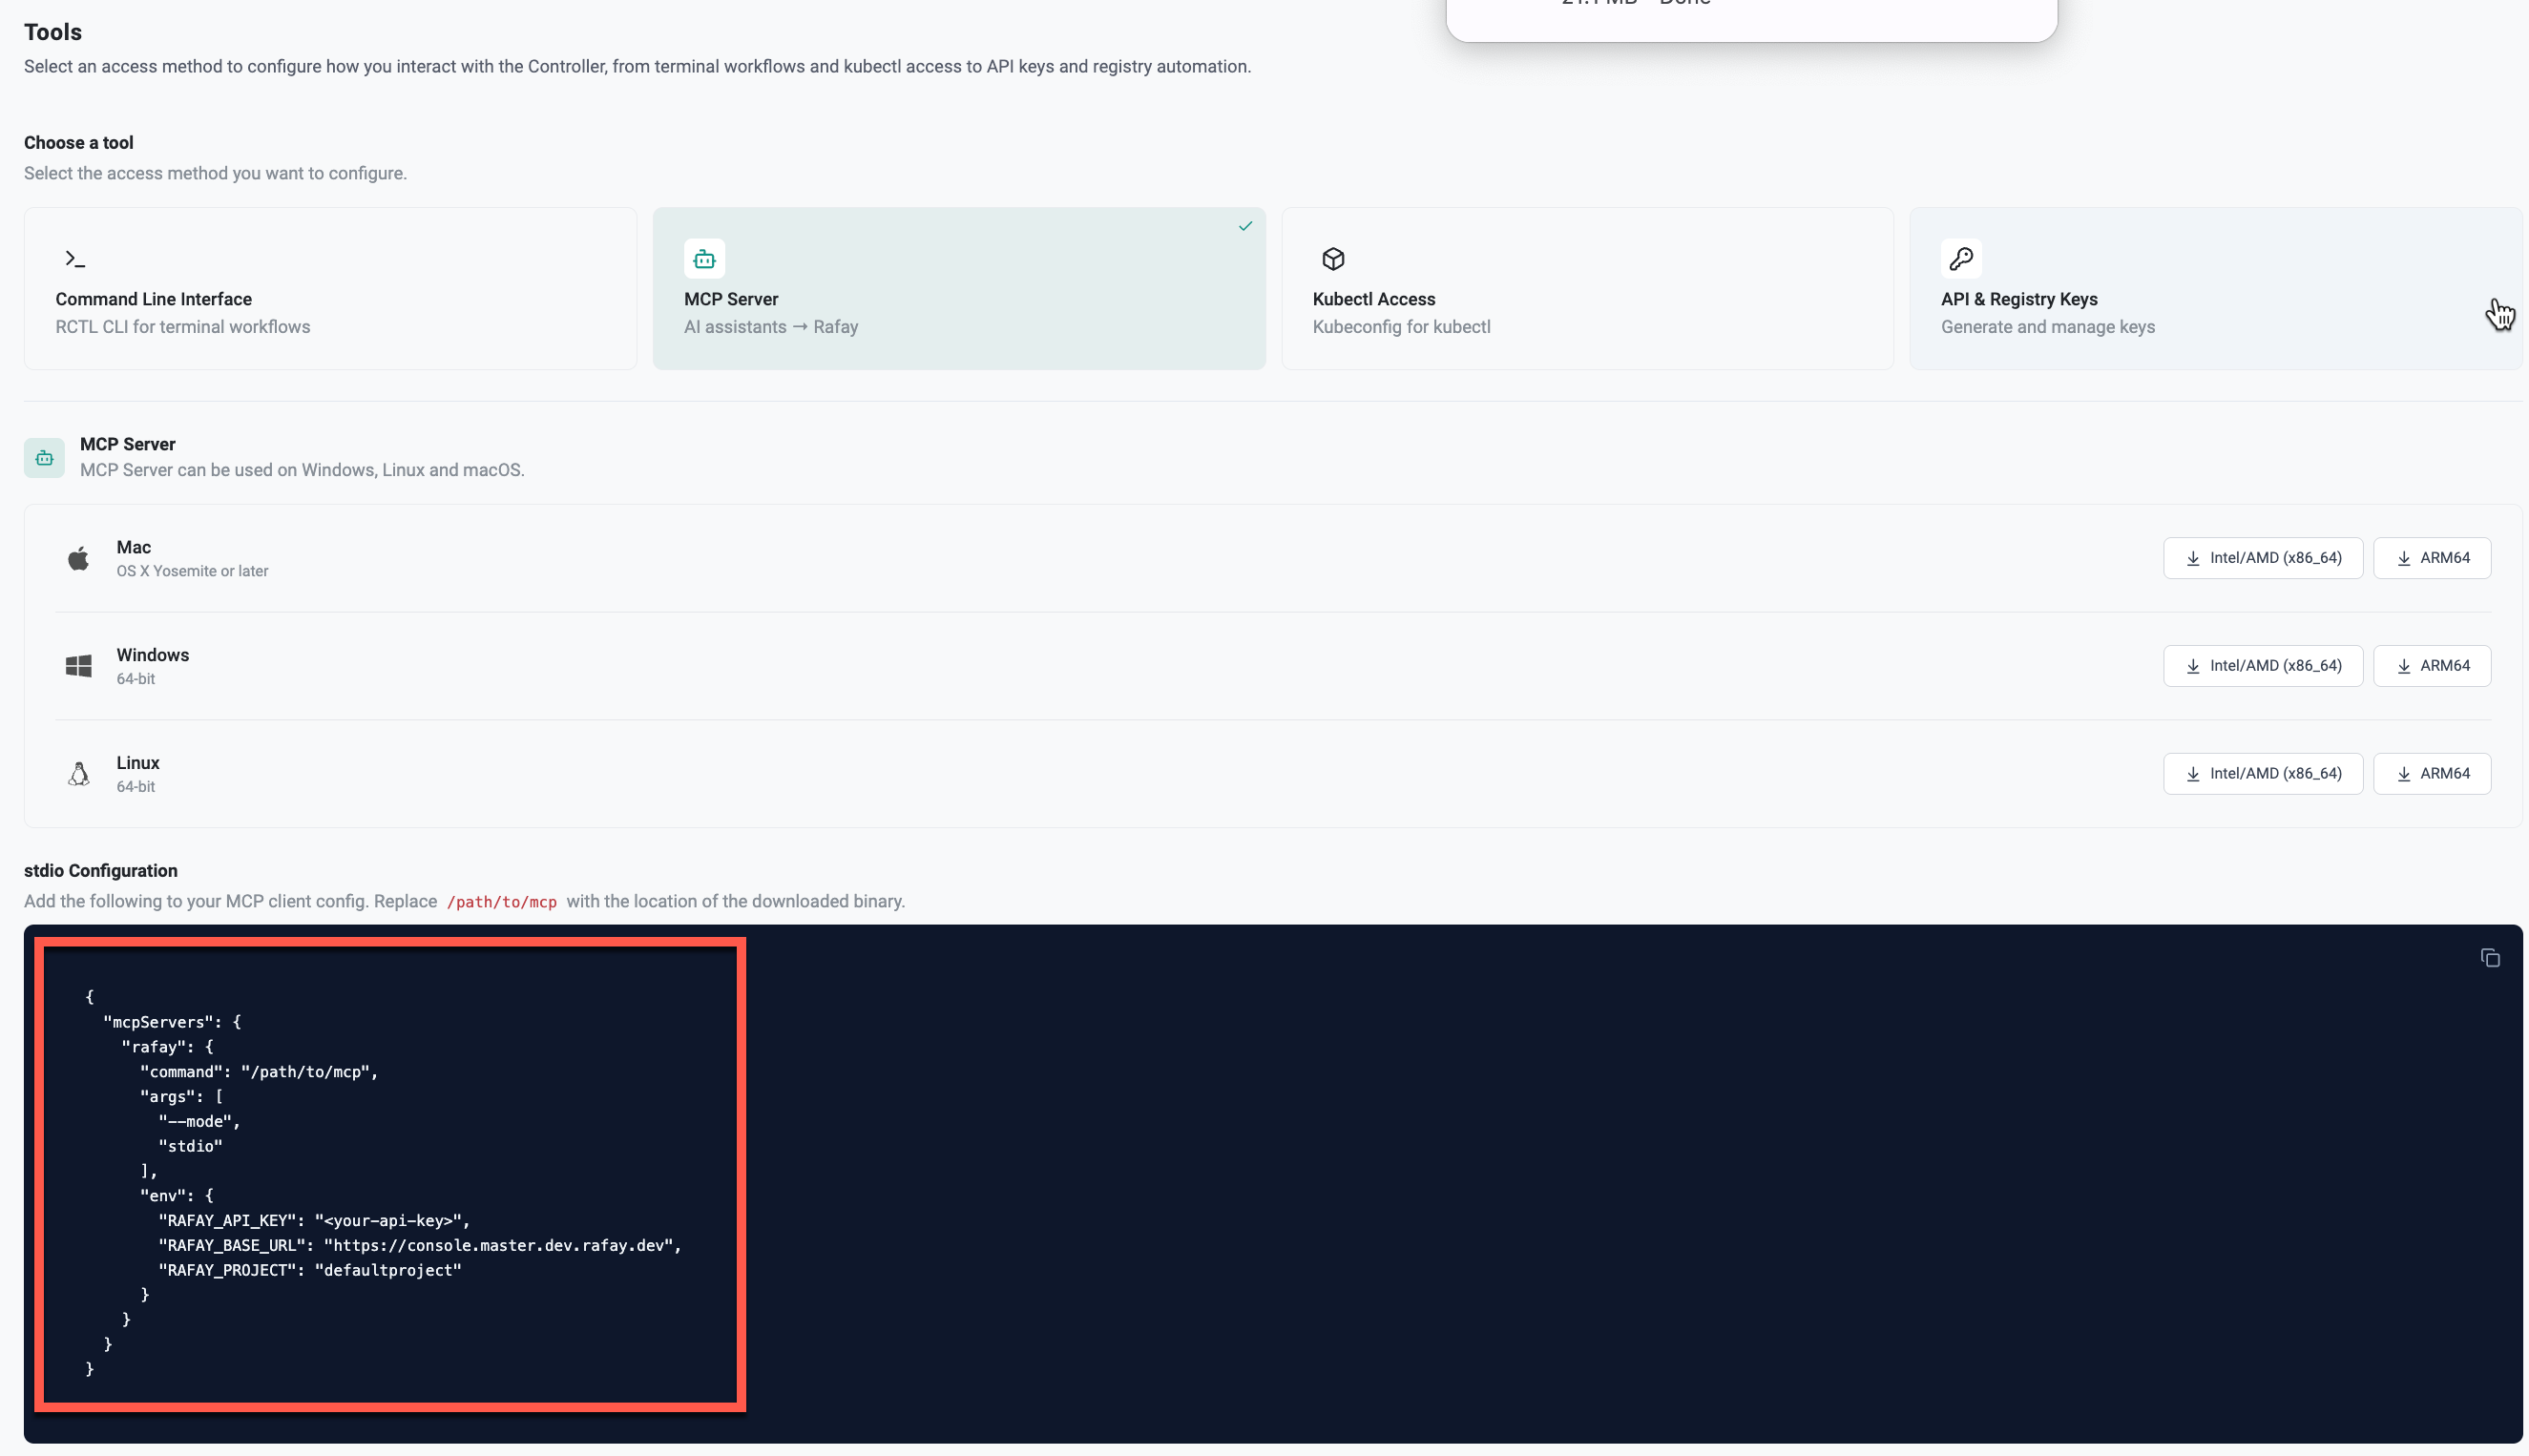
The full configuration snippet looks like this:
{
  "mcpServers": {
    "rafay": {
      "command": "/path/to/mcp",
      "args": ["--mode", "stdio"],
      "env": {
        "RAFAY_API_KEY": "<your-api-key>",
        "RAFAY_BASE_URL": "https://your-controller.example.com",
        "RAFAY_PROJECT": "defaultproject"
      }
    }
  }
}
Replace /path/to/mcp with the actual path to the downloaded binary on your machine.This configuration uses stdio standard input/output which is commonly used for connecting local MCP servers to AI clients such as Claude Desktop, Cursor, and other MCP-compatible tools. In this mode the AI tool launches the MCP server binary directly on your machine and communicates with it as a local background process using stdin and stdout.
Configuration File Locations by AI Tool
Add the mcpServers block to the appropriate configuration file for your AI tool. The following steps use Claude Desktop as an example. The same approach applies to any other MCP-compatible AI tool. For Claude Desktop, navigate to Settings → Developer → Edit Config to open the configuration file.
Important
For most AI tools, add the mcpServers block at the top of the existing JSON config file, alongside any other existing keys (for example, preferences).
The following is an example of a complete configuration file after adding the mcpServers block.
{
  "mcpServers": {
    "rafay": {
      "command": "/Users/user1/Downloads/mcp-darwin-arm64/mcp",
      "args": [
        "--mode",
        "stdio"
      ],
      "env": {
        "RAFAY_API_KEY": "<your-api-key>",
        "RAFAY_BASE_URL": "https://your-controller.example.com",
        "RAFAY_PROJECT": "defaultproject"
      }
    }
  },
  "preferences": {
    "coworkScheduledTasksEnabled": false,
    "ccdScheduledTasksEnabled": true,
    "sidebarMode": "chat",
    "coworkWebSearchEnabled": true
  },
  "coworkUserFilesPath": "/Users/user1/Claude"
}
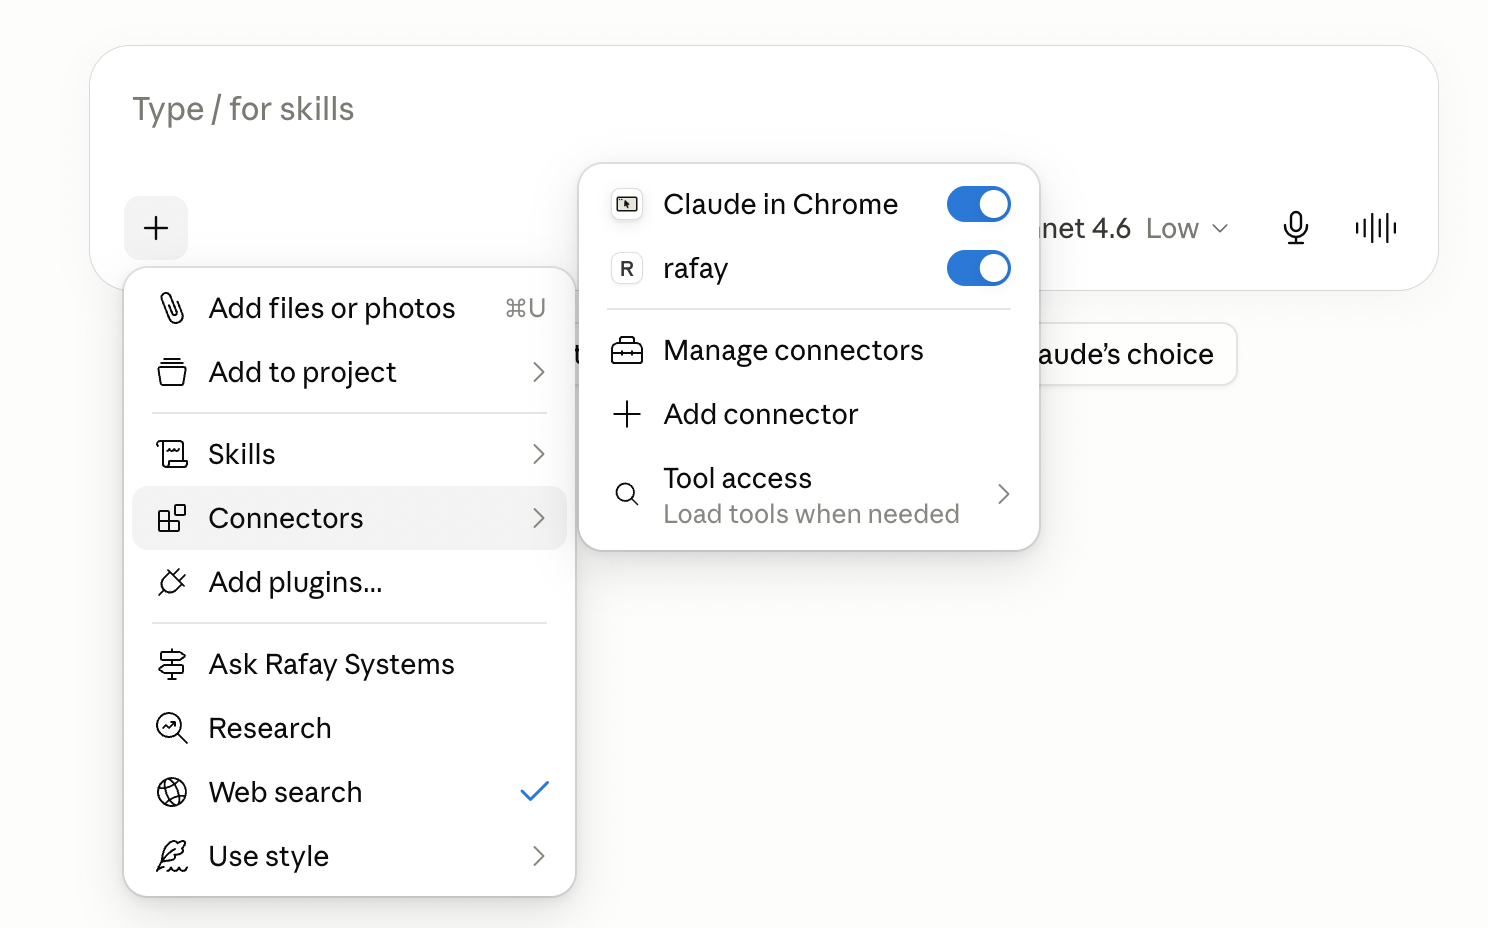
Step 4: Enable the Rafay MCP Server
- Save the configuration file and restart your AI tool
- The Rafay MCP server will appear in the connectors or tools list
- Enable it to activate the integration
Step 5: Start Querying Rafay Resources
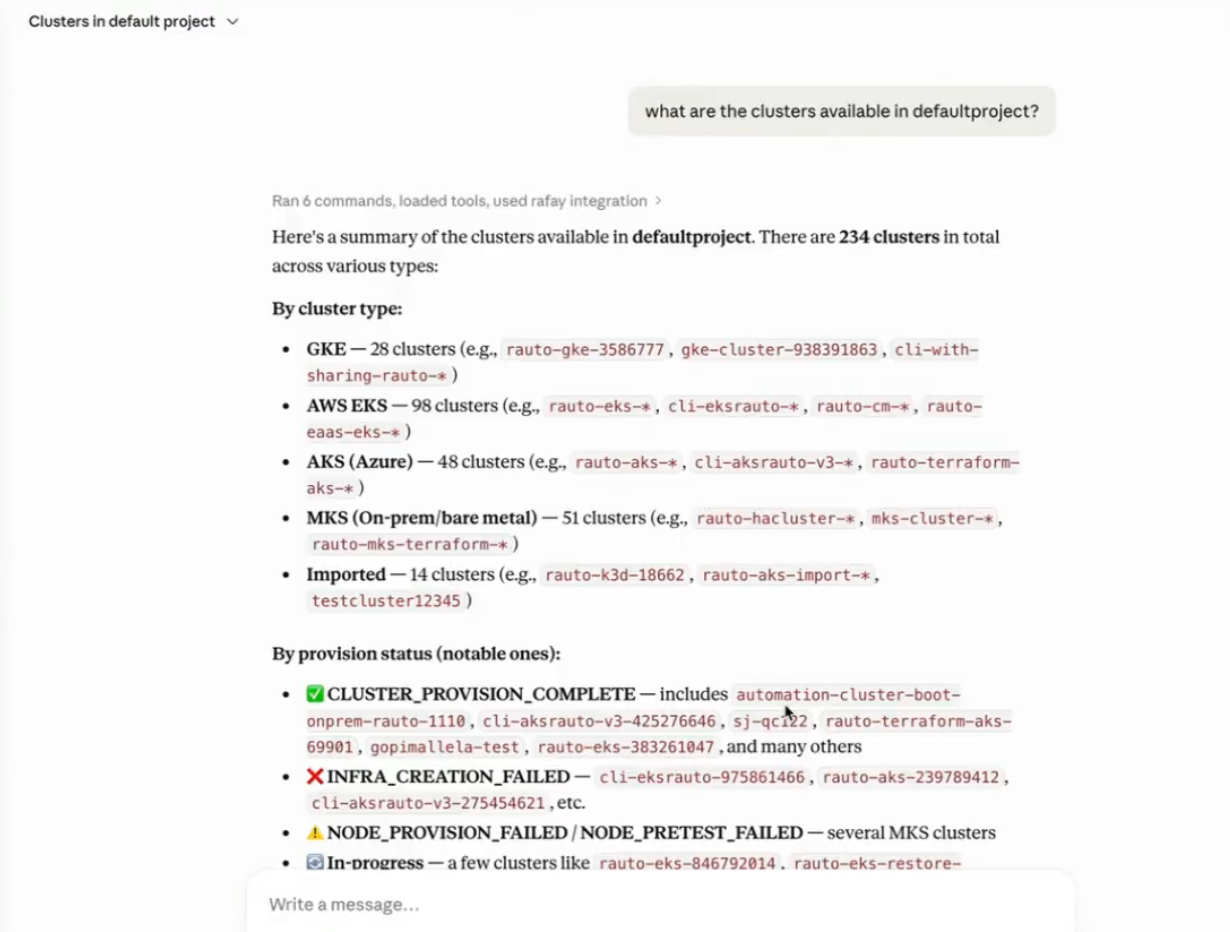
Once the connector is enabled, you can ask your AI assistant natural language questions about your Rafay infrastructure. The AI tool uses the MCP server to fetch real-time data from the Rafay platform and returns a structured response.
Example Queries
-
Read Operations
-
What are the clusters available in
defaultproject? - How many pods are running in cluster
demo-project? - List all namespaces in
defaultproject. - Show me all workloads deployed in
defaultproject. -
Debug why pod abc is in a bad state in cluster
mkscluster. -
Write Operations
Important
Write operations are available only when Allow Write Access is enabled by an Organization Admin under System → Settings → MCP Server.
- Create a blueprint with an
nginxadd-on and publish it to clusterdemo-cluster. - Delete the workload
demo-wlfromdefaultproject. - Publish the blueprint onto cluster xyz.
- Unpublish workload abc from its clusters.
- Create an add-on using this YAML file and add it to a new blueprint.
Note: The Rafay MCP Server is not limited to Claude Desktop and can also be used with Claude Code/CLI, Cursor, VS Code with GitHub Copilot, or any other MCP-compatible LLM client.
Supported Resource Types
The following matrix shows which MCP tools support each resource type:
resource_type |
rafay_get |
rafay_list |
rafay_delete |
rafay_apply |
rafay_execute (actions) |
|---|---|---|---|---|---|
addon |
Yes | Yes | Yes | Yes | No |
agent |
Yes | Yes | No | No | No |
blueprint |
Yes | Yes | Yes | Yes | No |
blueprint_version |
No | Yes | No | No | No |
cluster |
Yes | Yes | No | No | kubectl, publish_blueprint |
cluster_addon |
No | Yes | No | No | No |
config_context |
Yes | Yes | No | No | No |
environment |
Yes | Yes | No | No | No |
environment_template |
Yes | Yes | No | No | No |
group |
No | Yes | No | No | No |
namespace |
Yes | Yes | No | No | No |
project |
Yes | Yes | No | No | No |
repository |
Yes | Yes | No | No | No |
resource_template |
Yes | Yes | No | No | No |
role |
No | Yes | No | No | No |
sso_user |
No | Yes | No | No | No |
user |
No | Yes | No | No | No |
workflow_handler |
Yes | Yes | No | No | No |
workload |
Yes | Yes | Yes | Yes | publish, unpublish |