Part 2: Scale
What Will You Do
In this part, you will:
- Scale the number of nodes in the cluster
Step 1: Scale Nodes
In this step, we will scale the number of nodes within the cluster. You can scale the number of nodes up or down, depending on your needs. In this example, we will scale the number of nodes up to 2.
- Navigate to the previously created project in your Org
- Select Infrastructure -> Clusters
- Click on the cluster name of the previosuly created cluster
- Click the "Nodes" tab
- Click "Add Node"
- Follow the "Node Installation Instructions" on the screen. These instructions will require you to have a shell into the new node. You will need to copy the commands in the installation instructions and execute them on the node. The node will then be configured and presented in the provisioning window.
- Click "Close"
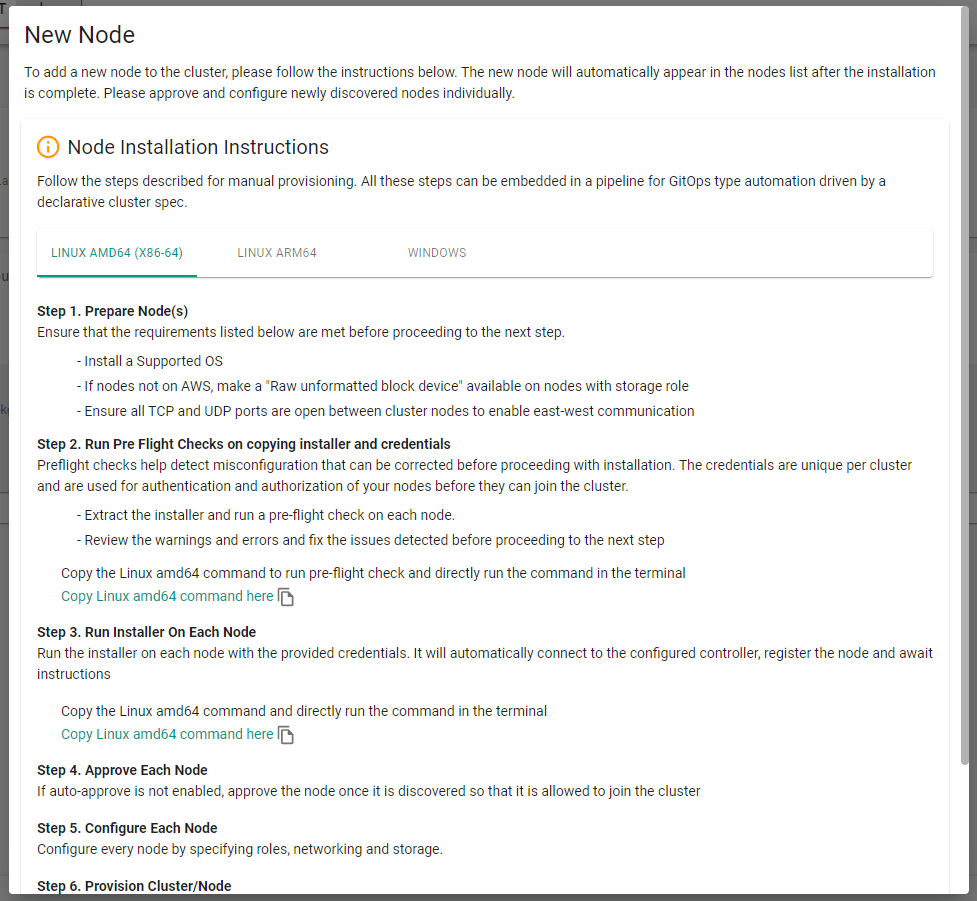
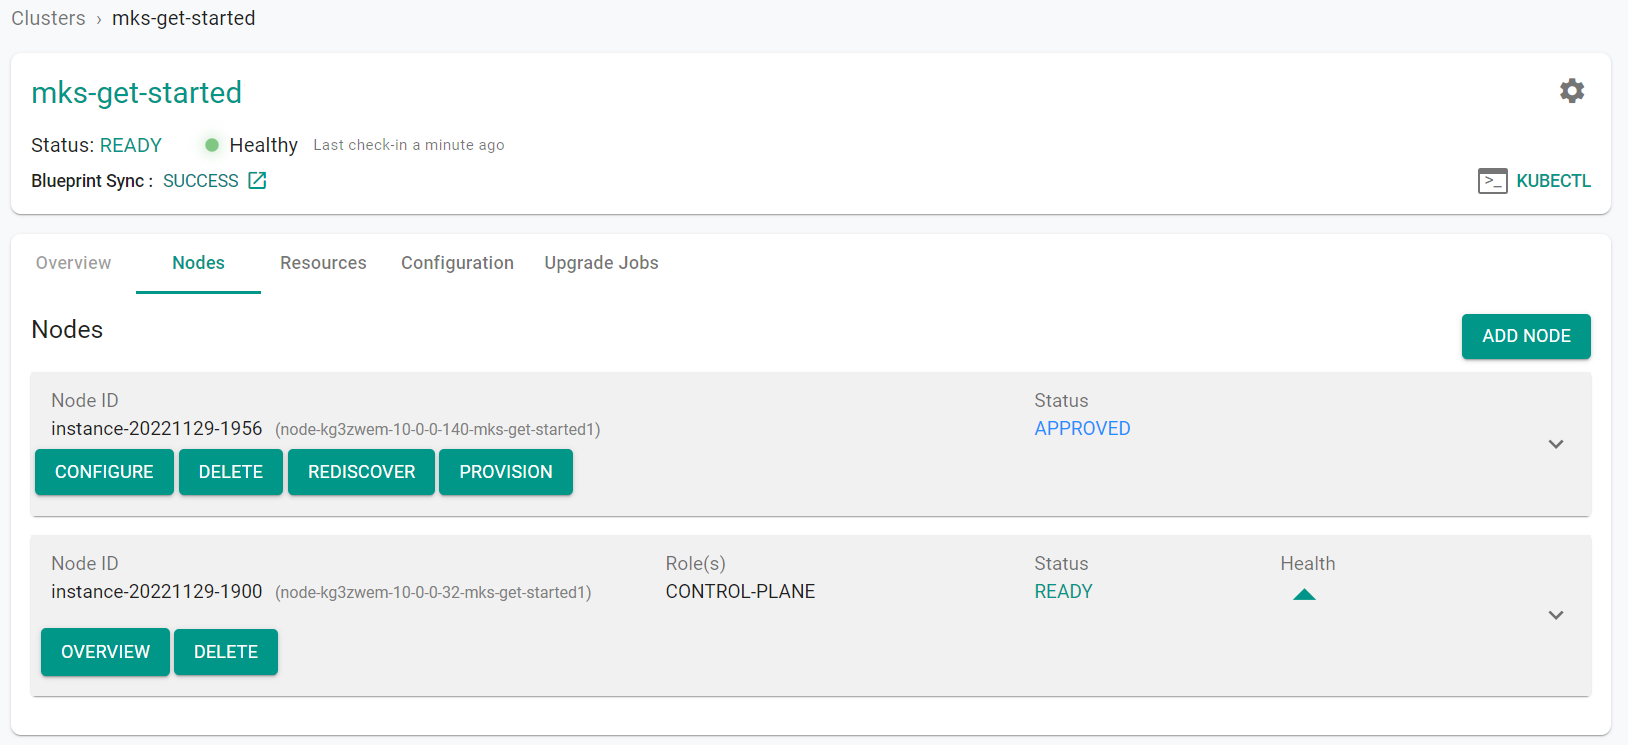
After a few minutes, you will see the new node as discovered and approved
- Click "Provision"
- Click "Yes" to confirm provisioning the node
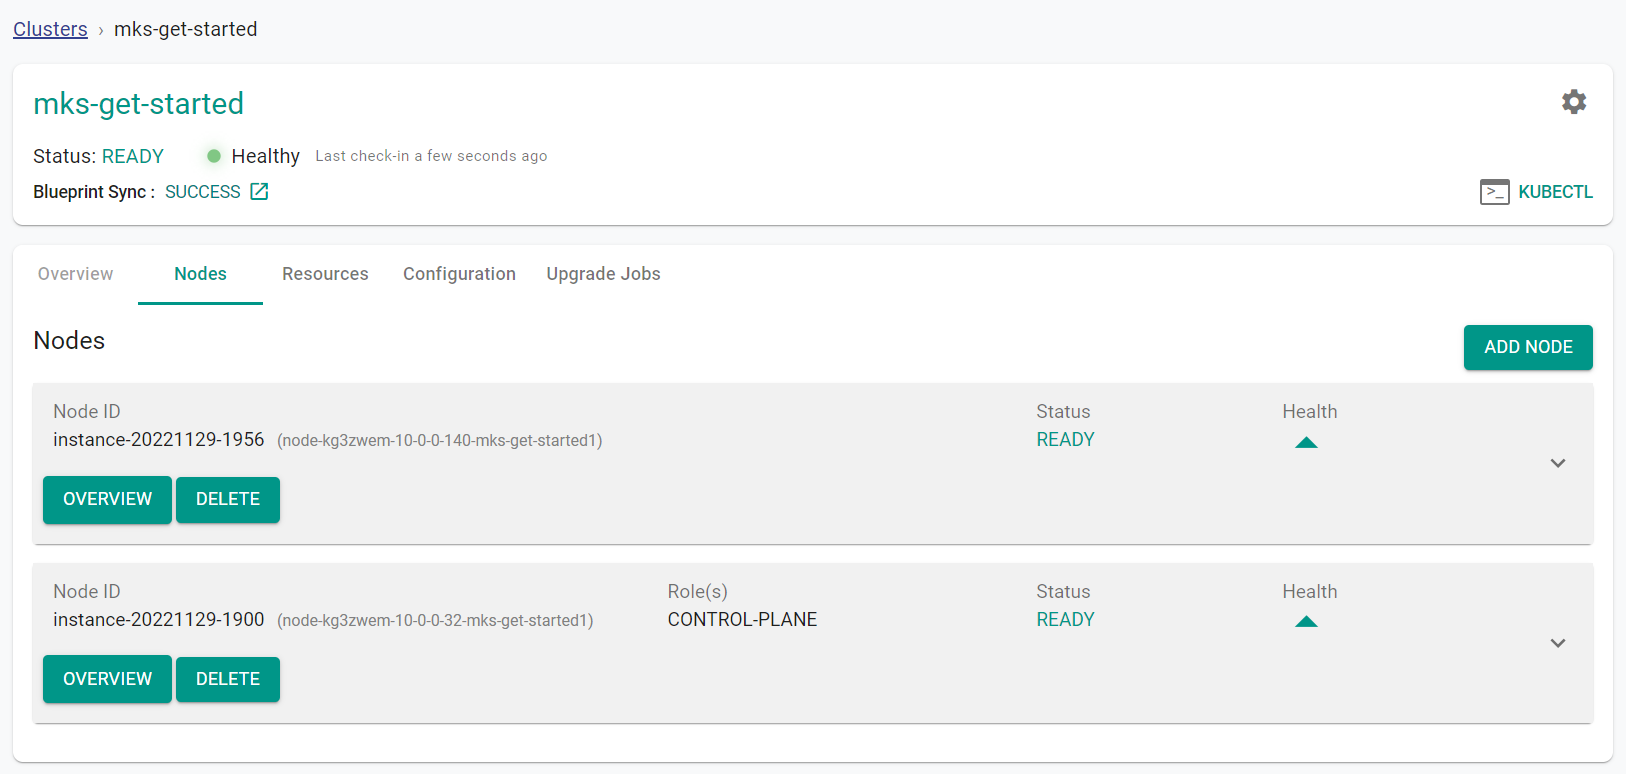
After a few minutes, from the web console, we can see that the scale operation has completed and the number of "Ready" nodes is 2.
Step 1: Scale Nodes
In this step, we will scale the number of nodes within the cluster. You can scale the number of nodes up or down, depending on your needs. In this example, we will scale the number of nodes up to 2.
Download the cluster config from the existing cluster
- Go to Infrastructure -> Clusters. Click on the settings icon of the cluster and select "Download Cluster Config"
- Add the below node section into the config file. Be sure to update the the node specific information.
- arch: amd64
hostname: instance-20221129-15188
operatingSystem: Ubuntu20.04
privateip: 172.31.61.188
roles:
- Storage
- Worker
ssh:
    ipAddress: 152.70.157.140
    port: "22"
    privateKeyPath: mks-get-started2.pem
    username: ubuntu
The updated YAML file will look like this:
apiVersion: infra.k8smgmt.io/v3
kind: Cluster
metadata:
labels:
    check1: value1
    check2: value2
name: mks-get-started
project: mks
spec:
blueprint:
    name: default
    version: 1.20.0
config:
    autoApproveNodes: true
    dedicatedMastersEnabled: false
    highAvailability: false
    kubernetesVersion: v1.24.6
    location: sanjose-us
    network:
    cni:
        name: Calico
        version: 3.19.1
    podSubnet: 10.244.0.0/16
    serviceSubnet: 10.96.0.0/12
    nodes:
    - arch: amd64
    hostname: instance-20221129-1516
    operatingSystem: Ubuntu20.04
    privateip: 172.31.61.40
    roles:
    - Master
    - Worker
    - Storage
    ssh:
        ipAddress: 129.146.141.203
        port: "22"
        privateKeyPath: mks-get-started1.pem
        username: ubuntu
    - arch: amd64
    hostname: instance-20221129-15188
    operatingSystem: Ubuntu20.04
    privateip: 172.31.61.188
    roles:
    - Storage
    - Worker
    ssh:
        ipAddress: 152.70.157.140
        port: "22"
        privateKeyPath: mks-get-started2.pem
        username: ubuntu
type: mks
- Execute the following command to scale the number of nodes within the cluster. Note, update the file name in the below command with the name of your updated specification file.
./rctl apply -f mks-get-started-config.yaml
You will see output similar to the following
    {
    "taskset_id": "d27rwvk",
    "operations": [
        {
        "operation": "NodeAddition",
        "resource_name": "instance-20221129-15188",
        "status": "PROVISION_TASK_STATUS_PENDING"
        }
    ],
    "comments": "The status of the operations can be fetched using taskset_id",
    "status": "PROVISION_TASKSET_STATUS_PENDING"
    }

    Downloading Installer And Credentials
    Copying Installer and credentials to node:  152.70.157.140
    Running the Pre-Flight checks on node:  152.70.157.140
    Running Installer command on node:  152.70.157.140
    [+] Performing pre-tests
        [+] Operating System check
        [+] CPU check
        [+] Memory check
        [+] Internet connectivity check
        [+] Connectivity check to rafay registry
        [+] DNS Lookup to the controller
        [+] Connectivity check to the Controller
        [+] Multiple default routes check
        [+] Time Sync check
        [+] Storage check
            Detected device: /dev/loop0, mountpoint: /snap/core18/2566, type: loop, size: 55.6M, fstype: squashfs
            Detected device: /dev/loop1, mountpoint: /snap/lxd/22753, type: loop, size: 67.8M, fstype: squashfs
            Detected device: /dev/loop2, mountpoint: /snap/oracle-cloud-agent/44, type: loop, size: 59.6M, fstype: squashfs
            Detected device: /dev/loop3, mountpoint: /snap/snapd/17336, type: loop, size: 48M, fstype: squashfs
            Detected device: /dev/loop4, mountpoint: /snap/core20/1623, type: loop, size: 63.2M, fstype: squashfs
            Detected device: /dev/sda, mountpoint: null, type: disk, size: 46.6G, fstype: null
            Detected device: /dev/sda1, mountpoint: /, type: part, size: 46.5G, fstype: ext4
            Detected device: /dev/sda14, mountpoint: null, type: part, size: 4M, fstype: null
            Detected device: /dev/sda15, mountpoint: /boot/efi, type: part, size: 106M, fstype: vfat
        [+] Hostname underscore check
        [+] DNS port check
        [+] Nameserver Rotate option check for /etc/resolv.conf

        [+] Checking for Warnings

        [+] Checking for Fatal errors

        [+] Checking for hard failures
            No Fatal Errors... Continuing

        [+] Initiating cluster node install
            [+]  Detected Operating System Ubuntu-20.04
            [+]  Detected System architecture amd64
            [+]  Enabling multi minion support
            [+]  Updating system package repository database
            [+]  Installing node-agent
            [+]  Setting node ID to node-2q9e4nm-10-0-0-234-mks-get-started
            [+]  Installing credentials on node
            [+]  Configuring node-agent
            [+]  Installing and starting node-proxy
            [+]  Starting node-agent
            [+]  Setting up the crontab
            [+]  Successfully performed all operations
From the web console, we can see that the node has been discovered, approved and will automatically be provisioned.
- Navigate to the previously created project in your Org
- Select Infrastructure -> Clusters
- Click on the cluster name of the previosuly created cluster
- Click the "Nodes" tab to see the additional node

After a few minutes, from the web console, we can see that the scale operation has completed and the number of "Ready" nodes is 2.

Recap
Congratulations! At this point, you have successfully scaled the number of nodes in an MKS cluster