Cluster Provisioning
During provisioning, both the EKS Control Plane and the Autoscaling Group for the EKS Worker Nodes are automatically provisioned by the Controller based on input/configuration specified by the user.
Cloud Credentials
The controller needs to be configured with credentials in order to programmatically create and configure required EKS infrastructure on AWS in your account. These credentials securely managed as part of a cloud credential in the Controller.
The creation of a cloud credential is a "One Time" task. It can then be used to create clusters in the future when required. Refer Amazon EKS Credentials for additional instructions on how to configure this.
Important
To guarantee complete isolation across Projects (e.g. BUs, teams, environments etc.), cloud credentials are associated with a specific project. These can be shared with other projects if necessary.
Self Service Wizard
This approach is ideal for users that need to quickly provision and manage EKS clusters without having to become experts in Amazon EKS tooling, best practices and writing bespoke Infrastructure as Code (IaC).
The wizard prompts the user to provide critical cluster configuration details organized into logical sections:
- General (mandatory)
- Cluster Settings
- Node Groups Settings
- Advanced
Create Cluster
- Click on Clusters on the left panel
- Click on the New Cluster button
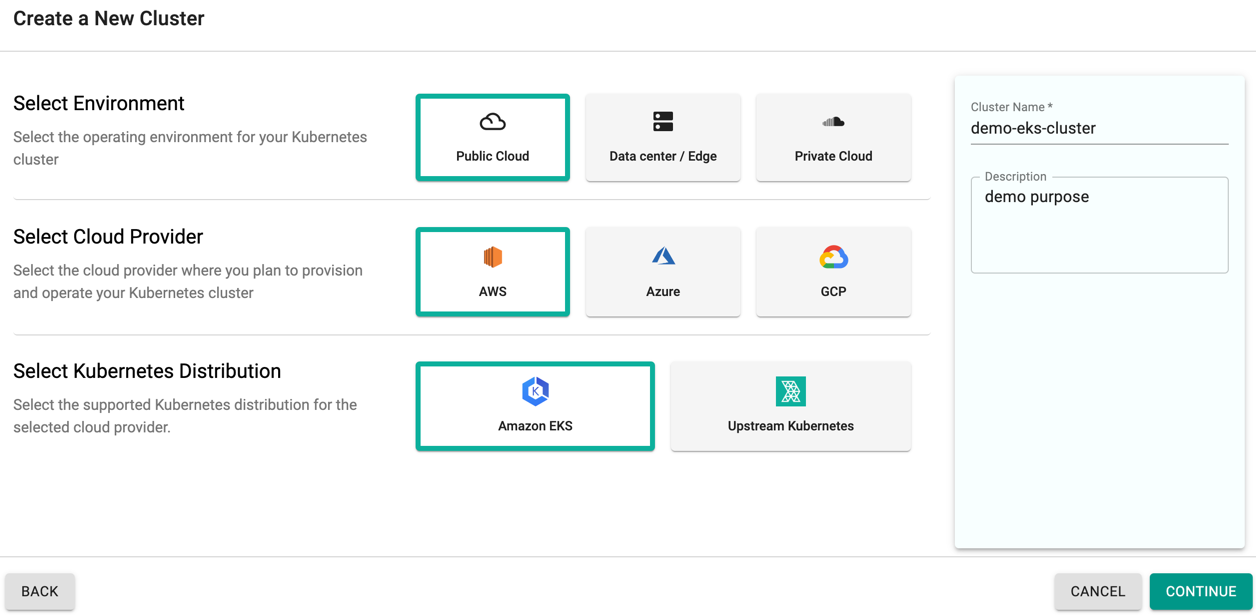
- Select Create a New Cluster and click Continue
- Select Environment as Public Cloud
- Select Cloud Provider as AWS
- Select Kubernetes Distribution as Amazon EKS
- Give it a name and click Continue
Important
1 | |
The user has to provide the below mandatory information
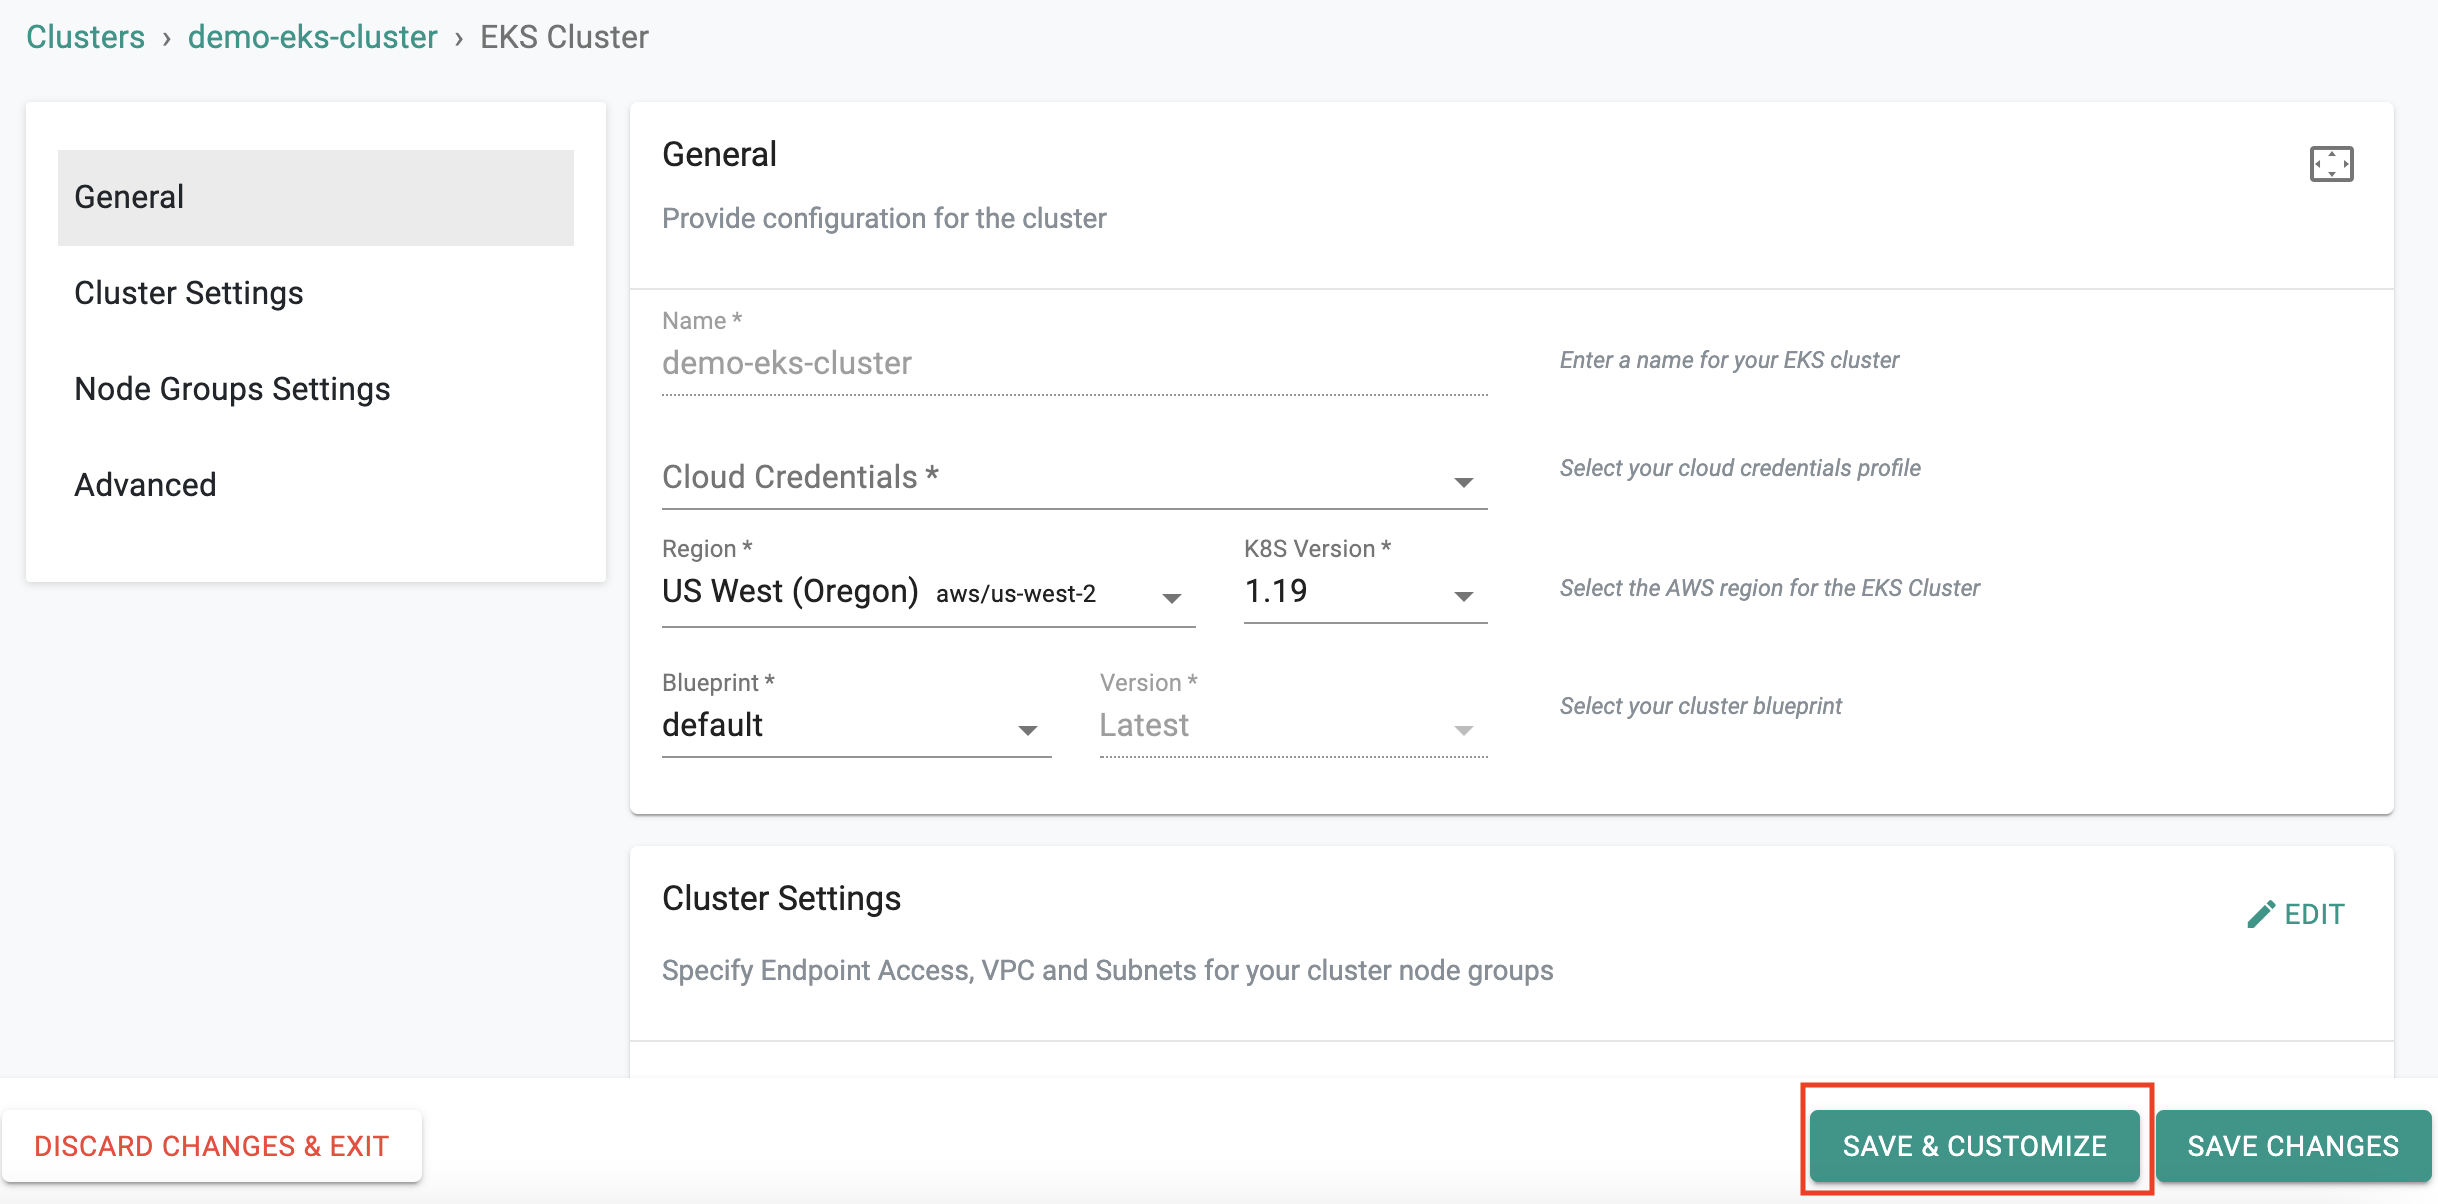
General Settings
- Select the Cloud Credential
- Select the AWS Region where you wish to provision your EKS Cluster
- Select the K8s version. The latest k8s version is v1.25. Refer section K8s Version Upgrade Pre-requisites to know the prerequisites of upgrading the desired K8s version
- Select the Cluster Blueprint. The Blueprints default and minimal has its built-in add-ons and do not allow to select the version

Important
On selecting the minimal blueprint or a custom blueprint with minimal as base version during EKS cluster provisioning, the aws-node-termination-handler component will not be deployed
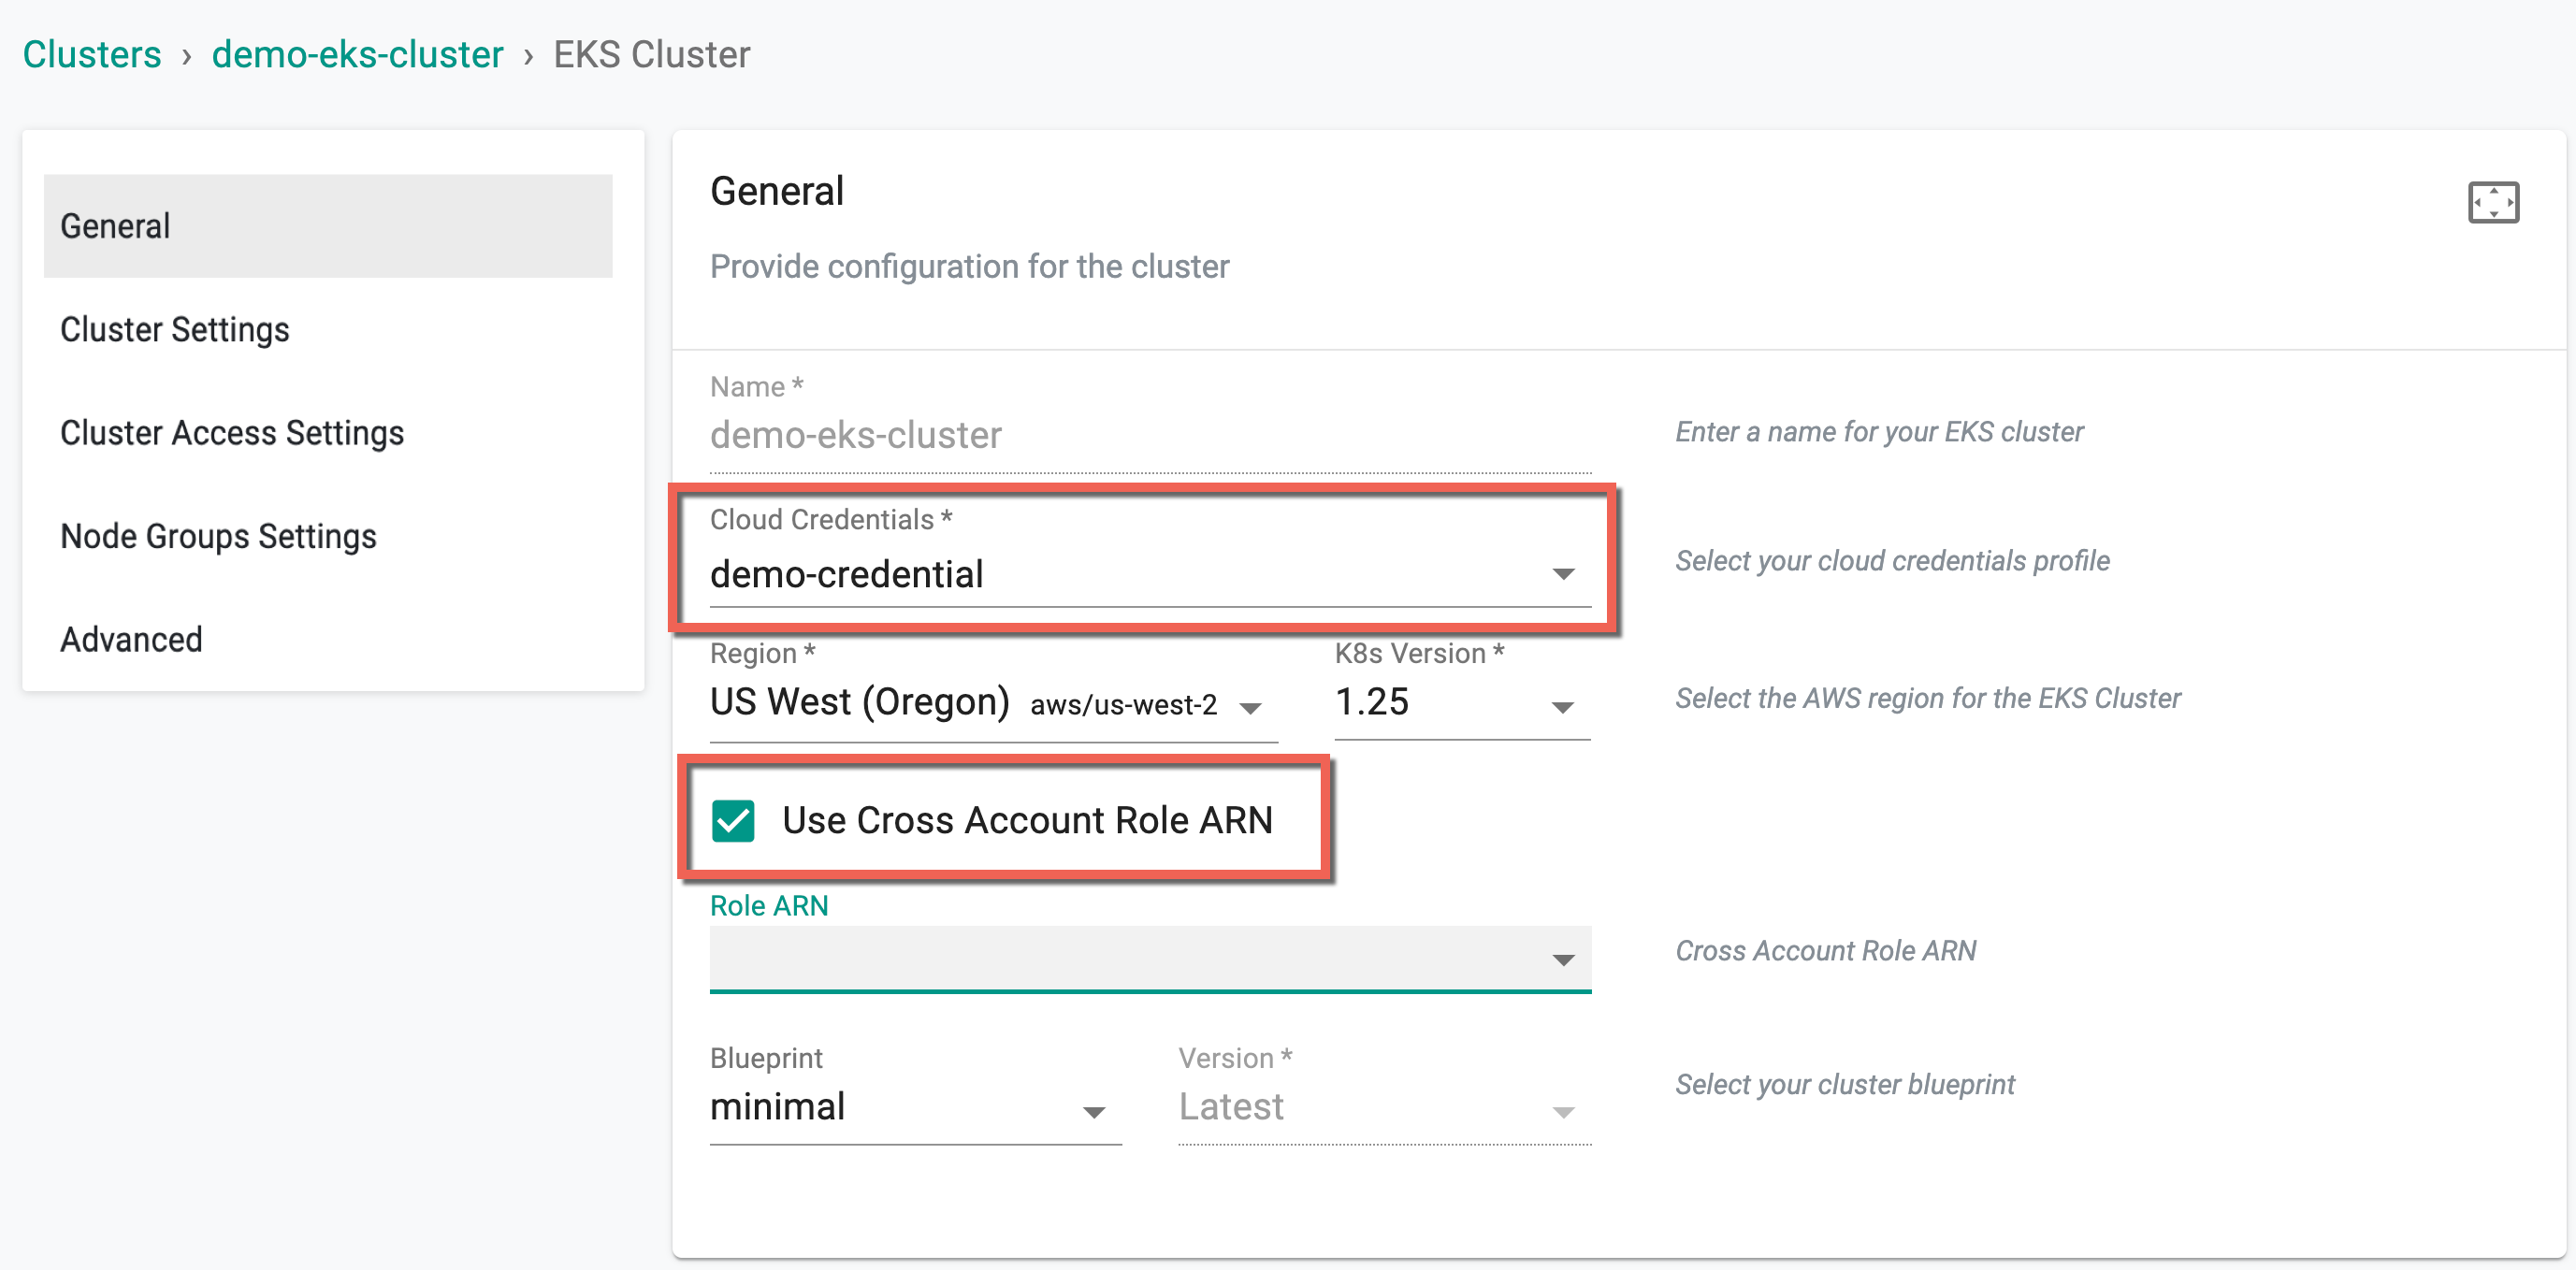
Role Based Cloud Credentials
On selecting the role based cloud credentials, user are allowed to add cross account role ARN, either the custom (user-defined ARN) or AWS role ARN. By utilizing the Use Cross Account Role ARN option, users can leverage a single IAM role at the master account level to perform targeted privileged actions across all user accounts.
The provided image showcases an example where the cloud credential "demo-credential" is chosen, specifically of the "Role" type and this credential contains the master account ARN role. Choosing the ARN role type credential displays the "Use Cross Account Role ARN" option
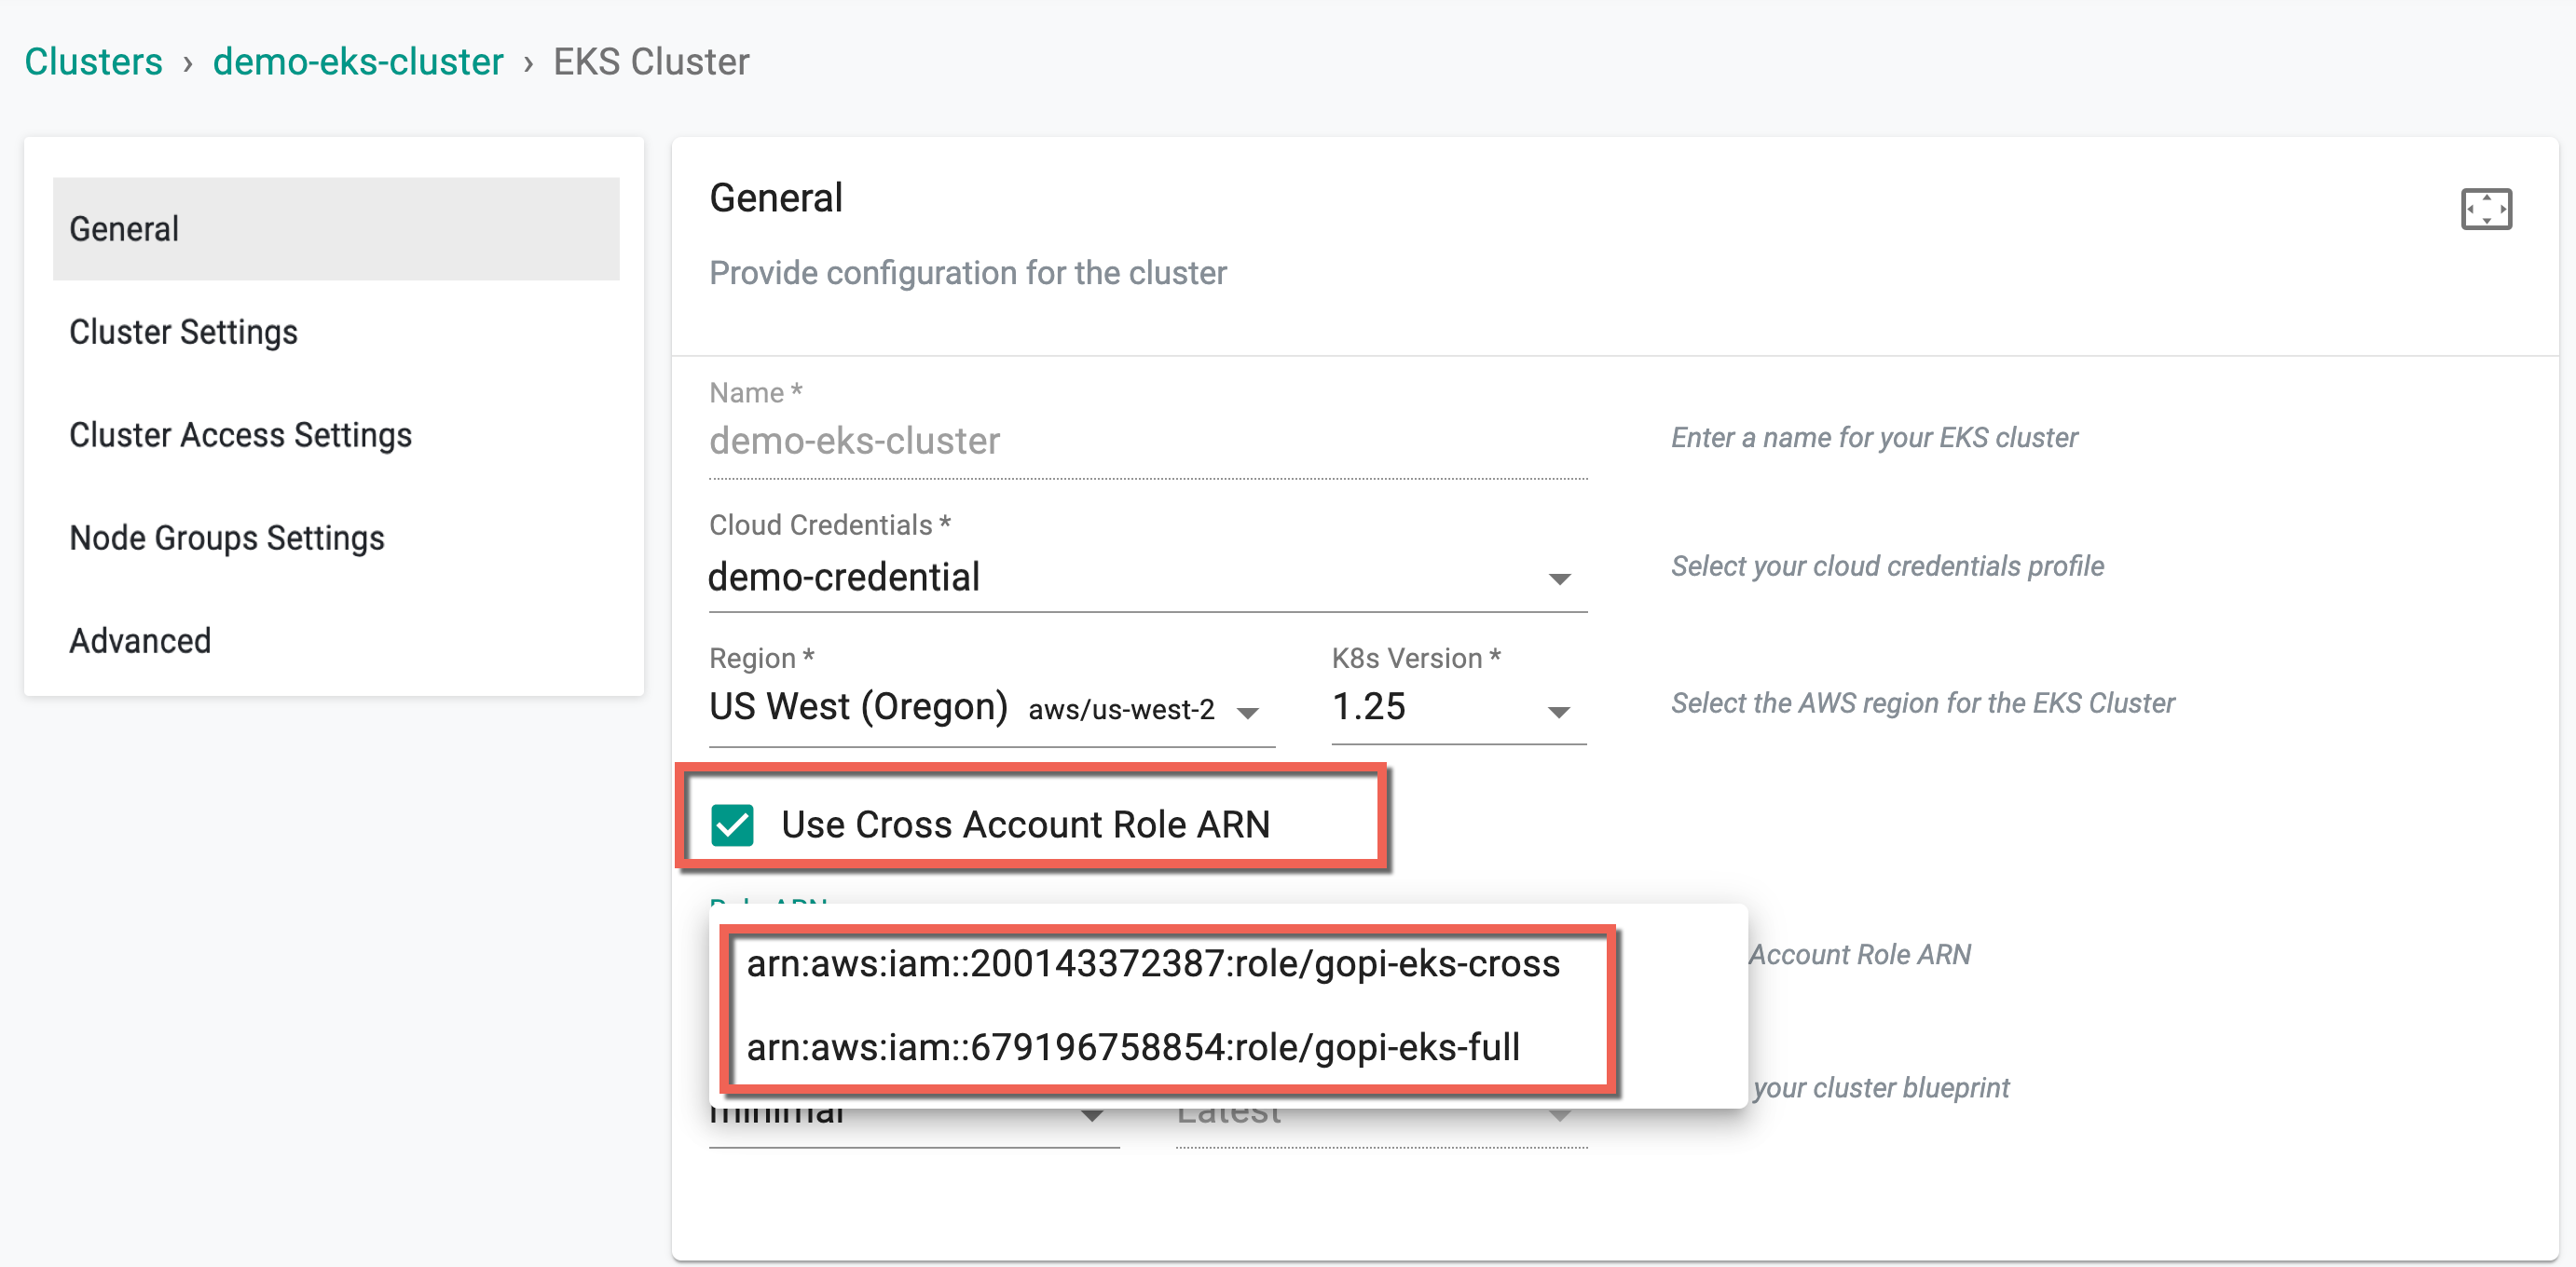
When this option is enabled, a drop-down display a list of child role ARNs (if any) linked to the master ARN role.
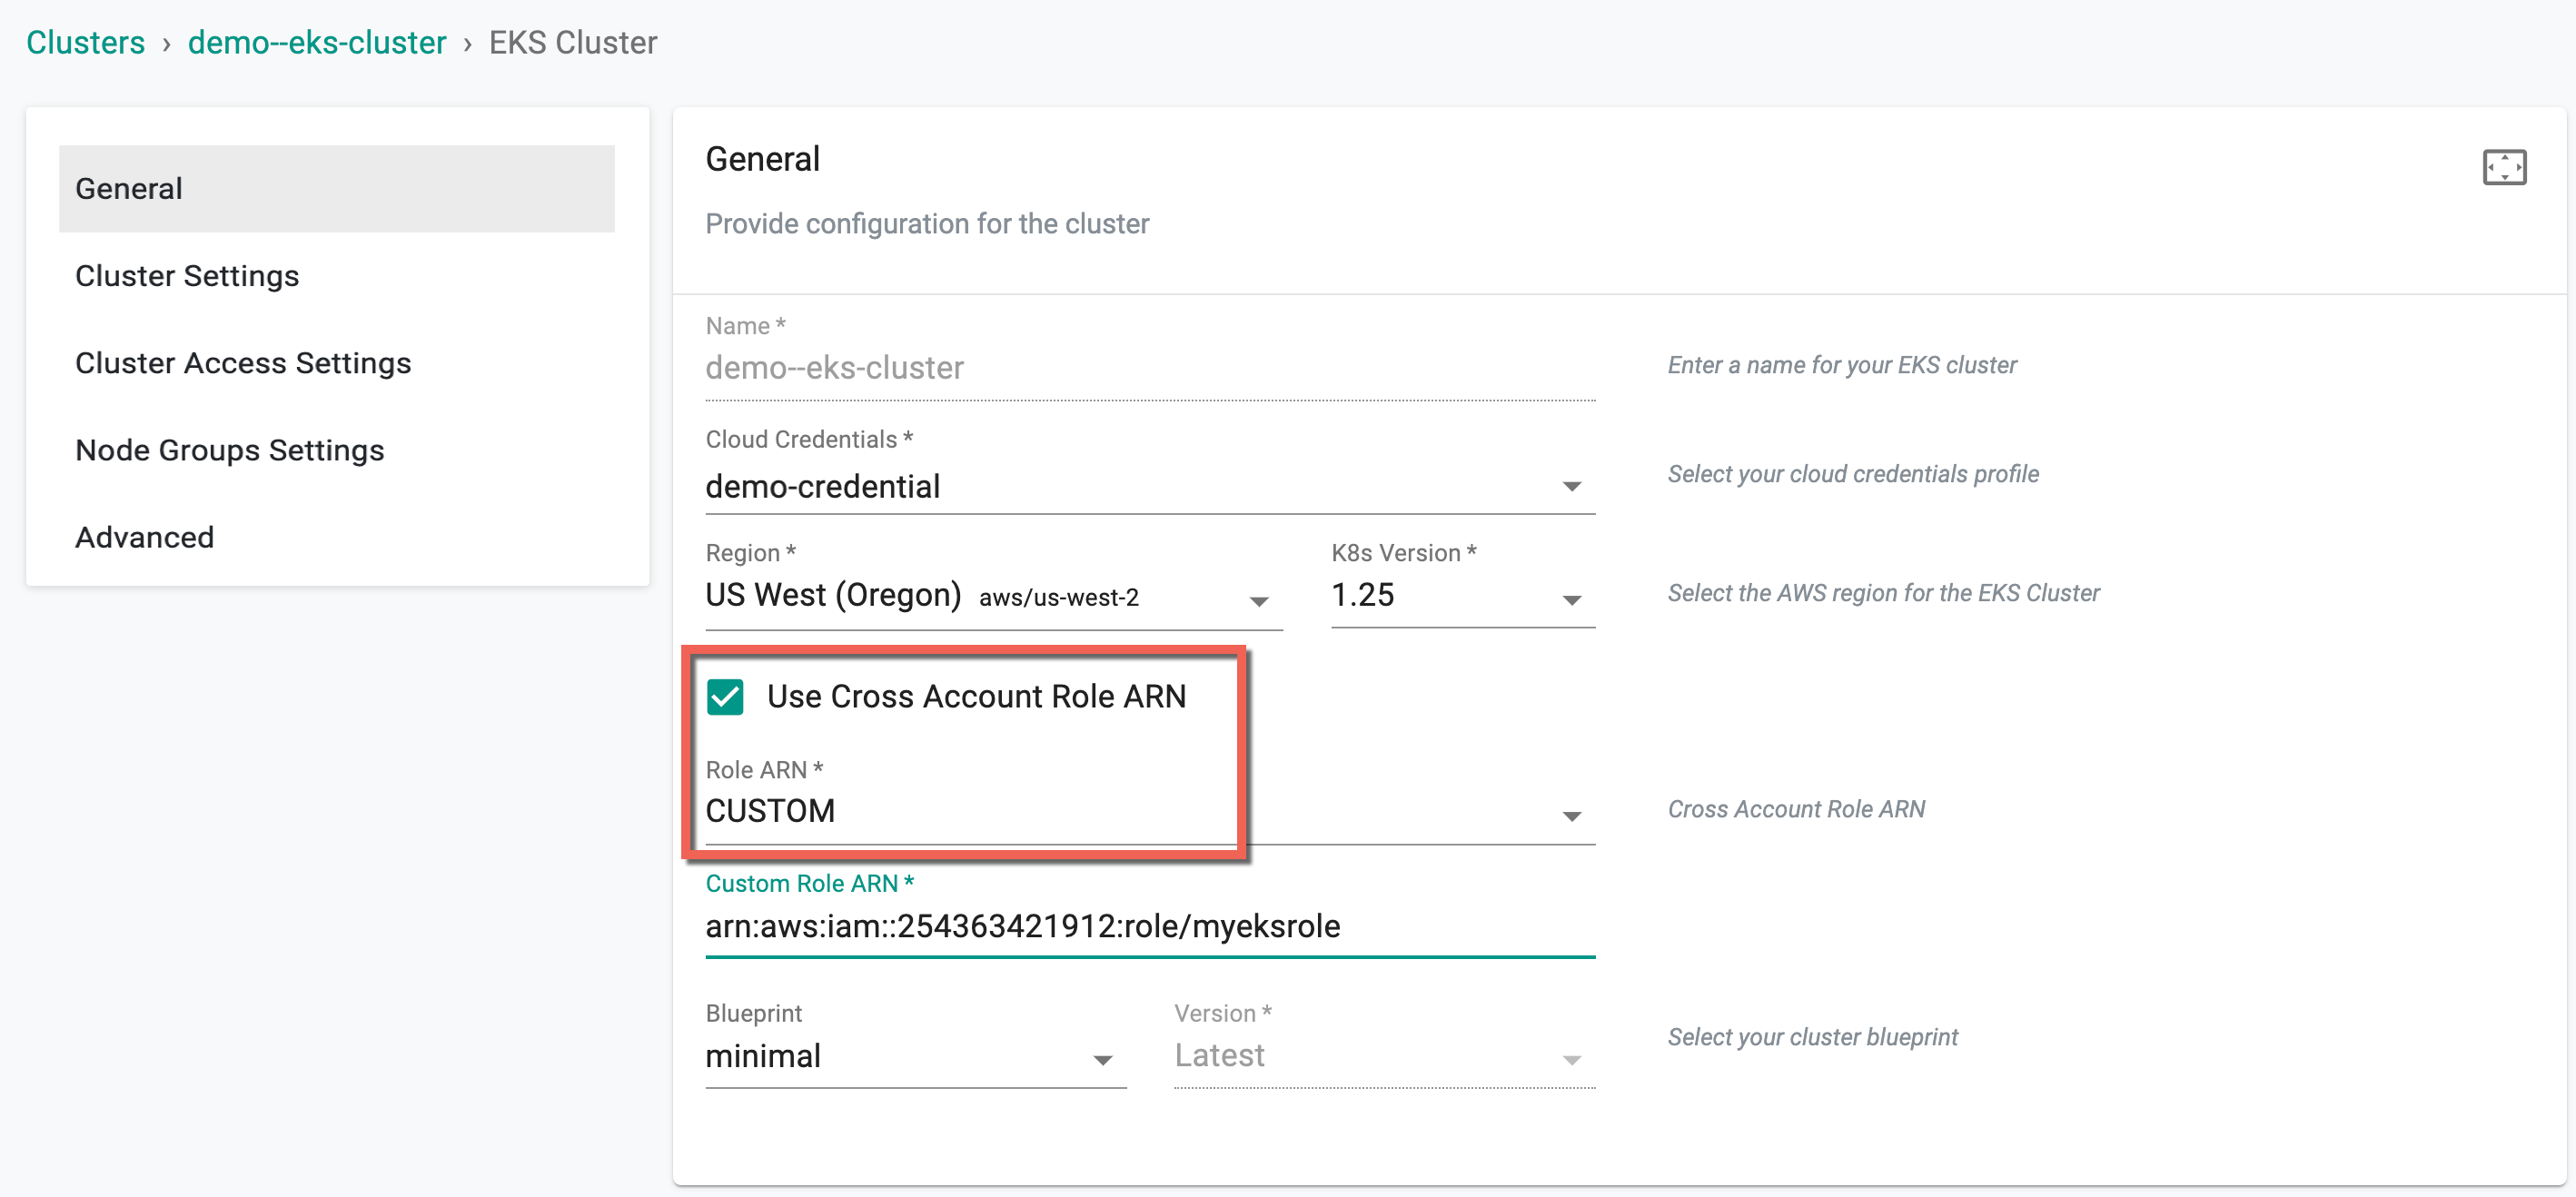
In case users cannot find the required child role from the drop-down, they have the alternative to choose the Custom option and manually enter the ARN details.
Refer here to know how to add multiple user accounts in AWS organization through one AWS account
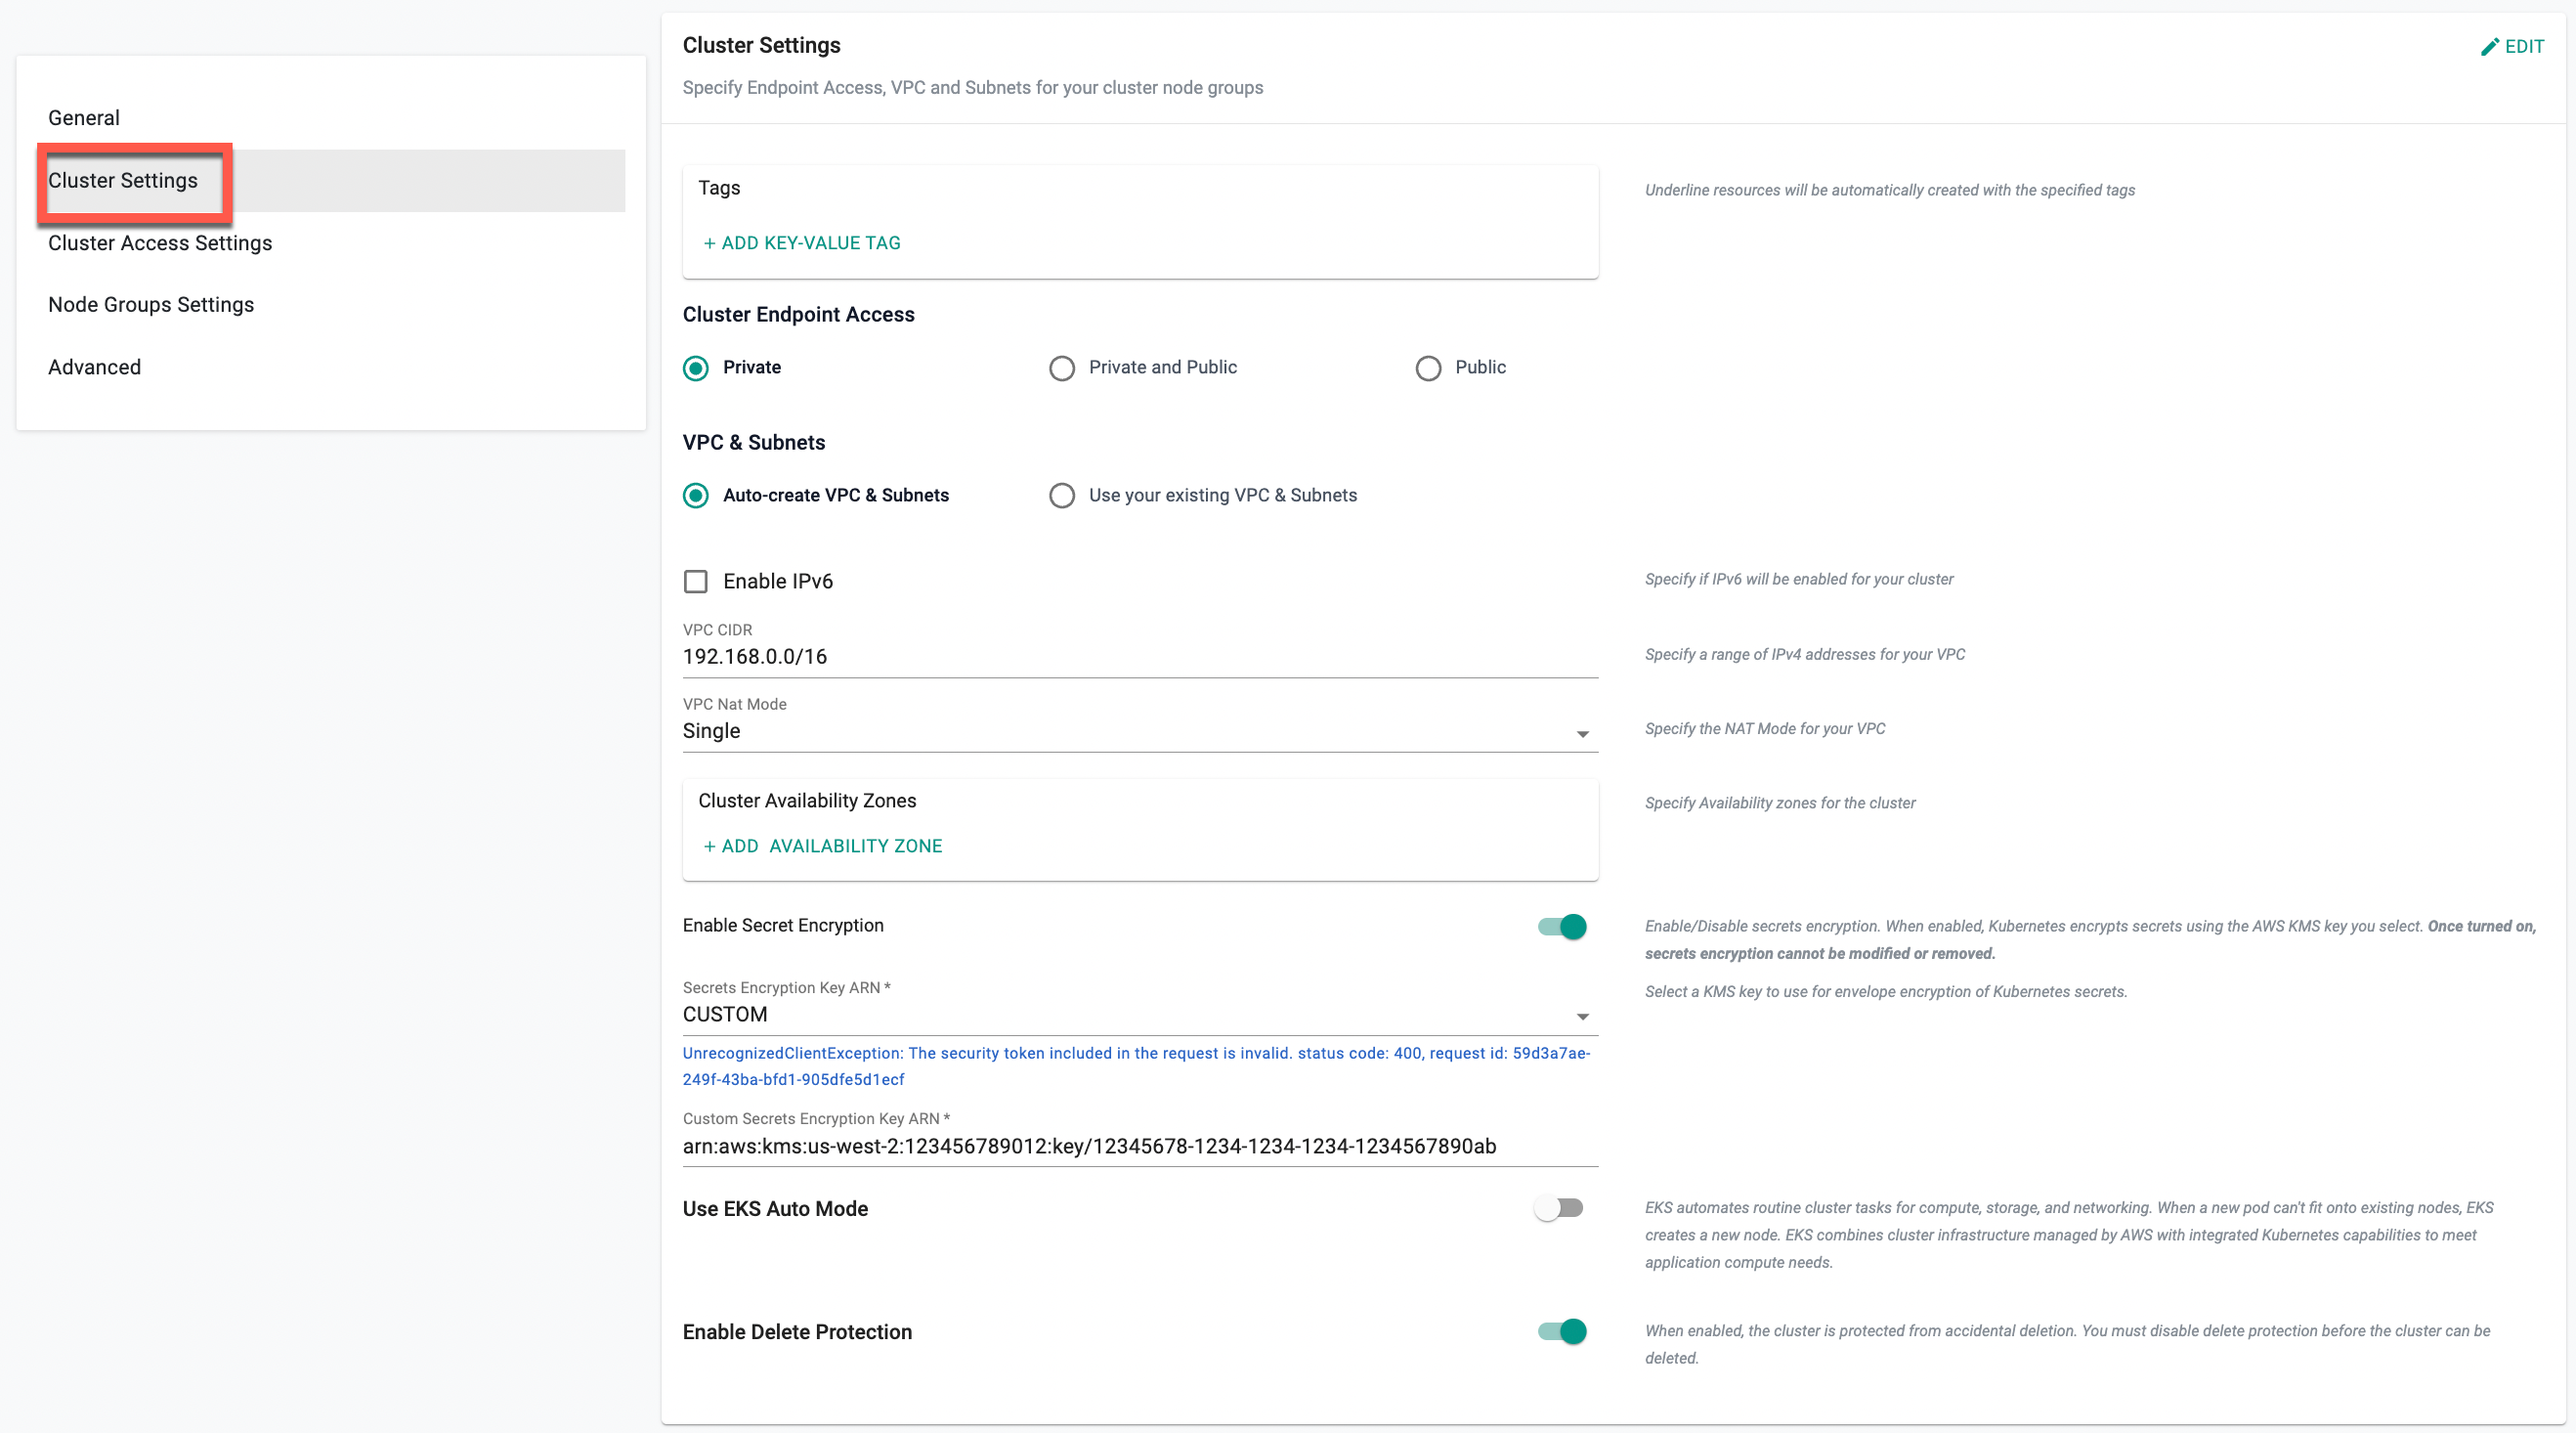
Cluster Settings
Click Edit to make the required changes on Cluster settings
- Select the required Cluster Endpoint Access and VPC & Subnets
- Provide the VPC CIDR and select the VPC Nat Mode
-
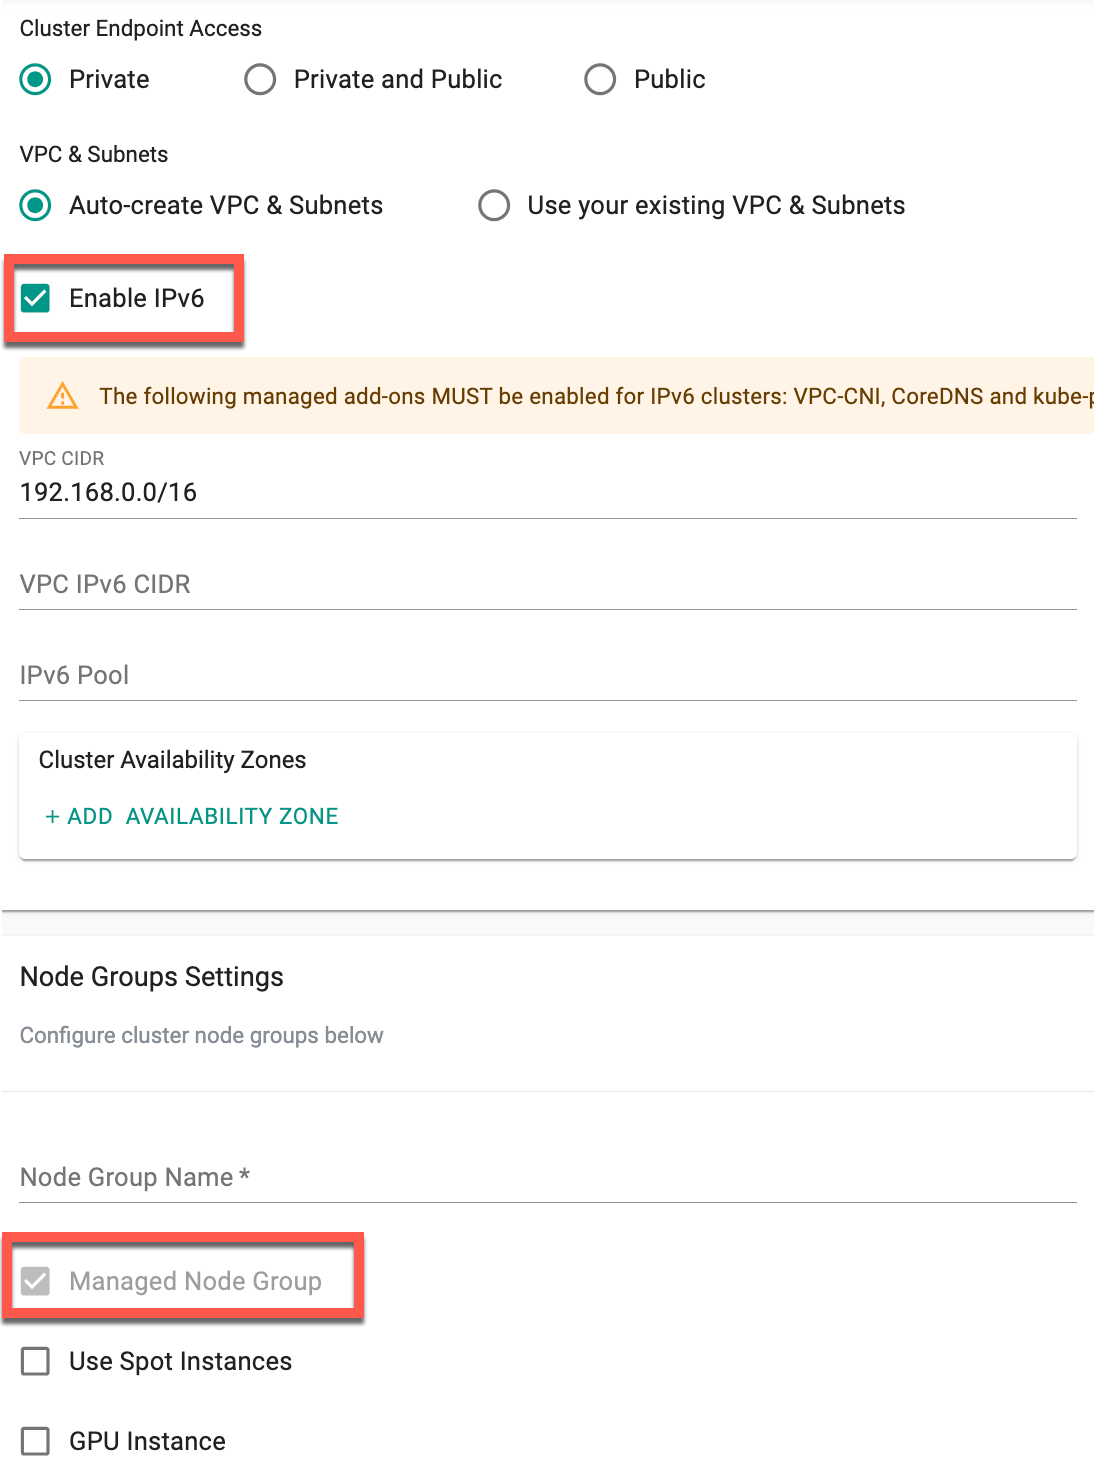
To provision an IPv6-enabled cluster, enable the Enable IPv6 option. Depending on this selection, VPC and Subnets fields may vary. For detailed information on IPv6, visit this page
-
Enable Secret Encryption allows users to encrypt encrypting Kubernetes secrets within the EKS Clusters. If selecting custom, manually enter the custom secrets encryption key ARN or select a key from the drop-down. For more details on Secret Encryption, refer to this page.
-
Use EKS Auto Mode allows users to automate Kubernetes cluster management, including node provisioning, scaling, and upgrades, ensuring optimized performance, security, and cost-efficiency. For detailed information on Auto Mode, visit this page
-
Enable Delete Protection protects the cluster from accidental deletion. When enabled, any attempt to delete the cluster will fail until Delete Protection is disabled. For detailed information on Delete Protection, visit this page
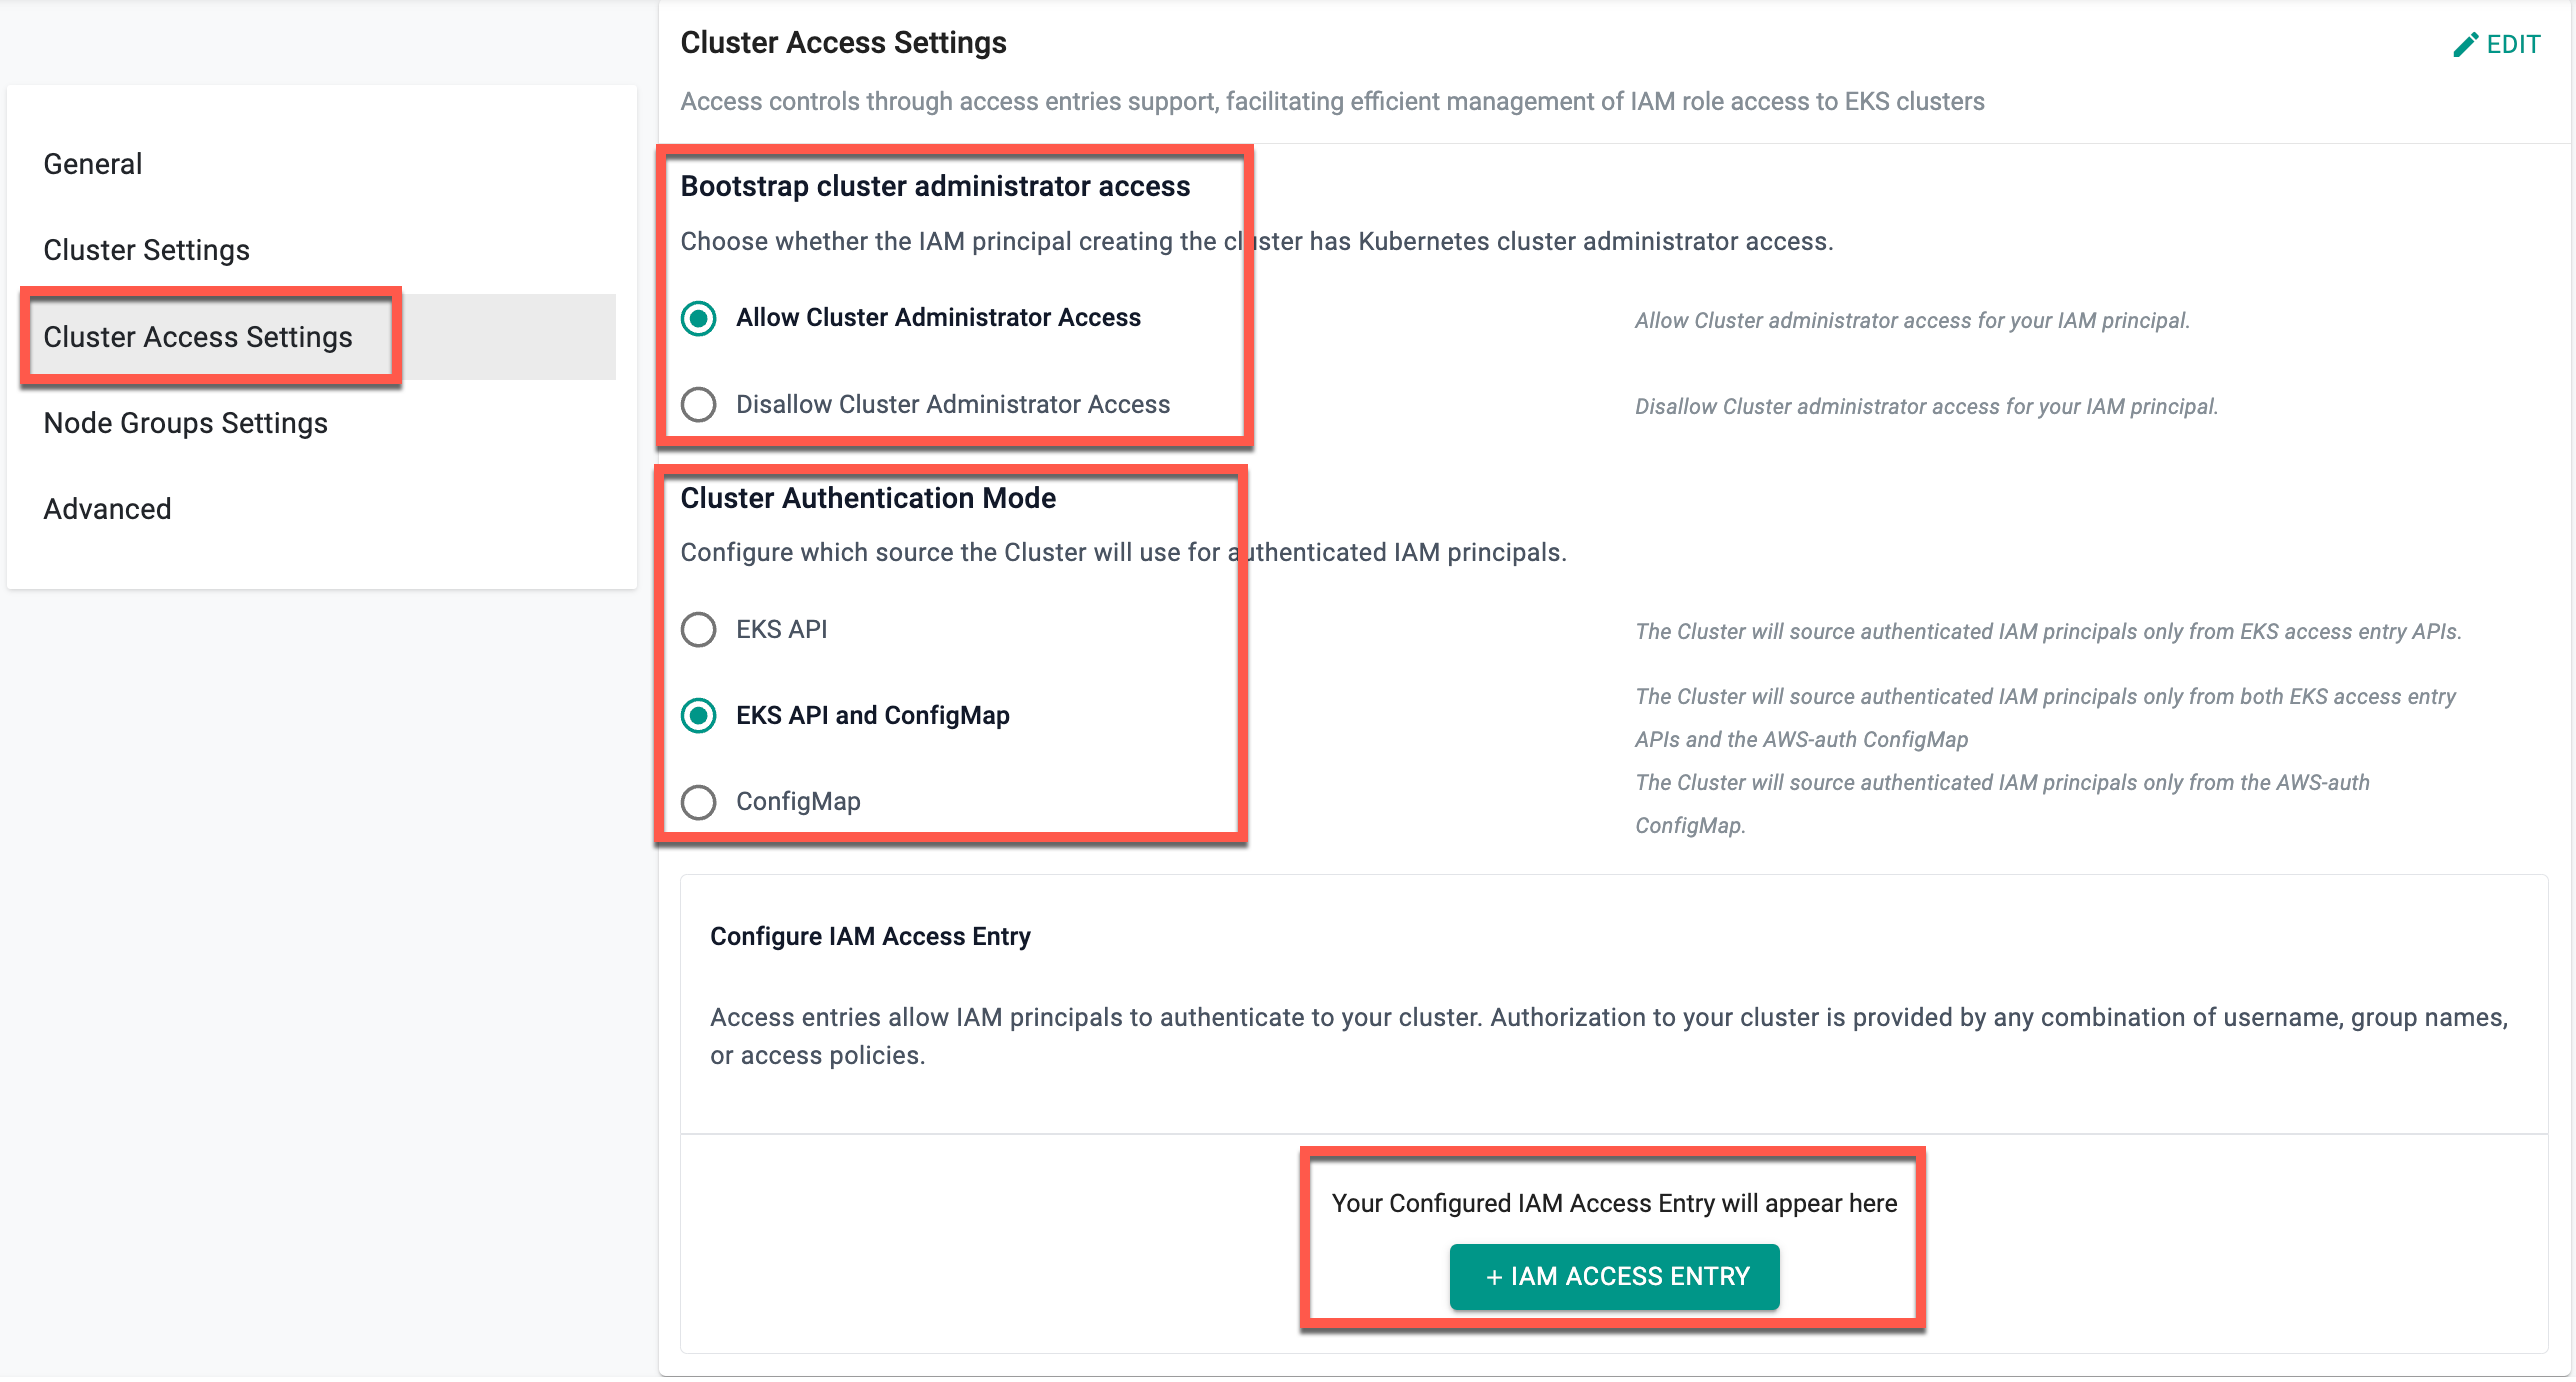
Cluster Access Settings
- Select the required Cluster Authentication Mode and Administration Access
- Click IAM Access Entry to add one or more users/groups and provide access to the cluster or namespace
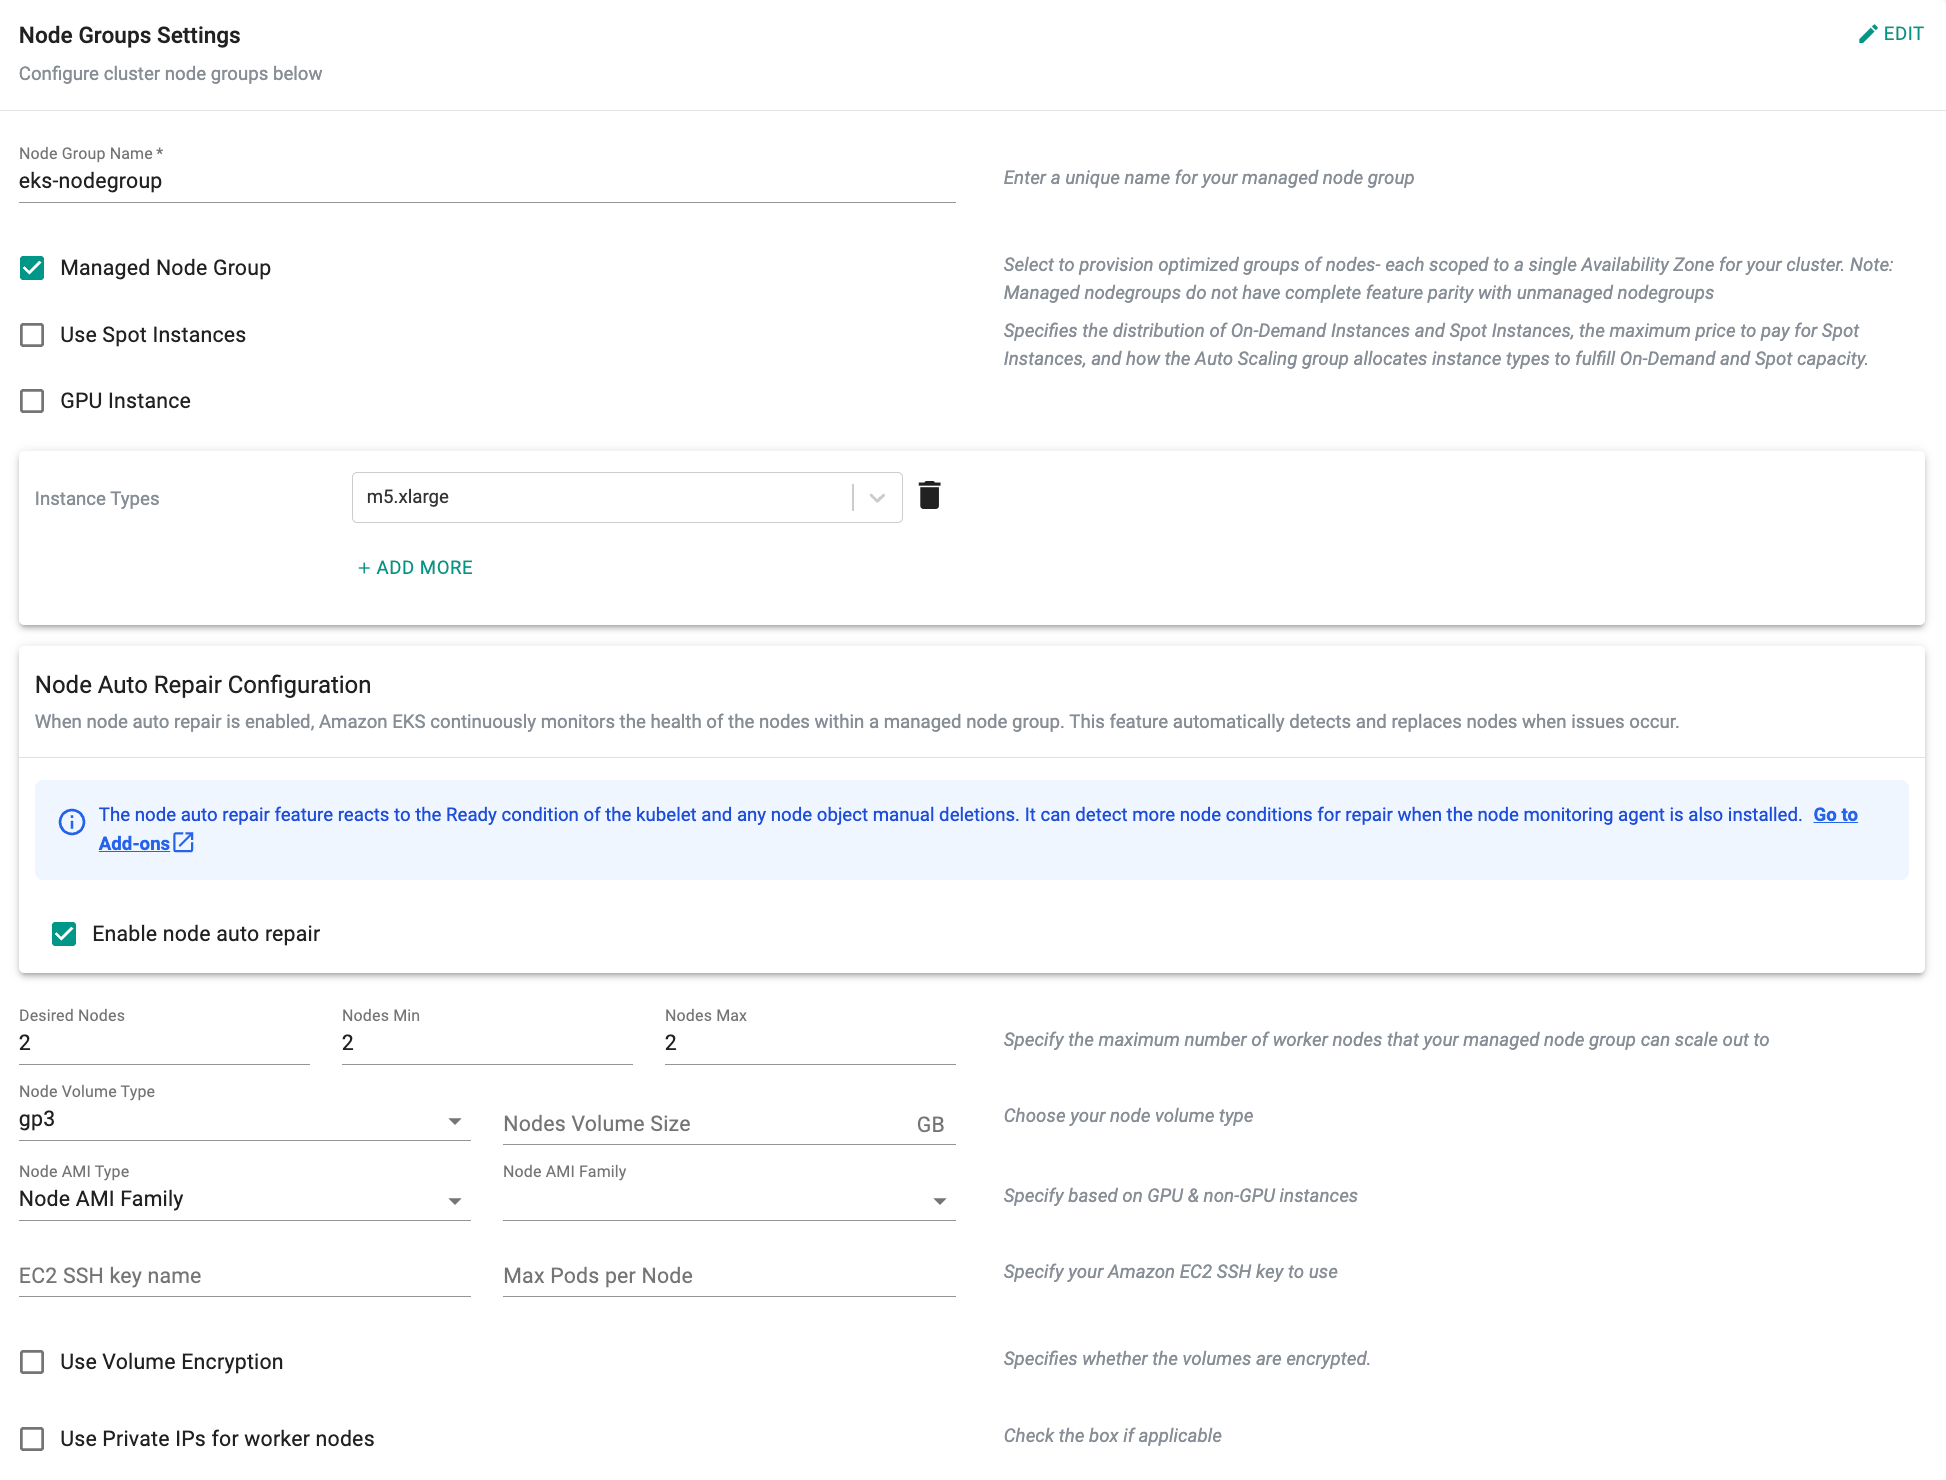
Node Groups Settings
Click Edit to make the required changes on Node Groups settings.
The Node Group Settings pages provide configuration fields used to define and customize a node group for the EKS cluster. These fields determine the node group’s identity, compute characteristics, scaling behavior, storage configuration, networking placement, metadata, scheduling restrictions, and IAM role associations.
- Node Group Basics
- Specify the node group name.
- The node group can be configured as a Managed Node Group, Spot Instance–based node group, or GPU-enabled node group, depending on the requirements.
- Choose one or more EC2 instance types for node provisioning.
When IPv6 is enabled, the self-managed node group is unsupported. Consequently, the Managed Node Group will be selected by default, and the user cannot enable/disable this checkbox.
-
Node Auto Repair
- Enable or disable automatic node repair for the managed node group.
-
Capacity and Storage
- Configure desired, minimum, and maximum node counts.
- Select the EBS volume type and specify the volume size.
- Choose the AMI family for the node group.
- Provide the SSH key name if required for node access.
- Set the maximum number of pods allowed per node.
- Enable volume encryption or private IP enforcement for worker nodes.
-
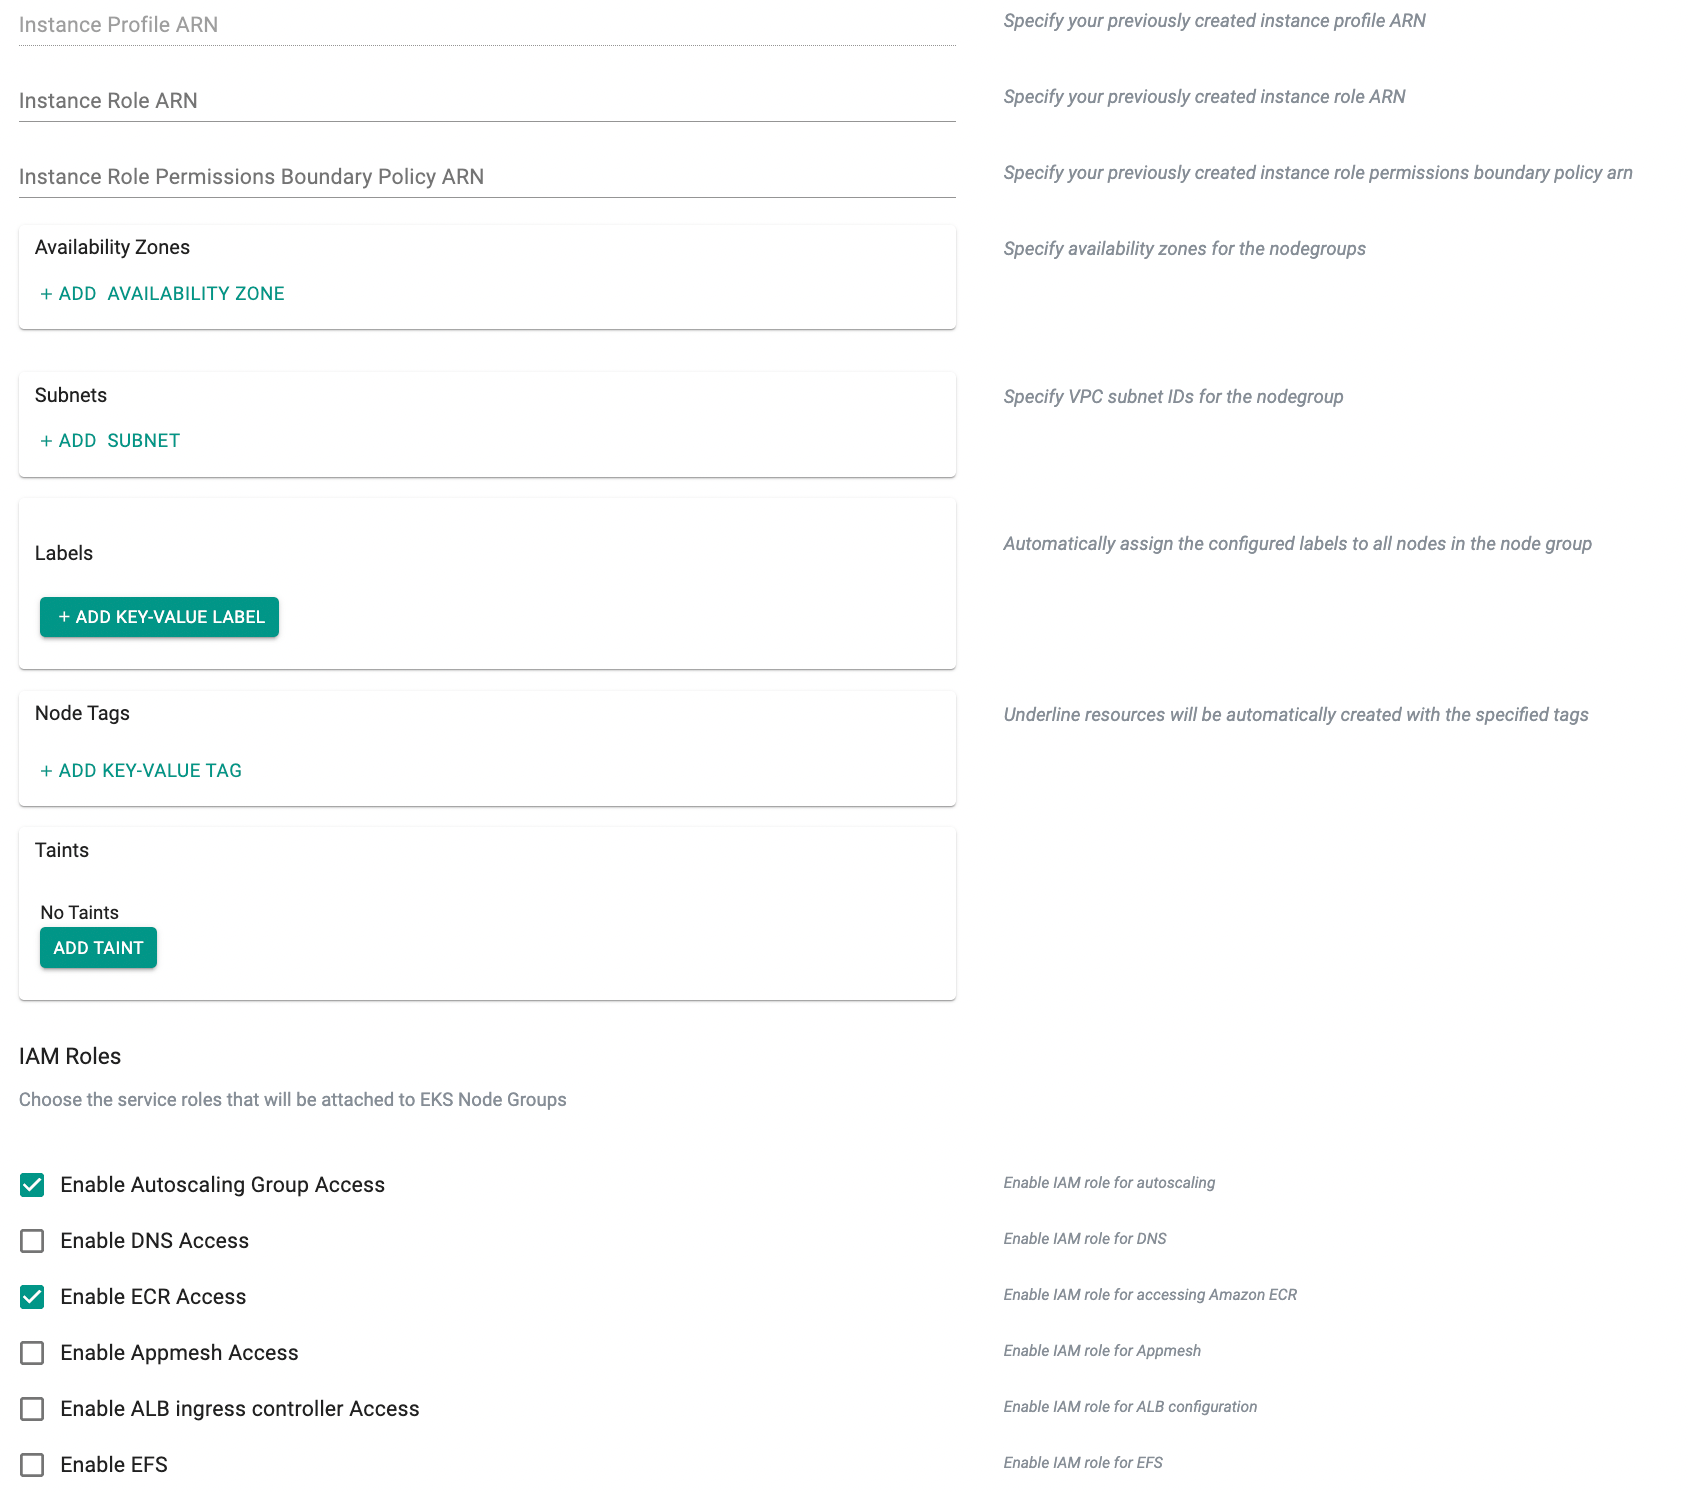
Networking and Placement
- Provide instance profile ARNs, instance role ARNs, or permissions boundary policy ARNs if applicable.
- Select availability zones for node placement.
- Choose VPC subnets for the node group.
Important
Users can set either similar subnets or different subnets for control plane and node groups
-
Node Metadata
- Add labels to apply metadata to all nodes in the group.
- Add tags for resource classification and management.
- Configure taints to control workload scheduling behavior.
-
IAM Roles
- Enable IAM roles required for node group functionality, including autoscaling, DNS, ECR, AppMesh, ALB ingress controller, and EFS access.
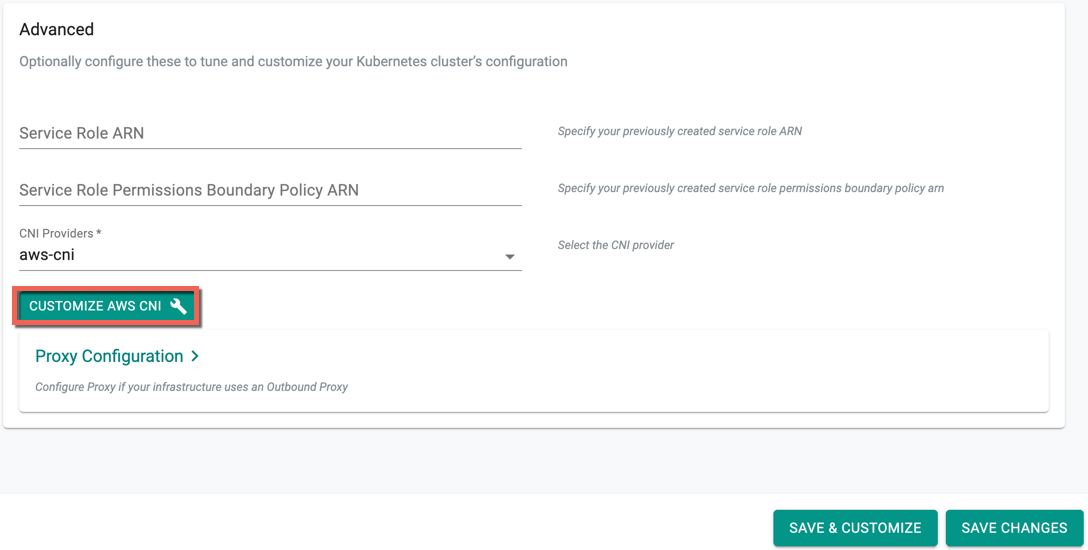
Advanced Settings
- Select the required CNI Providers from the drop-down, either aws-cni or calico. If selecting aws-cni, users can customize the CNI
- Click Customize AWS CNI
Important
Please make sure that the required IAM Policies are enabled if you wish to customize the CNI
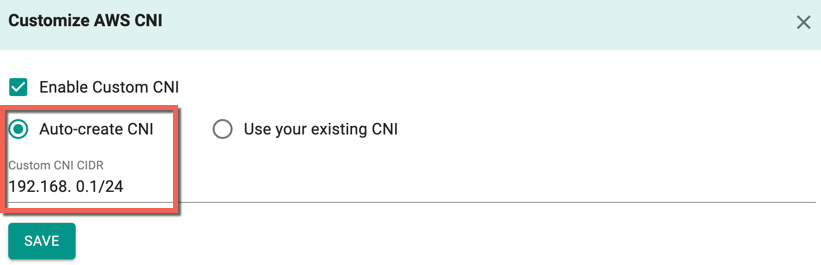
Customize AWS CNI screen appears.
- Select Enable Custom CNI
- Auto Creation allows the users to provide their CIDR details. Select Auto-create CNI option and enter the Custom CNI CIDR
Important
If you select an existing CIDR, the size of the CIDR is limited by the allocation rules such as allowed minimum, allowed maximum, and default.
- Users are allowed to manually enter their CNI details to overcome the allocation rules. Select Use your existing CNI option
- Provide the availability zone associated with the selected region
- Enter the available CIDR and Subnet
- Optionally, add one or more Security Group(s), Config details and Zone Spec
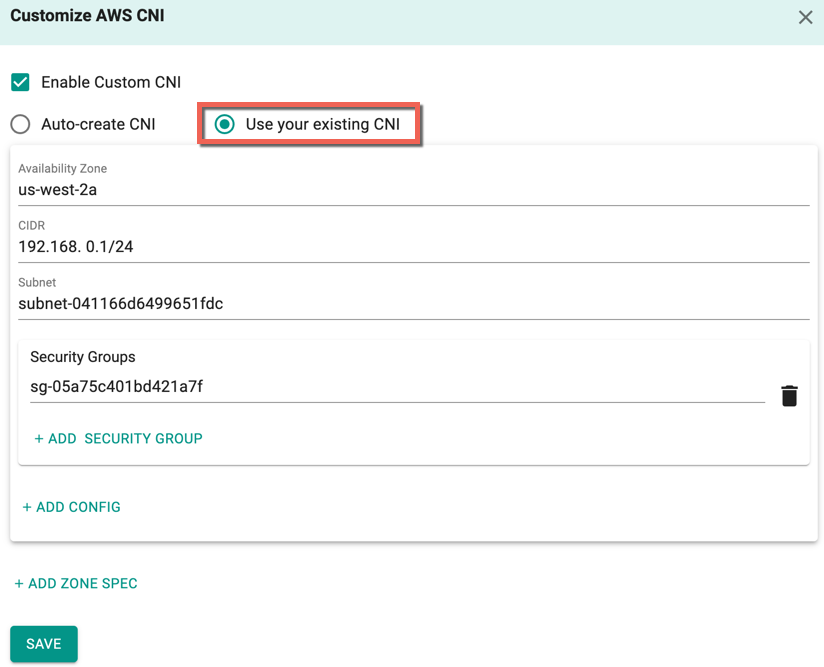
- Click Save
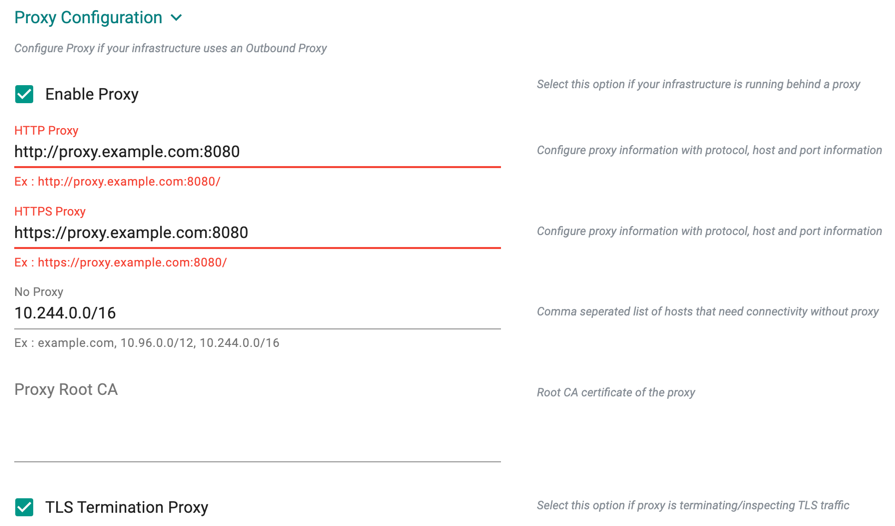
Proxy Configuration
- Select Enable Proxy if the cluster is behind a forward proxy.
- Configure the http proxy with the proxy information (ex: http://proxy.example.com:8080)
- Configure the https proxy with the proxy information (ex: https://proxy.example.com:8080)
- Configure No Proxy with Comma separated list of hosts that need connectivity without proxy. Kubernetes Service IP (from the default namespace) has to be included
- Configure the Root CA certificate of the proxy if proxy is terminating non MTLS traffic
- Enable TLS Termination Proxy if proxy is terminating non MTLS traffic and it is not possible to provide the Root CA certificate of the proxy
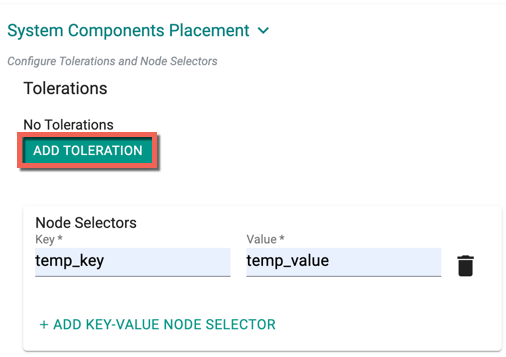
System Components Placement
Users can configure the kubernetes tolerations and nodeSelector in the advanced settings. Tolerations allow the Kubernetes scheduler to schedule pods with matching taints. Users can apply one or more taints to a node and this node will not accept any pods that do not tolerate the taints.
If nodes without taints exists in the cluster, use NodeSelectors to ensure the pods are scheduled to the desired nodes. These tolerations and nodeSelector are configured at the cluster level and are applied to the managed addons and core components. All the pods that are part of managed addons and components contain tolerations and nodeSelector in its YAML spec. Users can use corresponding taints (nodegroup taints) and labels (nodegroup labels) on the nodegroup
System Components Placement can contain a list of tolerations and nodeSelector
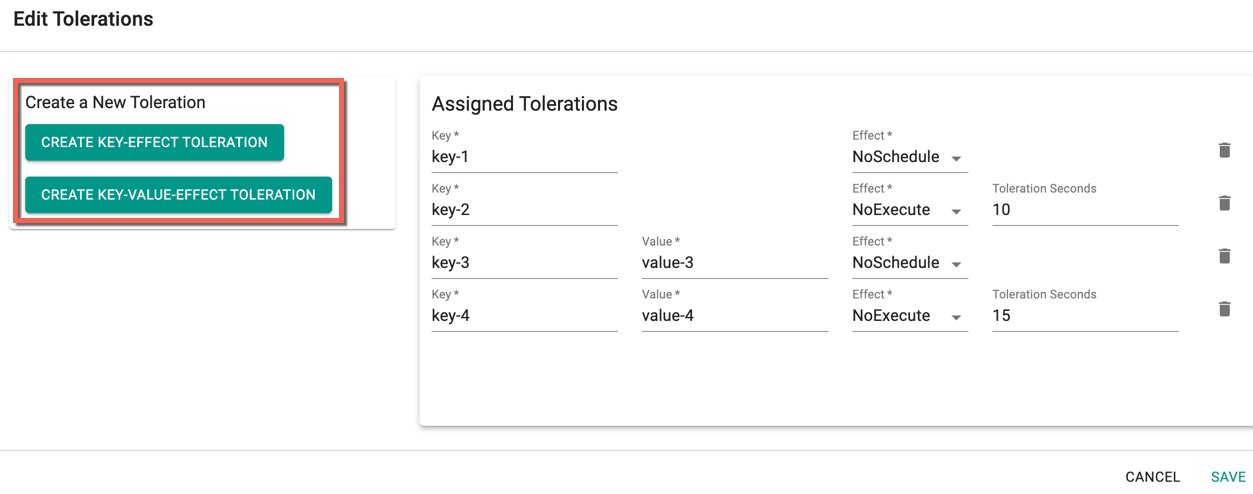
- Click Add Toleration to add one or more tolerations at cluster level
- Create one or more Key-Effect Toleration and Key-Value-Effect-Toleration
- Click Save
You can view the list of tolerations created as shown in the below example
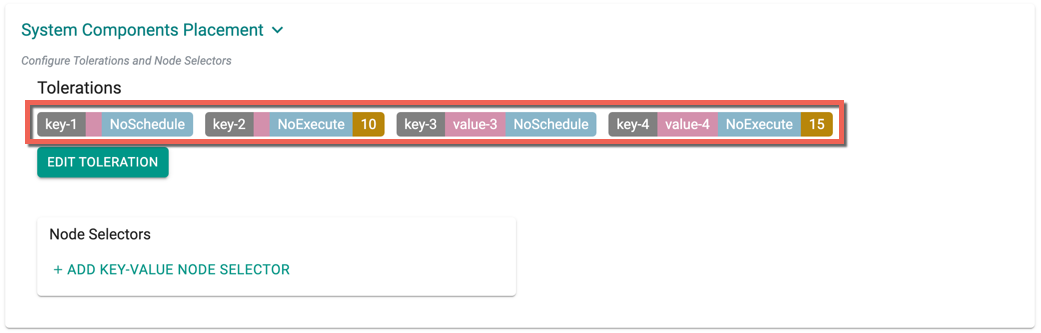
Important
Managed Add-ons and core components will be placed in Nodes with matching taints. If none of the node has taints, all the add-ons and core components will be split to all the available nodes
- Click Add Key-Value Node Selector to add one or more node selectors
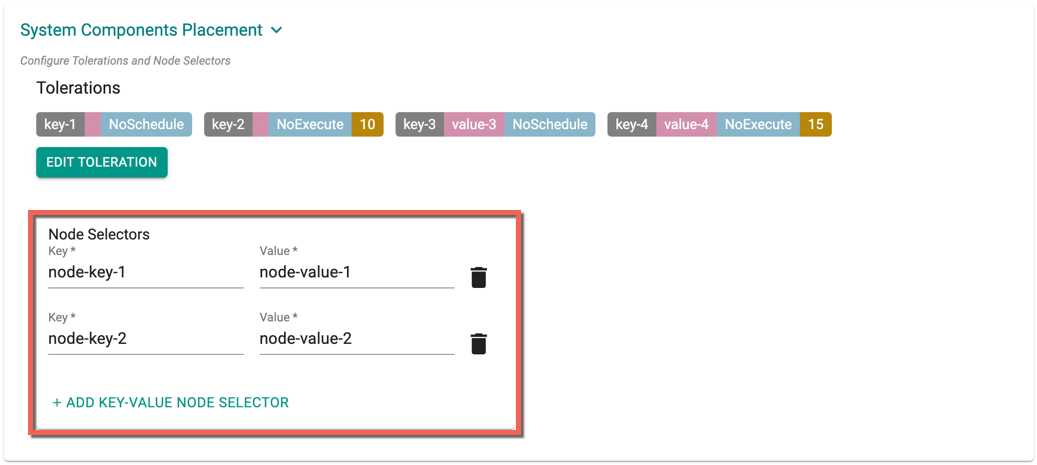
Important
The labels that are passed as part of the nodegroup level are matched using the Nodegroup Key Value pairs
- Enabling the Daemon Set Overrides allows the users to add additional tolerations for the Rafay daemon sets to match the taints available in the nodes.
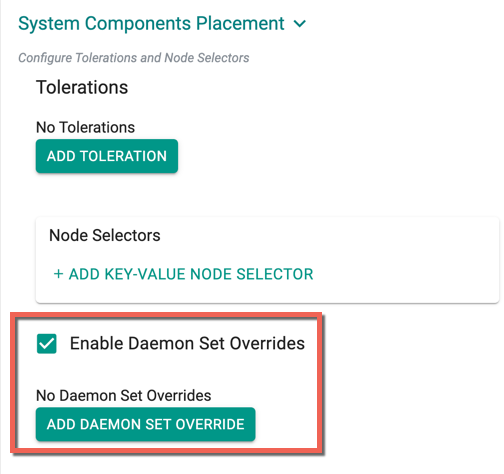
Recommendation
Use the tolerations in daemon set overrides, ensuring that daemon sets are run on every nodegroup
- Click Add Daemon Set Override to create one or more Key-effect(s) and Key-value(s). If the daemon sets are matching the toleration along with the taints already available, all the daemon sets gets deployed on the nodes
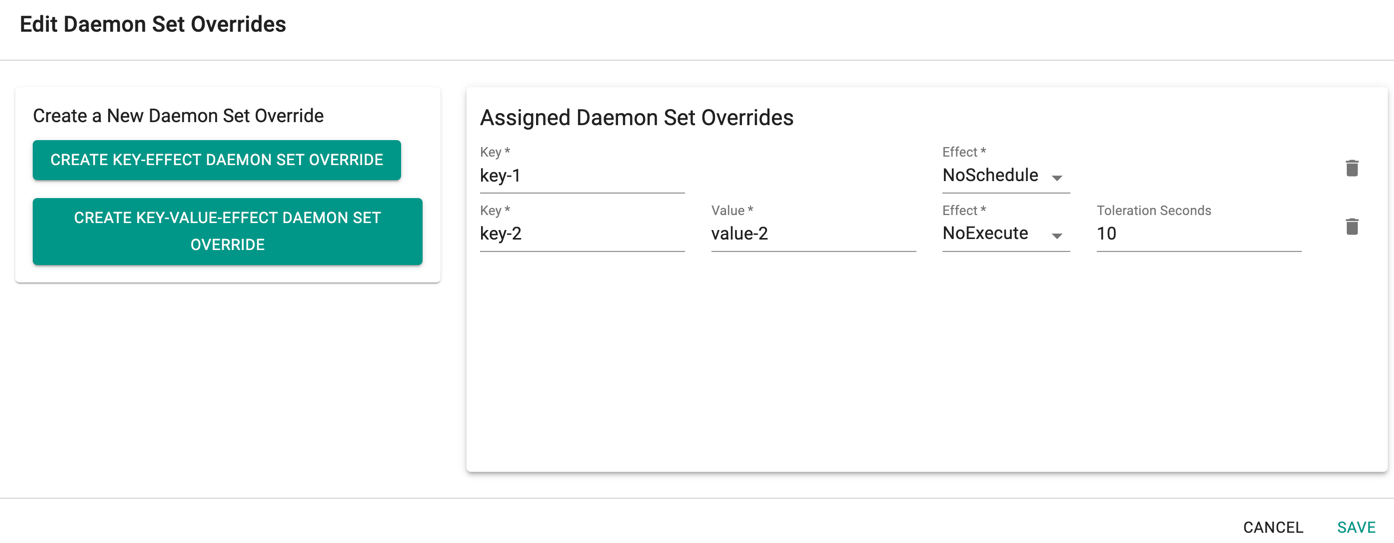
Important
Illustrative examples of declarative cluster specifications enabled with taints and tolerations for system components are available in this Git repository.
Managed Addons
Amazon Elastic Kubernetes Service (EKS) Add-ons are pre-built components that can be easily deployed onto an EKS cluster to enhance its functionality. These add-ons provide a quick and easy way to integrate different services with your Kubernetes workloads running on EKS.
The managed add-ons Amazon VPC CNI, CoreDNS, and Kube-Proxy are mandatory for successfully provisioning an EKS cluster. Therefore, these addons are pre-selected by default, but users have the option to choose the image version from the dropdown menu. Select one or more required managed add-ons and their version(s). The Version drop-down menu displays the image version corresponding to the selected K8s version. The supported add-ons are shown in the below image.

For more information about managed Addons and their latest available versions, refer to this page.
Custom IAM Policy for VPC CNI Addon (IPv4 and IPv6)
Breaking Change — vpc-cni v1.22.1 (Released May 29, 2026)
Starting from vpc-cni v1.22.1, Enhanced Subnet Discovery is enabled by default
(ENABLE_SUBNET_DISCOVERY=true). This feature requires the following IAM permissions
on the node role:
ec2:DescribeSubnetsec2:DescribeSecurityGroups
If you are using a custom IAM policy for the vpc-cni addon and these permissions
are missing, the aws-node daemon will fail to start.
To fix this, add the following permissions to your custom IAM policy:
{
  "Effect": "Allow",
  "Action": [
    "ec2:DescribeSubnets",
    "ec2:DescribeSecurityGroups"
  ],
  "Resource": "*"
}
For required IAM permissions when customizing CNI, also see IAM Policies.
IPv6 Cluster Addon Configuration
When creating an EKS cluster with IPv6, the vpc-cni addon requires explicit configurationValues. Without this, the cluster will fail to provision correctly.
Add the following addon configuration when creating an IPv6 EKS cluster:
addons:
  - name: vpc-cni
    version: latest
    configurationValues: '{"env":{"ENABLE_PREFIX_DELEGATION":"true","ENABLE_V6_EGRESS":"true","ENABLE_SUBNET_DISCOVERY":"false"},"init":{"env":{"ENABLE_V6_EGRESS":"true"}}}'
  - name: coredns
    version: latest
  - name: kube-proxy
    version: latest
  - name: aws-ebs-csi-driver
    version: latest
    attachPolicyARNs:
      - arn:aws:iam::aws:policy/service-role/AmazonEBSCSIDriverPolicy
Note
This configuration is mandatory for IPv6 clusters only. For more information on IPv6 EKS clusters, see IPv6 Enabled EKS Clusters.
Explore our blog for deeper insights on Amazon's VPC CNI for EKS Clusters, available here!
Important
By default, the add-on Amazon EBS CSI Driver gets deployed to the cluster on successful cluster provisioning
For more details on Amazon EKS Add-Ons, refer here
-
If nothing else is specified, the below defaults are used:
- Two (2) worker nodes
- AWS Region (US West- Oregon)
- Instance Type (m5.xlarge)
- Default Kubernetes version
- Default Cluster Blueprint
- VPC and Subnets automatically created
- Secure, private access to EKS Control Plane
- IAM Roles: Autoscaling Group, ECR
-
Click on Save Changes and Provision
Manual intervention is NOT REQUIRED unless there is an error or an issue to deal with. The entire process for provisioning with the cluster blueprint can take ~10-15 minutes. The process comprises multiple distinct parts:
- Provision EKS Control Plane
- Provision worker nodes in node groups
- Create required AWS infrastructure
- Download and deploy all the addons in the specified cluster blueprint
Update Tolerations
Users can update tolerations in an existing cluster.
- Select a cluster, then select Configuration.
- For Tolerations, click Edit to add tolerations.
- Create one or more Key-Effect Toleration and Key-Value-Effect-Toleration.
- Click Save.
Update Taints
- Select a cluster, then select Node Group.
- For Taints, click Edit to add taints.
- Create one or more Key-Effect Toleration and Key-Value-Effect-Toleration.
- Click Save.
Users can update taints in an existing cluster.
EKS Control Plane
The Controller provisions the EKS Control Plane and creates a node group that will contain the requested worker nodes.

Bootstrap Node
The provisioning process will temporarily create a bootstrap node in your VPC for secure, automated provisioning of the software components of the Kubernetes Operator and blueprint. This bootstrap node will be automatically removed once the bootstrap process is complete.
Cloud Formation Stacks
Both during and after provisioning, users can view the AWS Cloudformation stacks for both the EKS Control Plane and Worker Nodegroups in the AWS Console. A separate stack is created for the EKS Cluster control plane and the worker node nodegroup. An illustrative example is shown below.

Worker Nodes
The AWS EC2 nodes backing the Worker Nodes can be viewed on the AWS Console (EC2 Service). Note that the names of the nodes start with the EKS cluster's name in the Console. By default, the worker nodes are spread across multiple availability zones to ensure high availability. An illustrative example is shown below.

Kubernetes Mgmt Operator
Once the EKS Cluster's worker nodes are operational, the Kubernetes Operator is automatically deployed on the newly provisioned worker nodes to bring it under centralized management in the Controller.

Cluster Blueprint
Once the Kubernetes Management Operator is deployed on the cluster, the specified cluster blueprint is applied. This step will involve the download and configuration of the software addons configured in the blueprint.
The time required for this step is dependent on the size and complexity of the add-ons specified in the cluster blueprint.
Customize Cluster
Users can also use the self service wizard to create a "baseline cluster configuration", view the YAML based specification, update/save it and use the updated configuration to provision an EKS cluster. This can be very useful for advanced cluster customization or for advanced features that are only supported via the "cluster configuration file"
Step 1
Click on Save and Customize
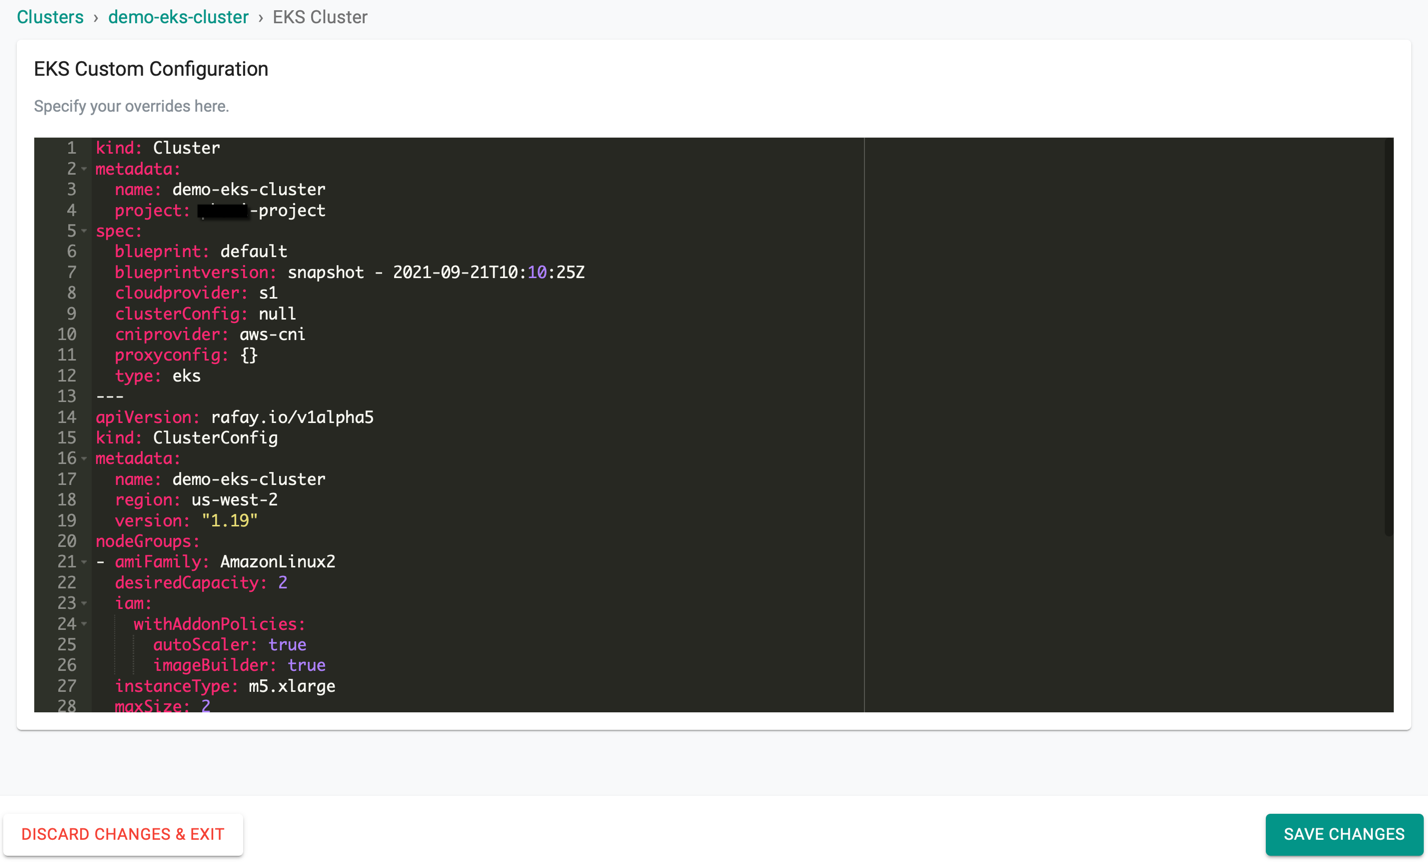
Step 2
This will present the user with the baseline cluster configuration in a YAML viewer. The user has two options for customizing the cluster configuration before provisioning using the self service wizard.
(a) Copy the configuration, make changes offline and paste the updated configuration and "Save" OR (b) Make required changes inline in the YAML viewer and "Save"
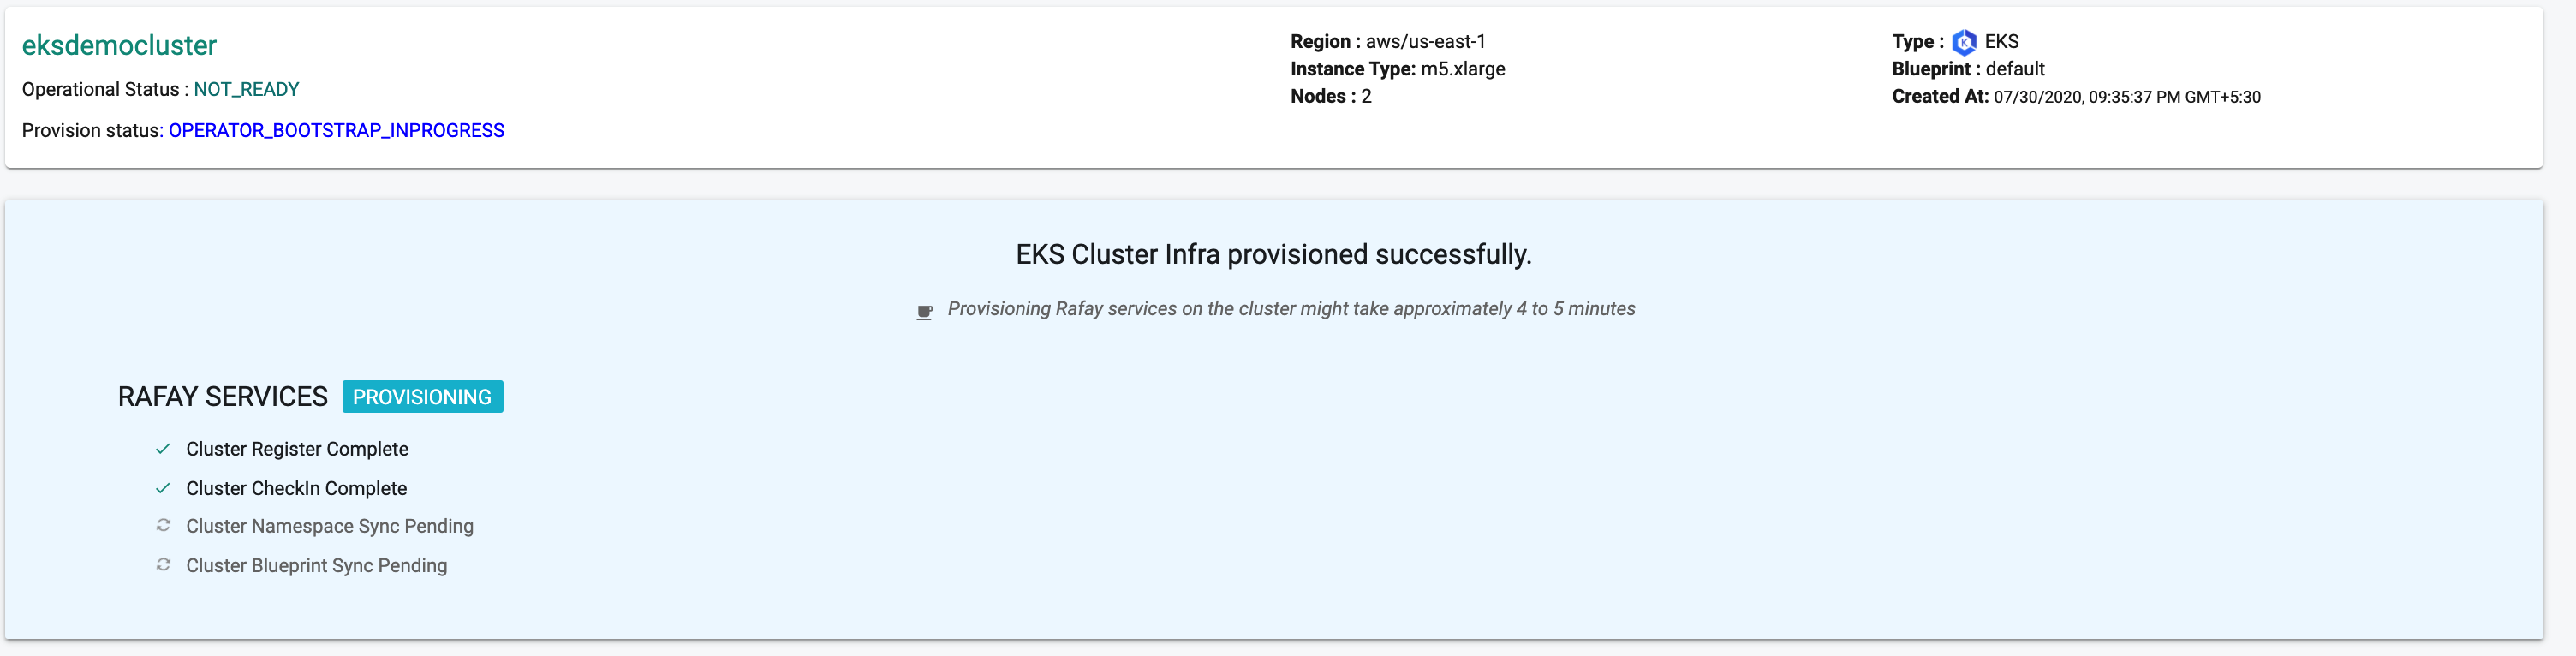
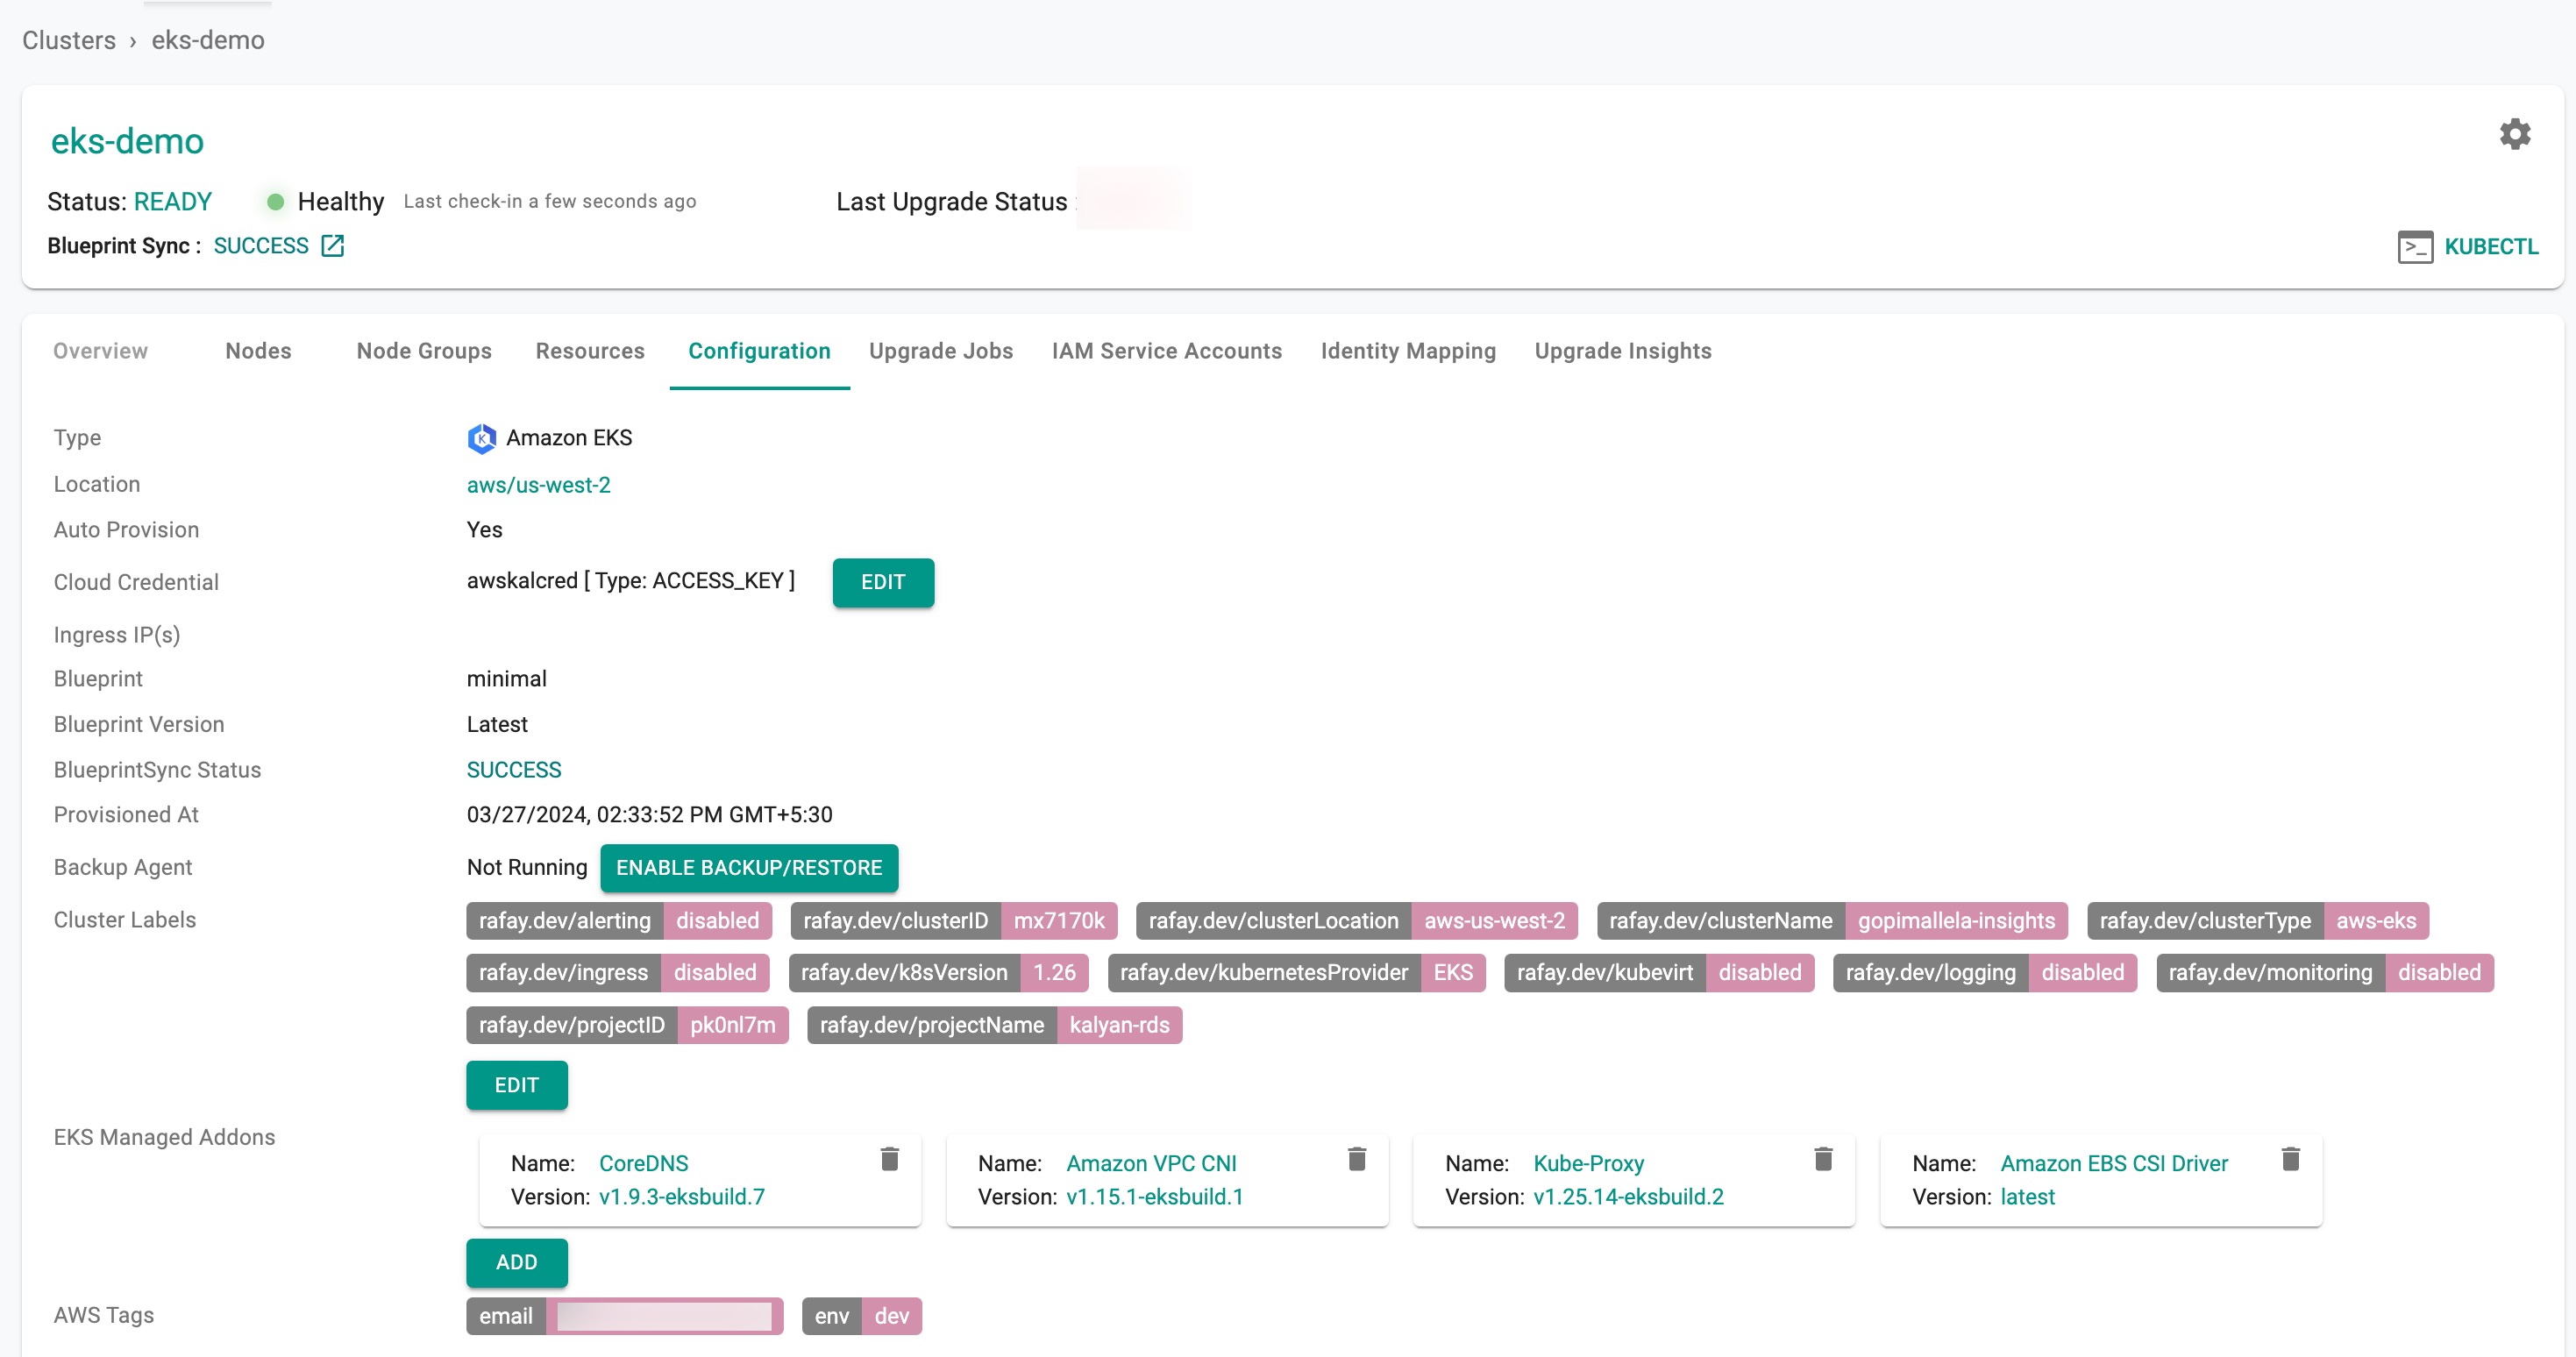
Successful Provisioning
Once all the steps are complete, the cluster is successfully provisioned as per the specified configuration. Users can now view and manage the Amazon EKS Cluster in the specified Project in the Controller just like any other cluster type. Once successfully provisioned, the user can view the dashboards. See example below.
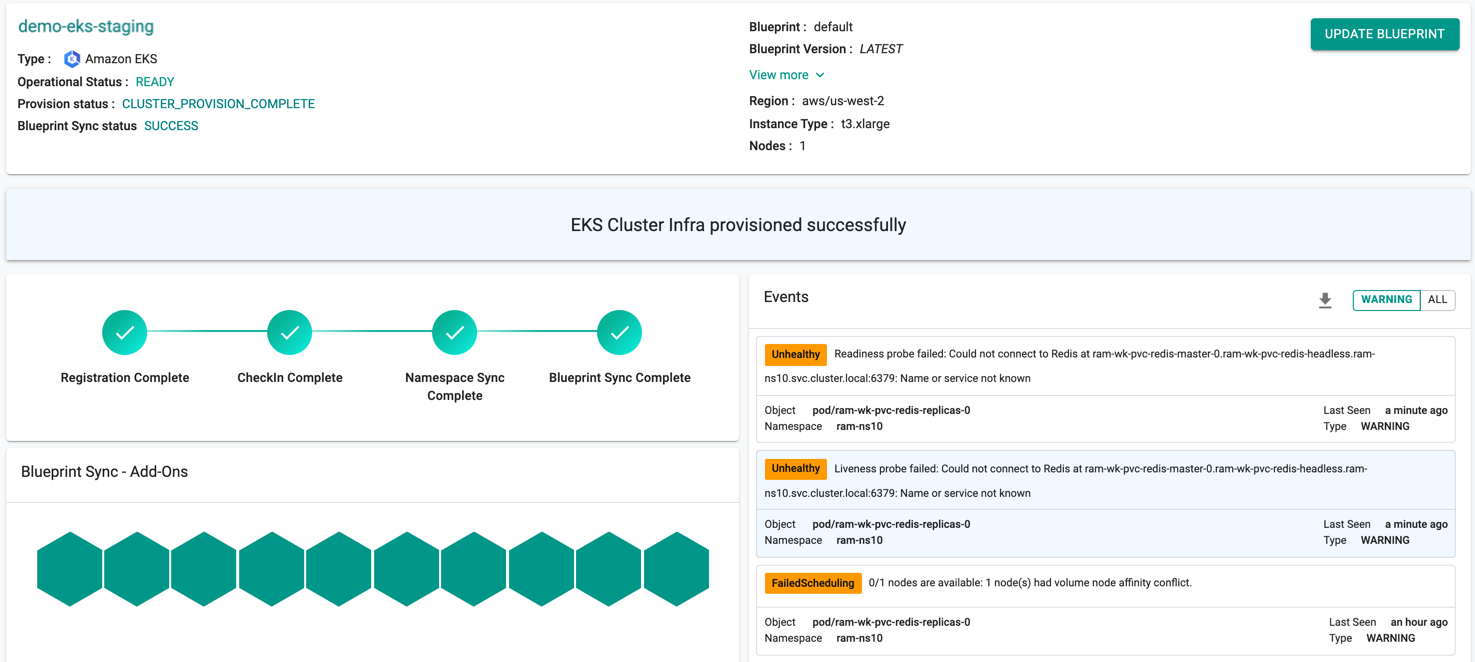
On successful cluster provisioning, users can view the detailed operations and workflow of the cluster by clicking the Operation Status Ready icon. The screen shows all the stages that occurred during cluster deployment. Click View more to know the Region, Instance Type and number of Nodes
Download Config
Download Cluster Config (Standard v1 Spec)
Downloads the cluster configuration in the standard v1 specification format, either from the console, using the RCTL CLI, or programmatically through the REST APIs.
Download Cluster Config (For GitOps System Sync)
Downloads the cluster configuration formatted for GitOps System Sync, either from the console, using the RCTL CLI, or programmatically through the REST APIs.
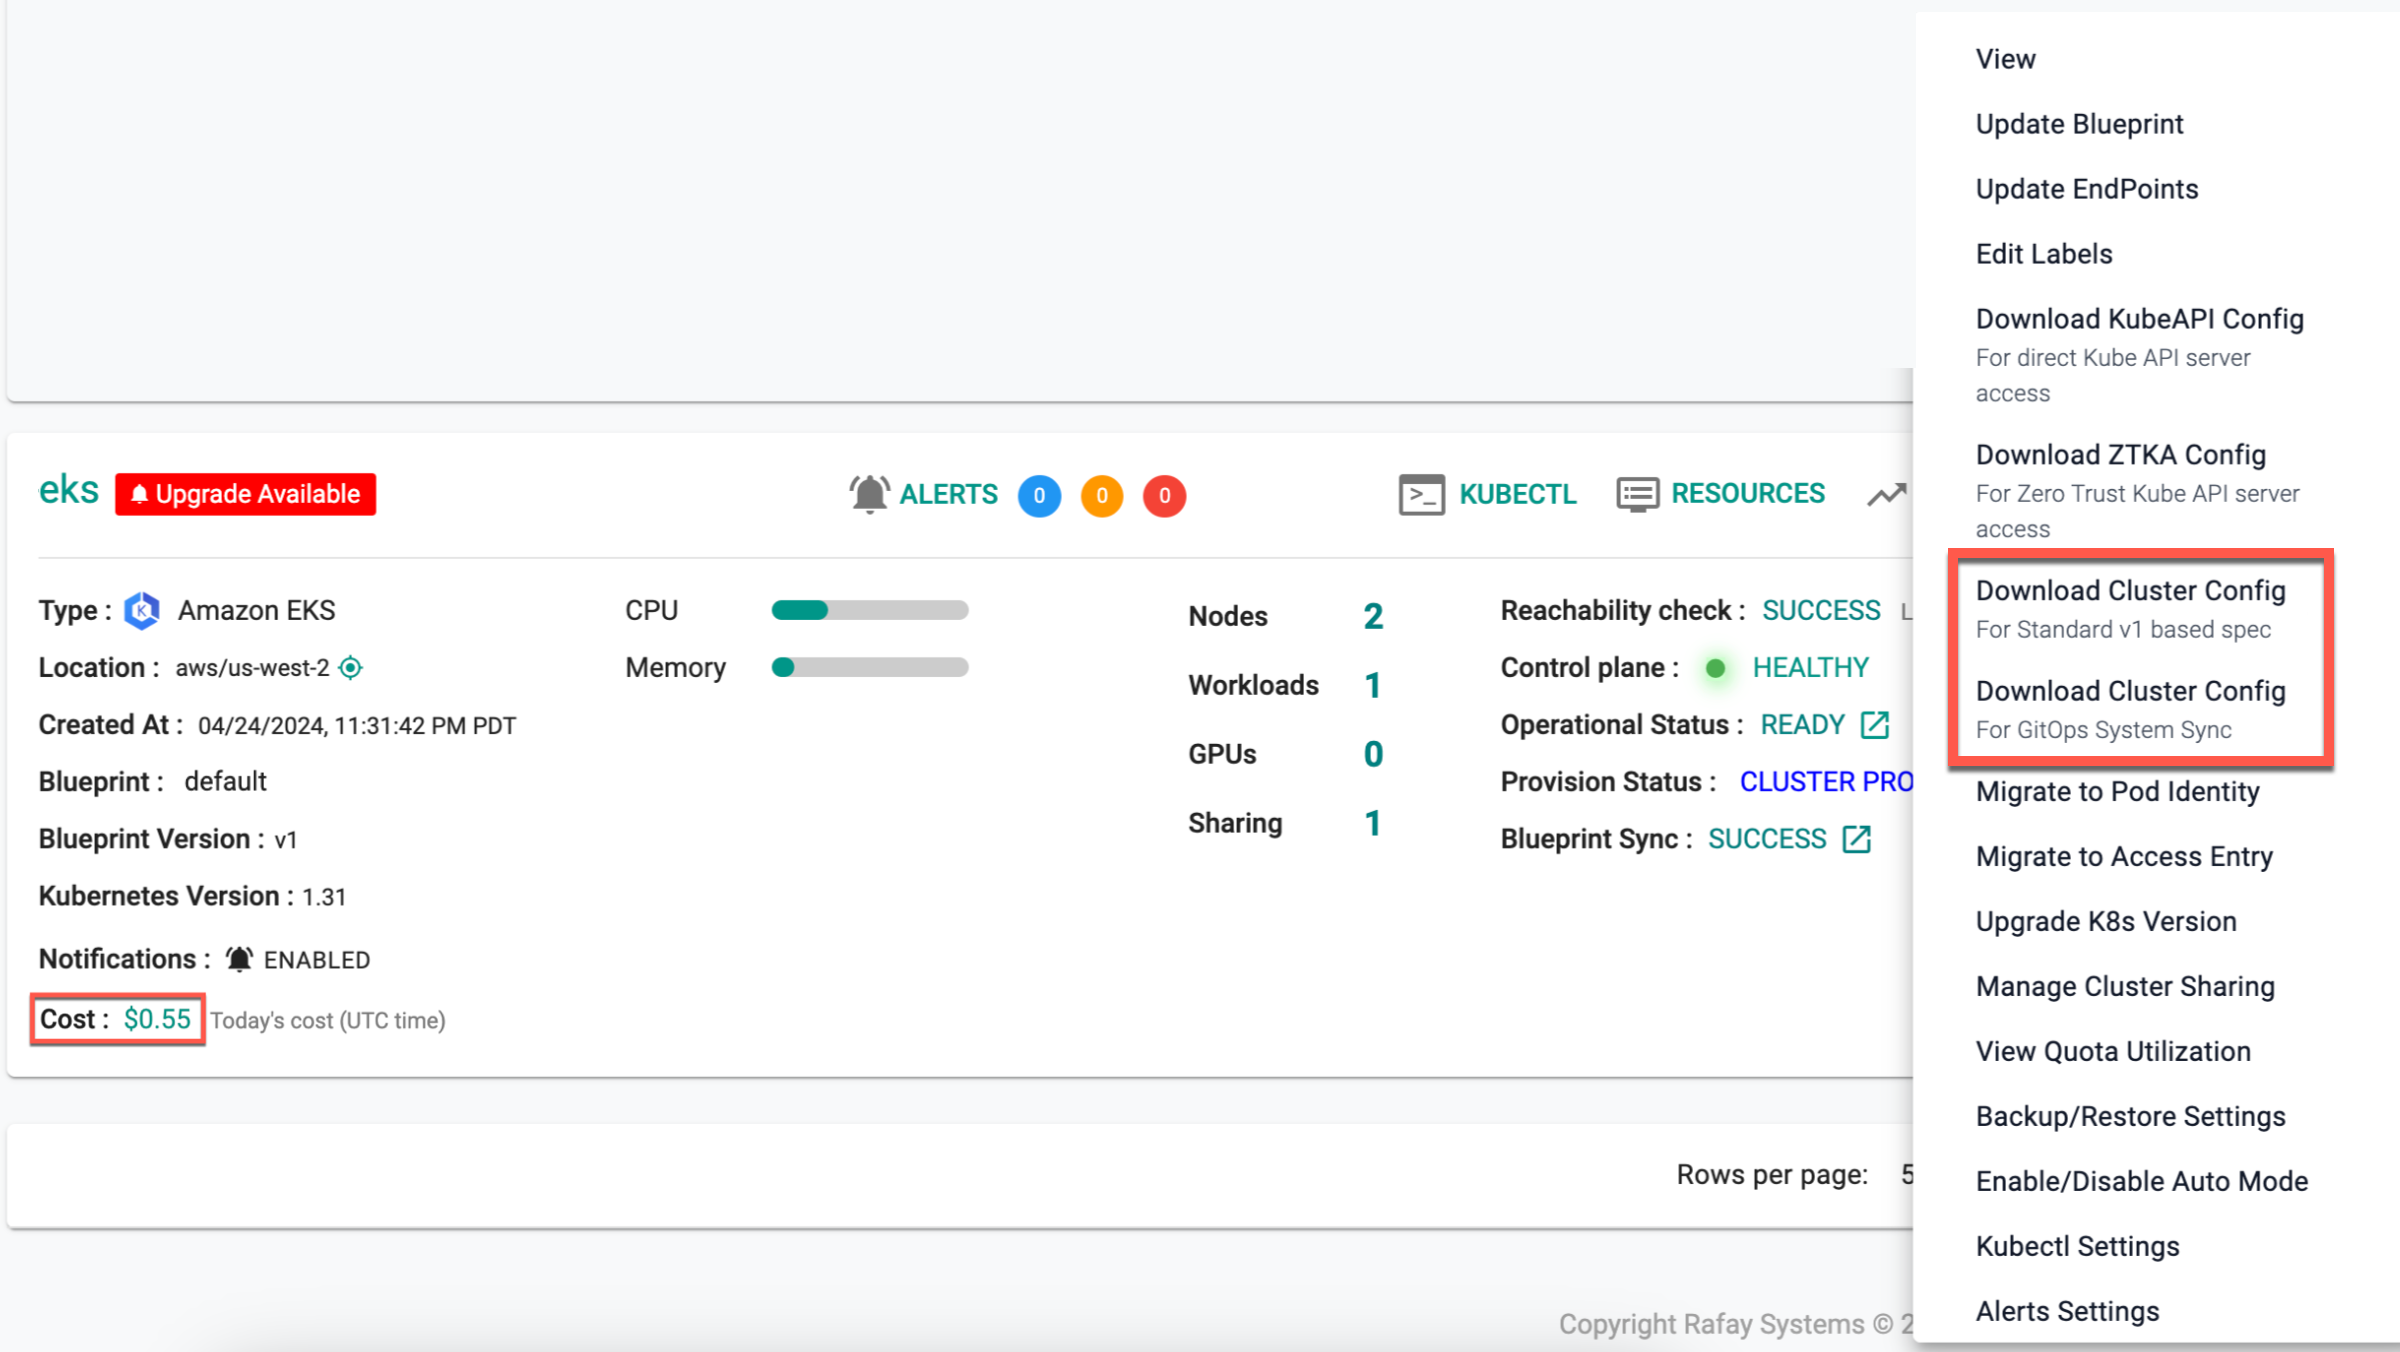
To view the cost details of this cluster, click on the available cost link. This will navigate you to the Cost Explorer page, where you can access detailed cost information for this specific cluster.
Failed Provisioning
Cluster provisioning can fail if the user had misconfigured the cluster configuration (e.g. wrong cloud credentials) or encountered soft limits in their AWS account for resources. When this occurs, the user is presented with an intuitive error message. Users are allowed to edit the configuration and retry provisioning.
Refer Troubleshooting to know more about the failed scenarios
Provision Status Troubleshooting
In some cases, the Provision Status may show as "failed" even though the cluster is actually up and running in the backend, all pods are operational, and you can interact with the cluster normally. This is typically a status synchronization issue between the Controller and the actual cluster state.
To resolve this and reconcile the Provision Status back to "CLUSTER PROVISION COMPLETE":
- Go to the cluster settings (gear icon)
- Click on Update Endpoint Access
- Do not change any settings - just click Yes to confirm
- This will trigger a reconciliation process that should restore the correct Provision Status
This approach is useful when the cluster infrastructure is healthy but the Controller's status tracking needs to be refreshed.
Automated Provisioning
Users can also fully automate the entire cluster provisioning process without any form of inbound access to their VPC. They can create and manage version controlled EKS Cluster Specs in their Git repos and use it to declaratively provision clusters using their existing pipelines in platforms such as Jenkins.
Jenkins pipeline examples and EKS Cluster specs are available in this public Git repo. An illustrative workflow is shown below.
