Provision
Cloud Credentials
The controller needs to be configured with credentials in order to programmatically create and configure required AKS infrastructure on Azure in your account. These credentials securely managed as part of a cloud credential in the Controller.
The creation of a cloud credential is a "One Time" task. It can then be used to create clusters in the future when required. Please review Microsoft AKS Credentials for additional instructions on how to configure this.
Important
To guarantee complete isolation across Projects (e.g. BUs, teams, environments etc.,), cloud credentials are associated with a specific project. These can be shared with other projects if necessary.
Self Service Wizard
This approach is ideal for users that need to quickly provision and manage AKS clusters without having to become experts in Microsoft AKS tooling, best practices and writing bespoke Infrastructure as Code (IaC).
The wizard prompts the user to provide critical cluster configuration details organized into logical sections:
- General (mandatory)
- Cluster Settings
- Node Pool Settings
- Advanced
Only the General section is mandatory. Out of box details are provided for the remaining sections.
Create Cluster
- Click Clusters on the left panel and the Clusters page appears
- Click New Cluster
- Select Create a New Cluster and click Continue
- Select the Environment Public Cloud
- Select the Cloud Provider Azure
- Select the Kubernetes Distribution Azure AKS
- Provide a cluster name and click Continue
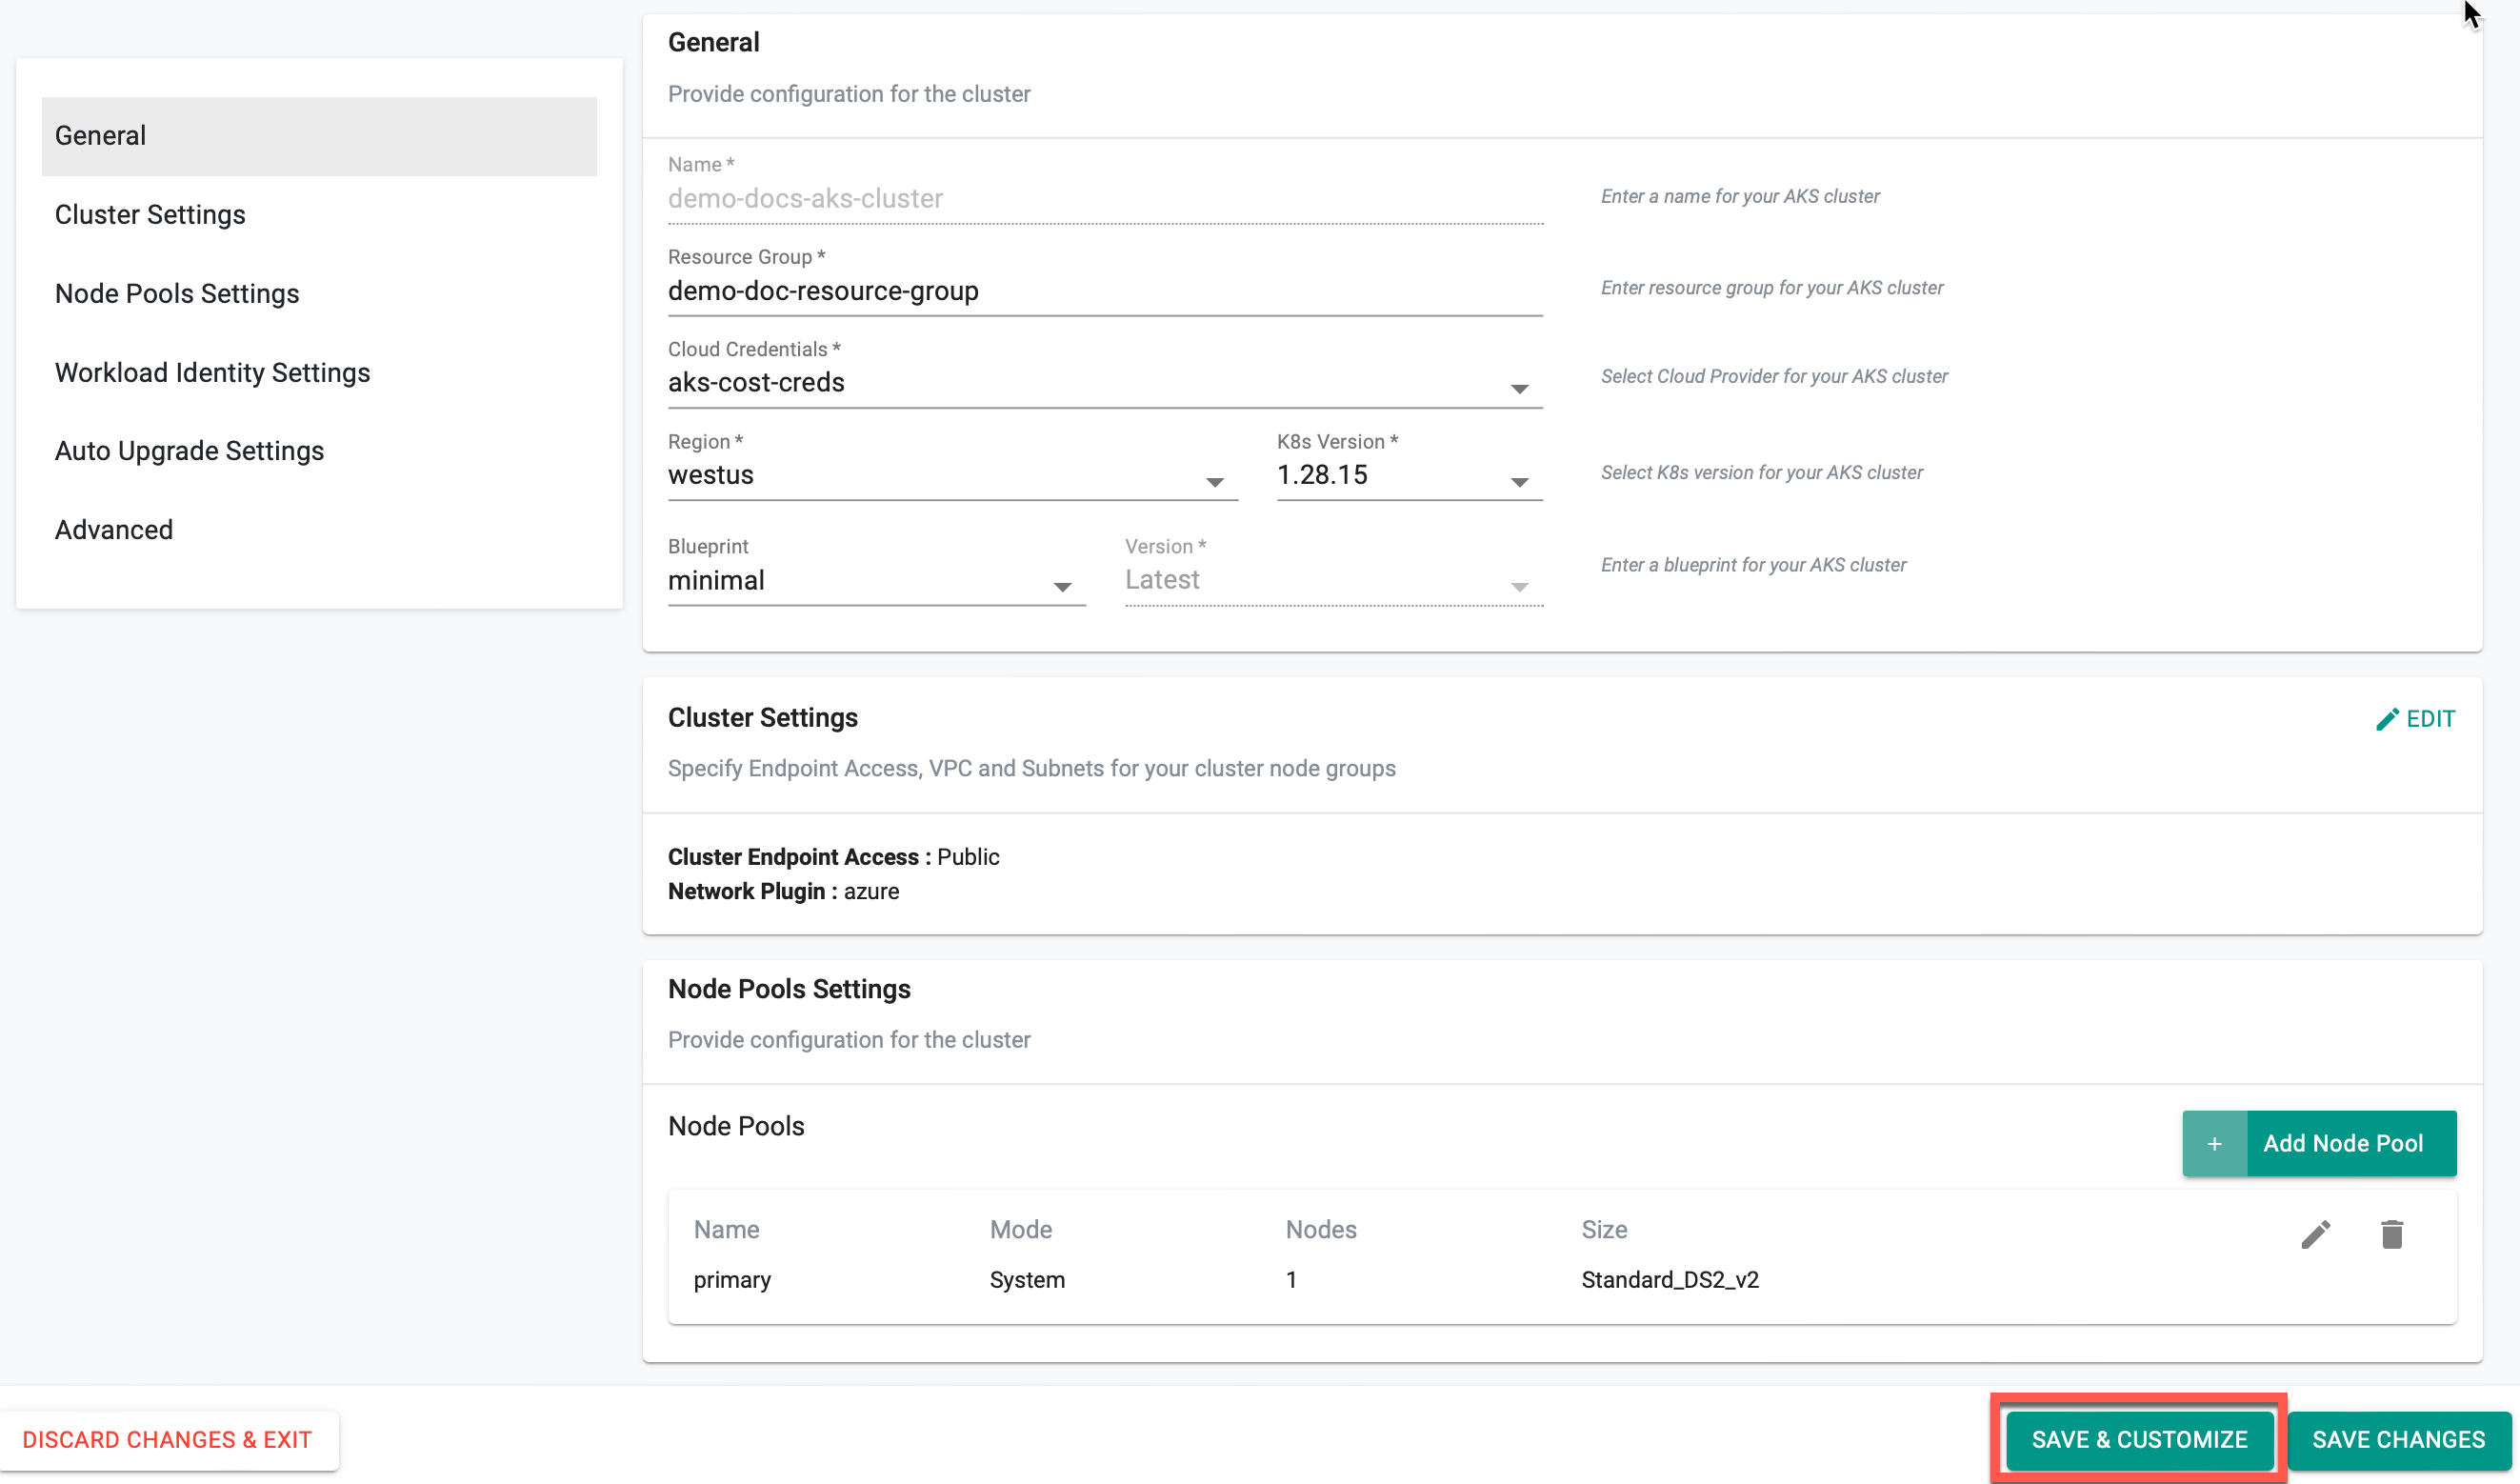
General (Mandatory)
General section is mandatory to create a cluster
- Enter the Resource Group for the AKS cluster
- Select the Cloud Credential from the drop-down created with Azure credentials
- Select a region and version
- Select a Blueprint and version. The default-aks is the system default blueprint available for all the AKS clusters to use by the roles Org Admin, Infra Admin and Cluster Admin. Customized blueprint can also be selected from the drop-down if required
- Click SAVE & CUSTOMIZE to customize the cluster configuration or SAVE CHANGES to proceed with the cluster provisioning

Cluster Settings (Optional)
Cluster Settings allows to customize the network settings. Click Edit next to Cluster Settings section
Network Configuration
By default, Network Configuration is set to Kubenet. Selecting Kubenet network automatically creates Virtual Network (VNet) for the clusters with default values.
Enable Overlay Option
- Users who do not require a new network and wish to utilize the existing one can choose Azure CNI. This option allows for the configuration of parameters such as Enable Overlay, specifying the existing Virtual Network Name, Cluster Subnet Name, IP address range, VNet Resource Group Name, etc. If Overlay is enabled, the Pod CIDR must be provided.
Users can utilize Azure CNI Overlay as an alternative networking solution to address challenges in traditional Azure CNI. This feature assigns IP addresses to pods from a separate CIDR range, improving scalability and optimizing address utilization. The 'podCIDR' field allows users to specify the IP range for pod IPs when using kubenet, enabling efficient IP address management and scalability to meet application demands. Refer Azure CNI Overlay for more information

Cluster Endpoint Access
Below are the different cluster endpoints:
Private cluster uses an internal IP address to ensure that network traffic between the API server and node pools remains on a private network only
Public cluster endpoints is accessible from external network (public network). Selecting Public enables the Authorized IP Ranges field providing cluster access to a specific IP address. Multiple IP ranges are allowed
Network Policy
Network Policies allows to define rules for ingress and egress traffic between pods in a cluster, improving you cluster security by restricting access to certain pods. Choose one of the three options, None, Calico and Azure for the cluster. Network policies are applicable only to Linux node pools
- Select SKU Tier Premium to enable a financially backed, higher SLA for the AKS clusters or Free, if not required
Important
- After the release of API version 2023-02-01, SKU Tier Paid is deprecated in favor of Premium. For older clusters, the previously configured Tier will remain visible in the configuration specifications.
- After the release of API version 2023-02-01, the dockerBridgeCIDR setting in network configurations of managedClusters is deprecated. For older clusters, the previously configured dockerBridgeCIDR will remain visible in the configuration specifications.
Authentication and Authorization
Authentication and Authorization allows the users to select from three (3) options for managing user identities and access permissions within the Kubernetes environment:
- Using local accounts with native Kubernetes RBAC
- Integrating Azure Active Directory (AD) for authentication with Kubernetes RBAC
- Leveraging Azure AD authentication with Azure RBAC
Users Assigned Identity
Provide the User Assigned Identity required by the AKS control plane to manage cluster resources. This identity serves as an authentication mechanism for the control plane to interact with Azure services
Kubelet Identity
Provide the kubelet identity to authenticate with external resources, such as Azure Container Registry (ACR), enabling the kubelet to securely pull images required for running containers within the Kubernetes cluster. Refer this page for more information on Kubelet Identity
ACR Settings
Click on + Add Azure Registry and enter the ACR Name and Resource Group name. This action enables the controller to interface with the Azure Container Registry, facilitating the retrieval of stored container images from the existing Azure Container Registry Service. Users can add multiple ACRs for a cluster
Important
Effective May 1, 2023, Microsoft has removed all Windows Server 2019 Docker images from the registry. Consequently, the Docker container runtime for Windows node pools has been retired. Although existing deployed nodepool will continue to function, scaling operations on existing windows nodepools are no longer supported. To maintain ongoing support and address this issue, it is recommended to create new node pools based on Windows instead of attempting to scale the existing ones.
For more information, you can refer to the AKS release notes.
Node Pools Settings (Optional)
A primary node pool is created by default when creating a cluster. It is mandatory to have one primary node pool for a cluster. To perform any changes to the existing node, click Edit. Primary node should always have the System Mode and Linux OS Type.

Secondary Node Pool
Click Add Node Pool to add secondary node and provide the required details.
Important
If Kubenet is selected as the Network Configuration under Cluster Settings, Azure do not support Windows OS Type for the secondary node pool. If Azure CNI is selected as the Network Configuration under Cluster Settings, Azure allows both Linux and Windows OS type for the User Mode.
Linux Node Pools
- Provide a Node Pool name
- Select Mode User and OS Type Linux
- Provide the required details
Spot Price
Enable Spot Price allows the user to set a price for the require instances. Based on the availability of the instances for the provided bid price, users can make use of the instances for the clusters at a significant cost savings. This check-box is enabled only for the combination of User Mode and Linux OS Type.
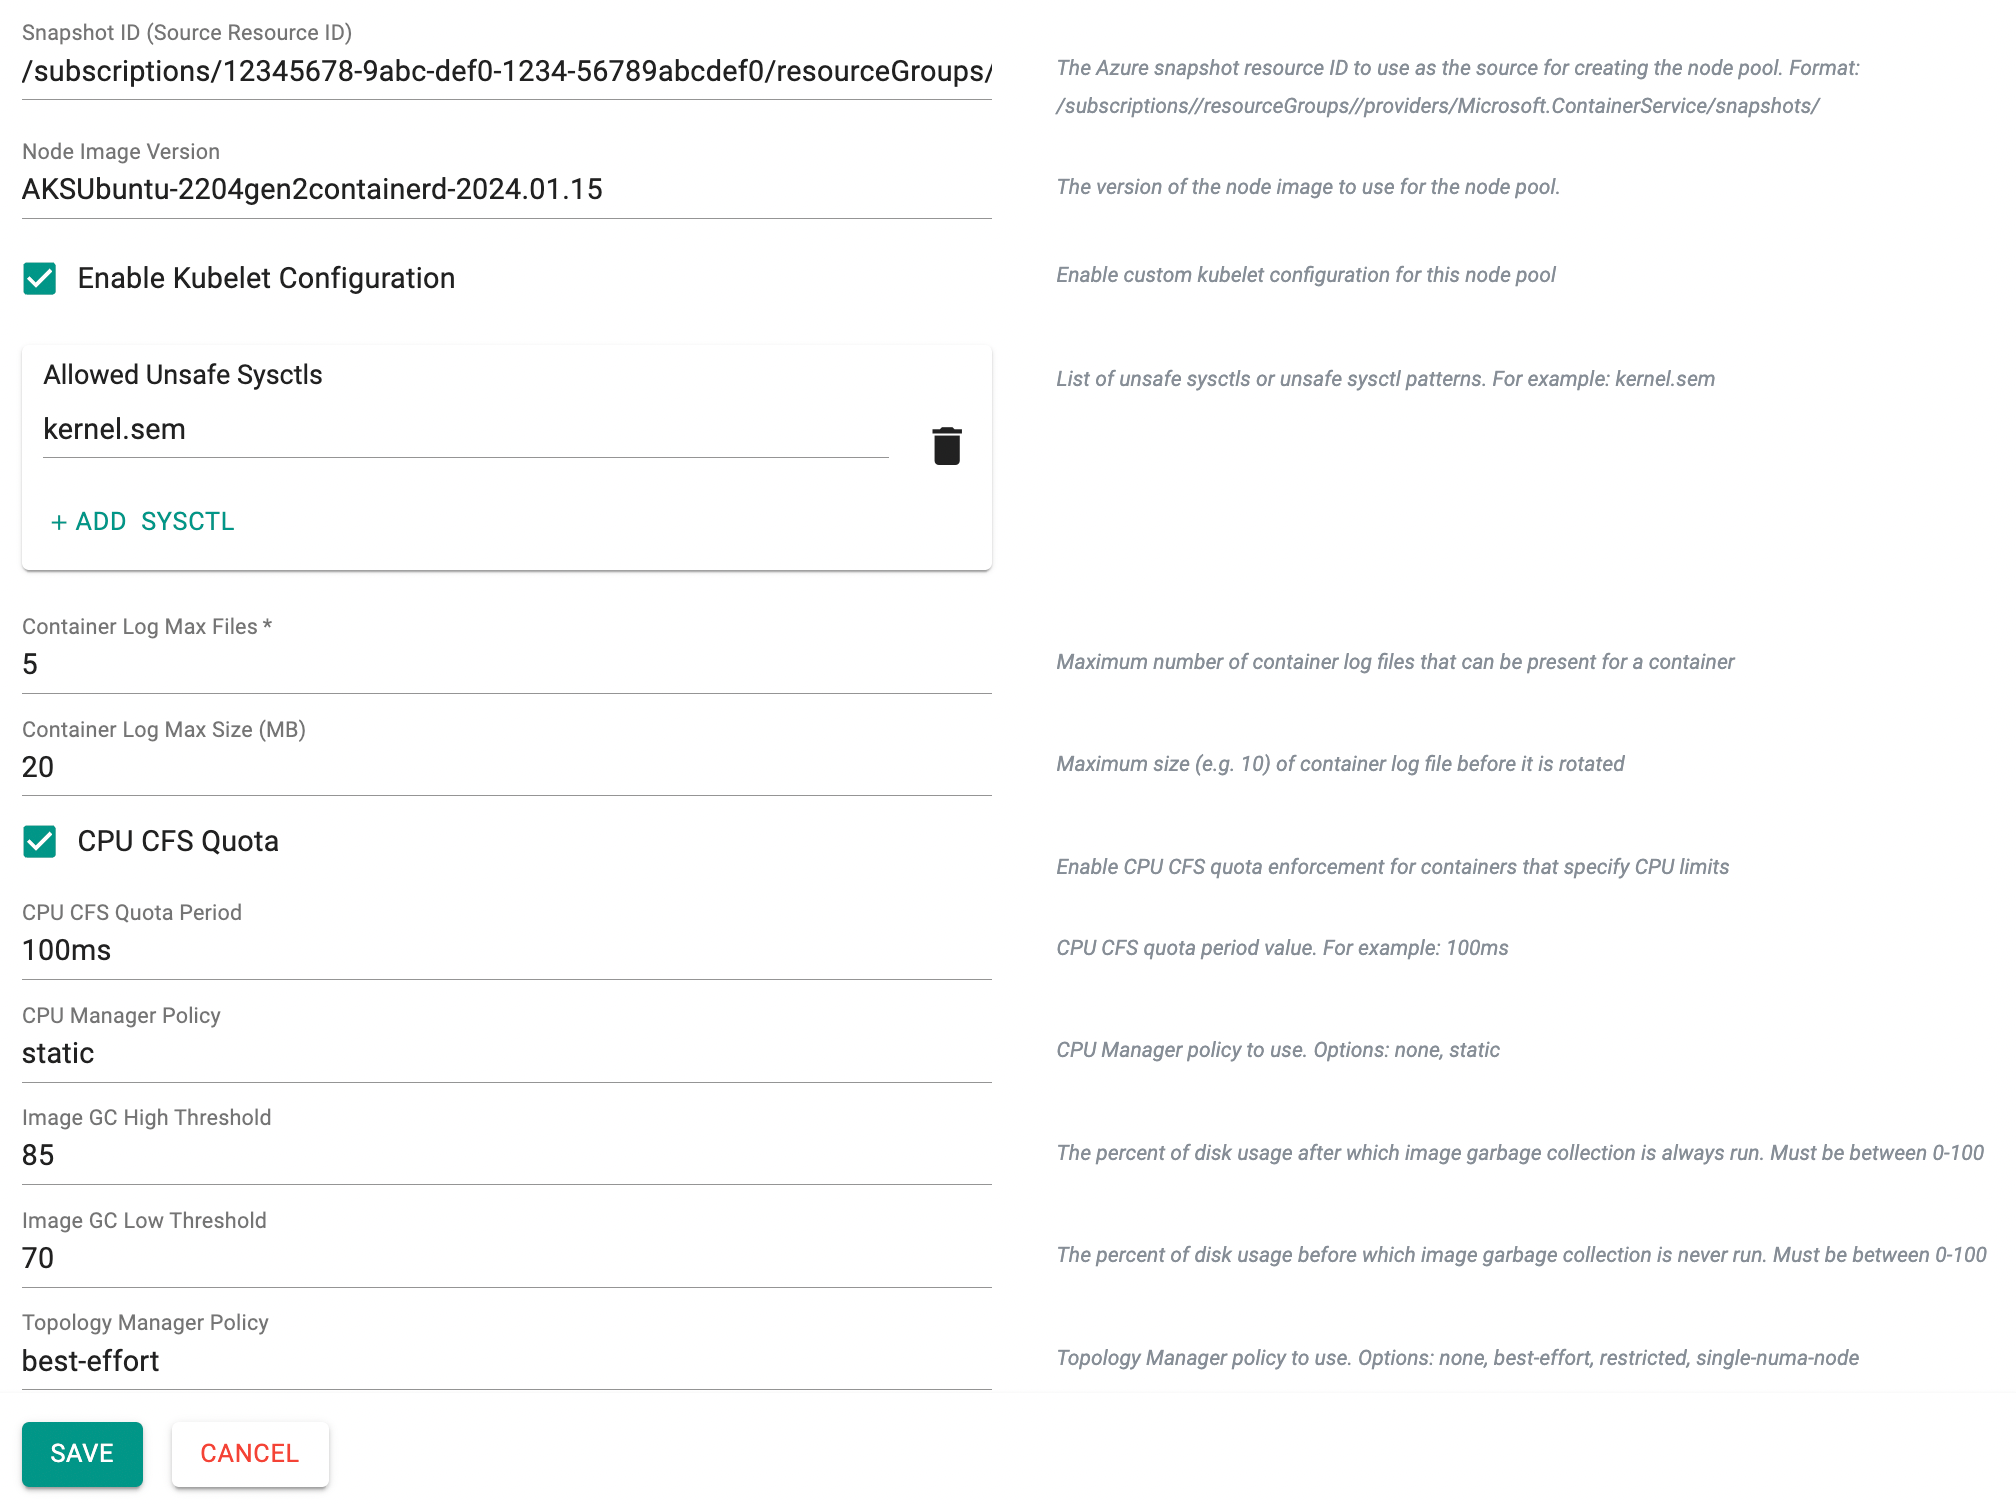
Snapshot ID (Source Resource ID)
Snapshot ID (Source Resource ID) allows the use of an existing Azure snapshot as the source image for creating the node pool. When specified, the node pool is provisioned using the provided snapshot instead of the default AKS node image.
Provide the snapshot resource ID in the following format:
/subscriptions/<subscription-id>/resourceGroups/<resource-group-name>/providers/Microsoft.ContainerService/snapshots/<snapshot-name>
The snapshot must be compatible with the selected Kubernetes version and node configuration.
Node Image Version
Node Image Version allows specification of the exact OS image version to be used for the node pool. When set, the node pool is created with the specified image version instead of the default image automatically selected by AKS.
If not specified, the default node image version associated with the selected Kubernetes version is used. The provided image version must be valid and available in the selected region.
Enable Kubelet Configuration
Enable Kubelet Configuration allows custom kubelet parameters to be configured for the node pool. When enabled, the following options are available:
| Field | Description |
|---|---|
| Allowed Unsafe Sysctls | Specifies unsafe sysctl parameters or sysctl patterns that can be set by pods on the node. Multiple sysctls can be added as required. |
| Container Log Max Files | Defines the maximum number of rotated container log files that can be retained per container. |
| Container Log Max Size (MB) | Specifies the maximum size (in MB) of a container log file before it is rotated. |
| CPU CFS Quota | Enables CPU Completely Fair Scheduler (CFS) quota enforcement for containers that specify CPU limits. |
| CPU CFS Quota Period | Specifies the duration of the CFS quota period (for example, 100ms). Applies when CPU CFS quota is enabled. |
| CPU Manager Policy | Defines the CPU manager policy for the node. Supported options: none, static. |
| Image GC High Threshold | Specifies the disk usage percentage at which image garbage collection is always triggered. Must be between 0 and 100. |
| Image GC Low Threshold | Specifies the disk usage percentage below which image garbage collection is not triggered. Must be between 0 and 100. |
| Topology Manager Policy | Defines the topology manager policy for resource allocation. Supported options: none, best-effort, restricted, single-numa-node. |
Windows Node Pools
Azure AKS supports Windows Nodes that allow running Windows containers.
Pre-Requisites
- Choose Azure CNI as the network configuration in the Cluster Settings section.
- Ensure the existence of the primary system node pool
Add Windows Node Pool
- Provide a Node Pool name
- Select Mode User and OS Type Windows
- Provide the required details
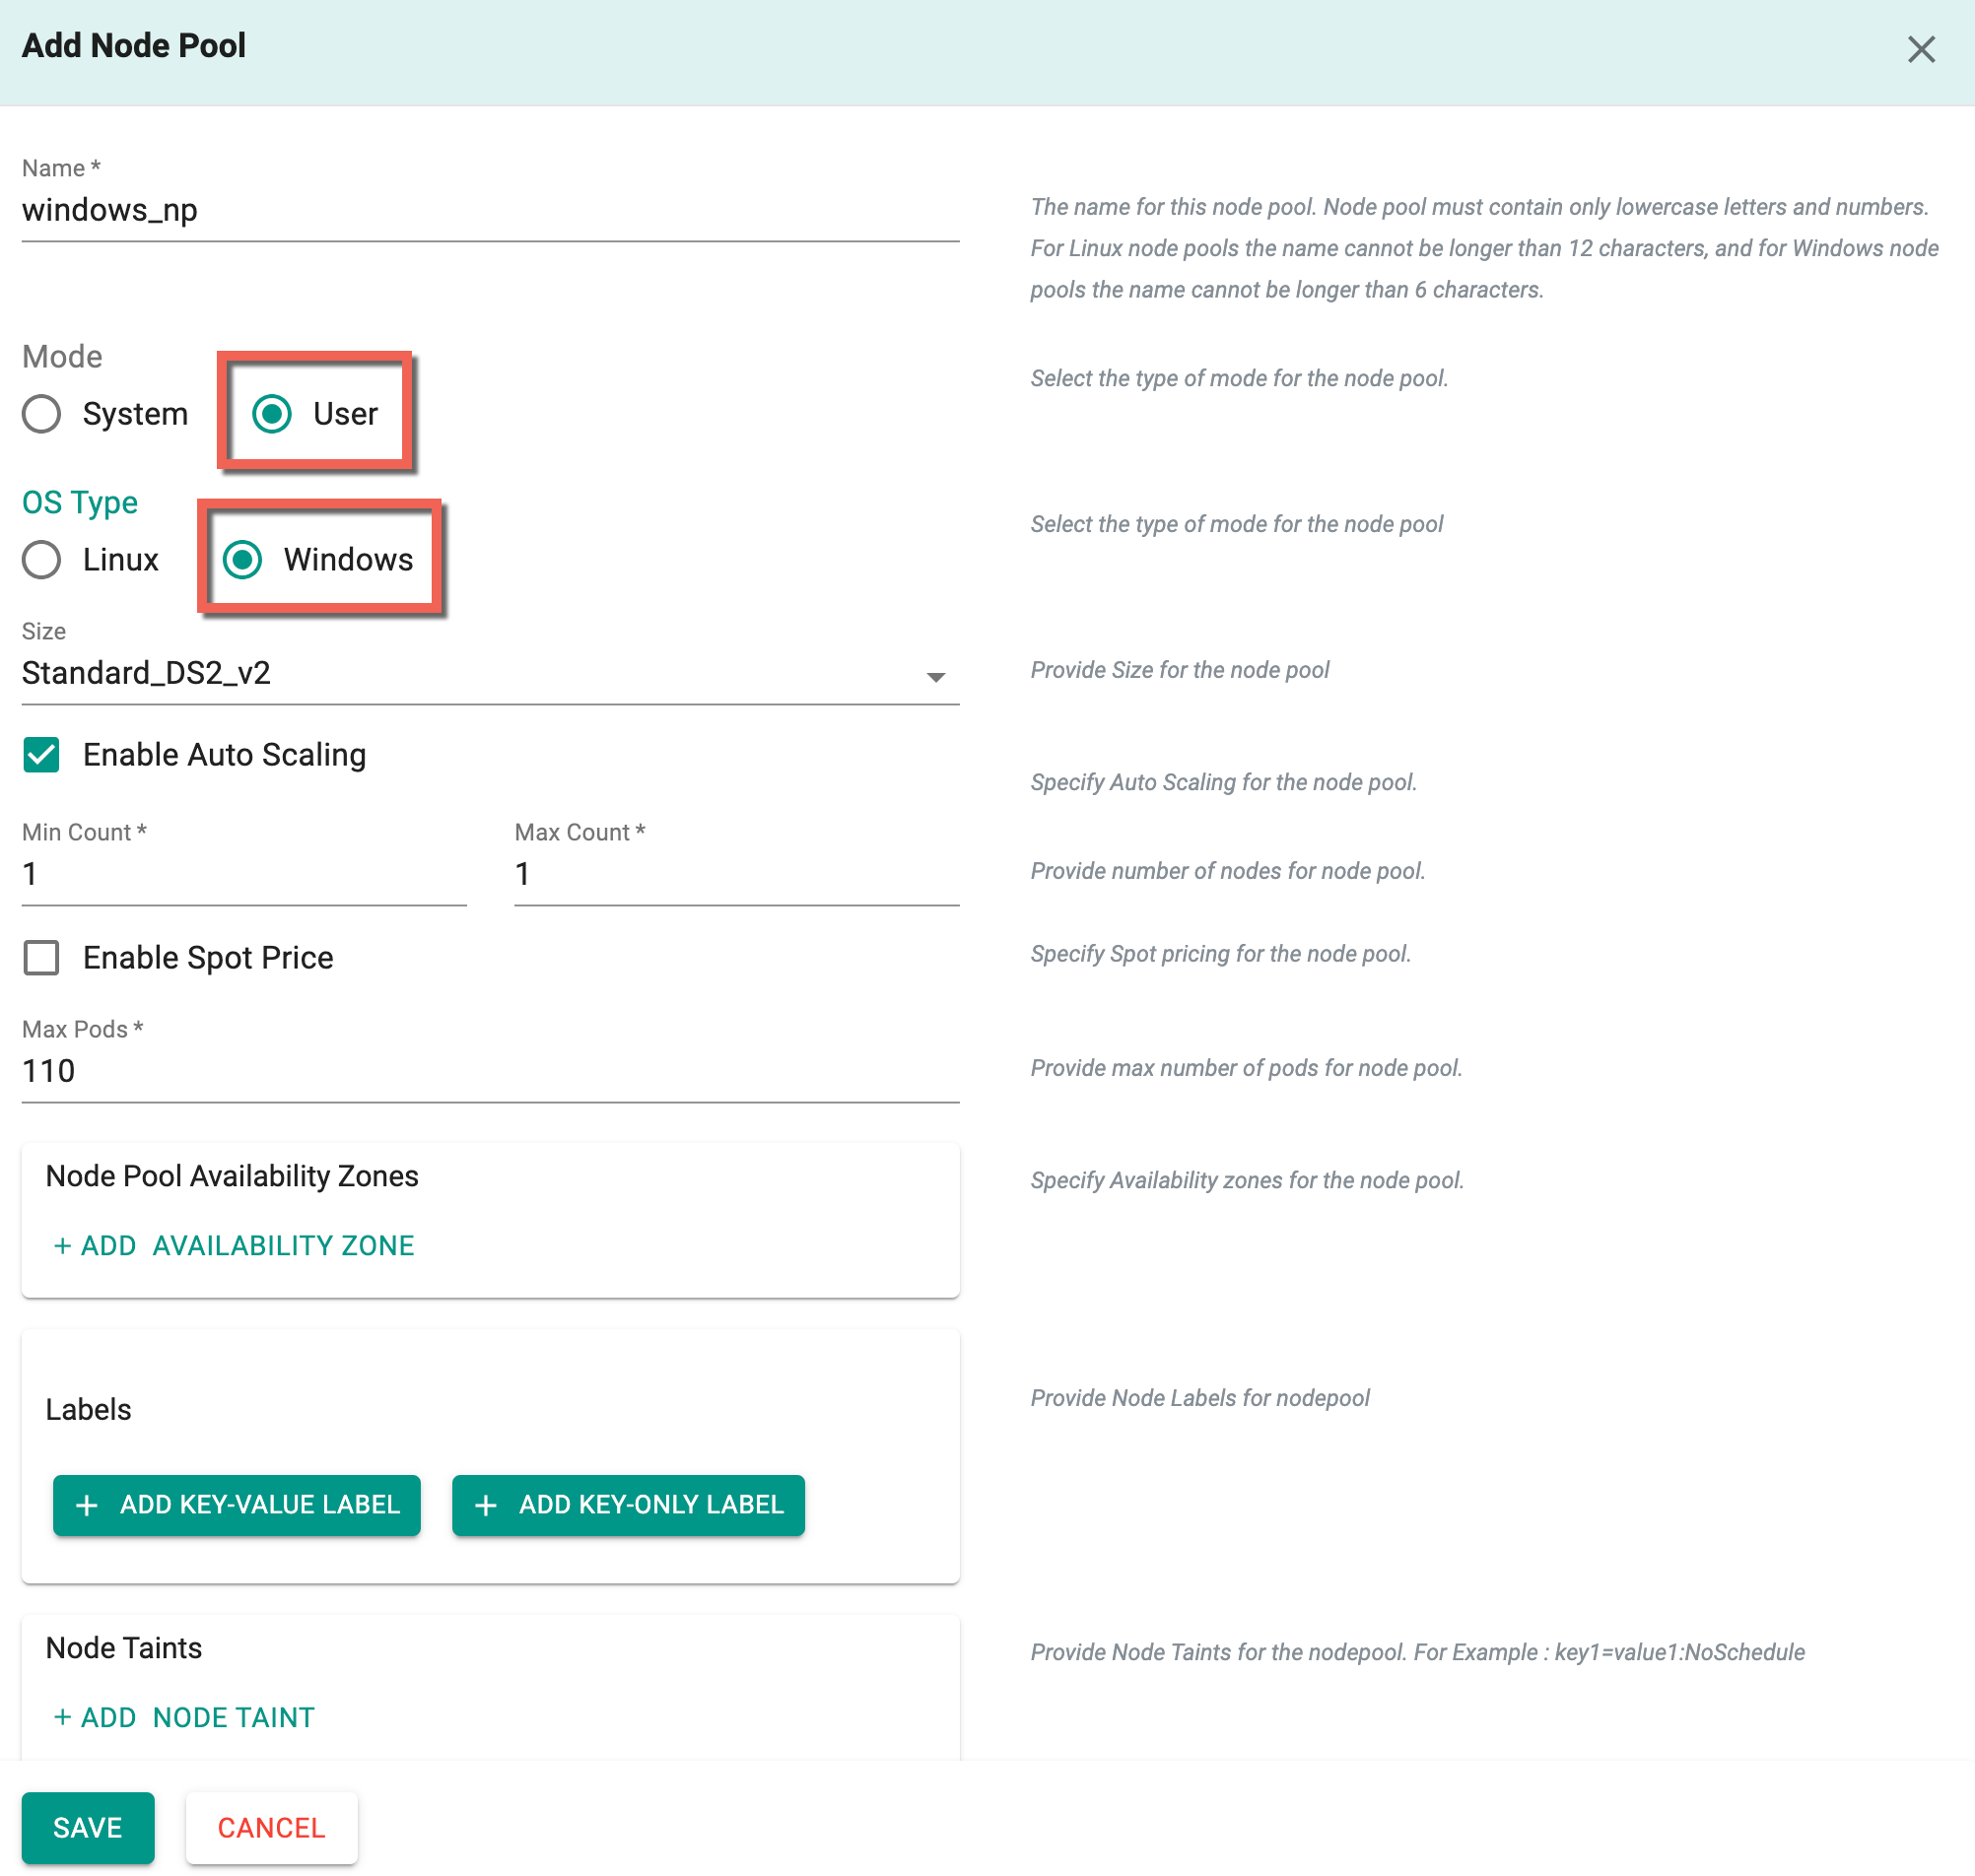
Click Save
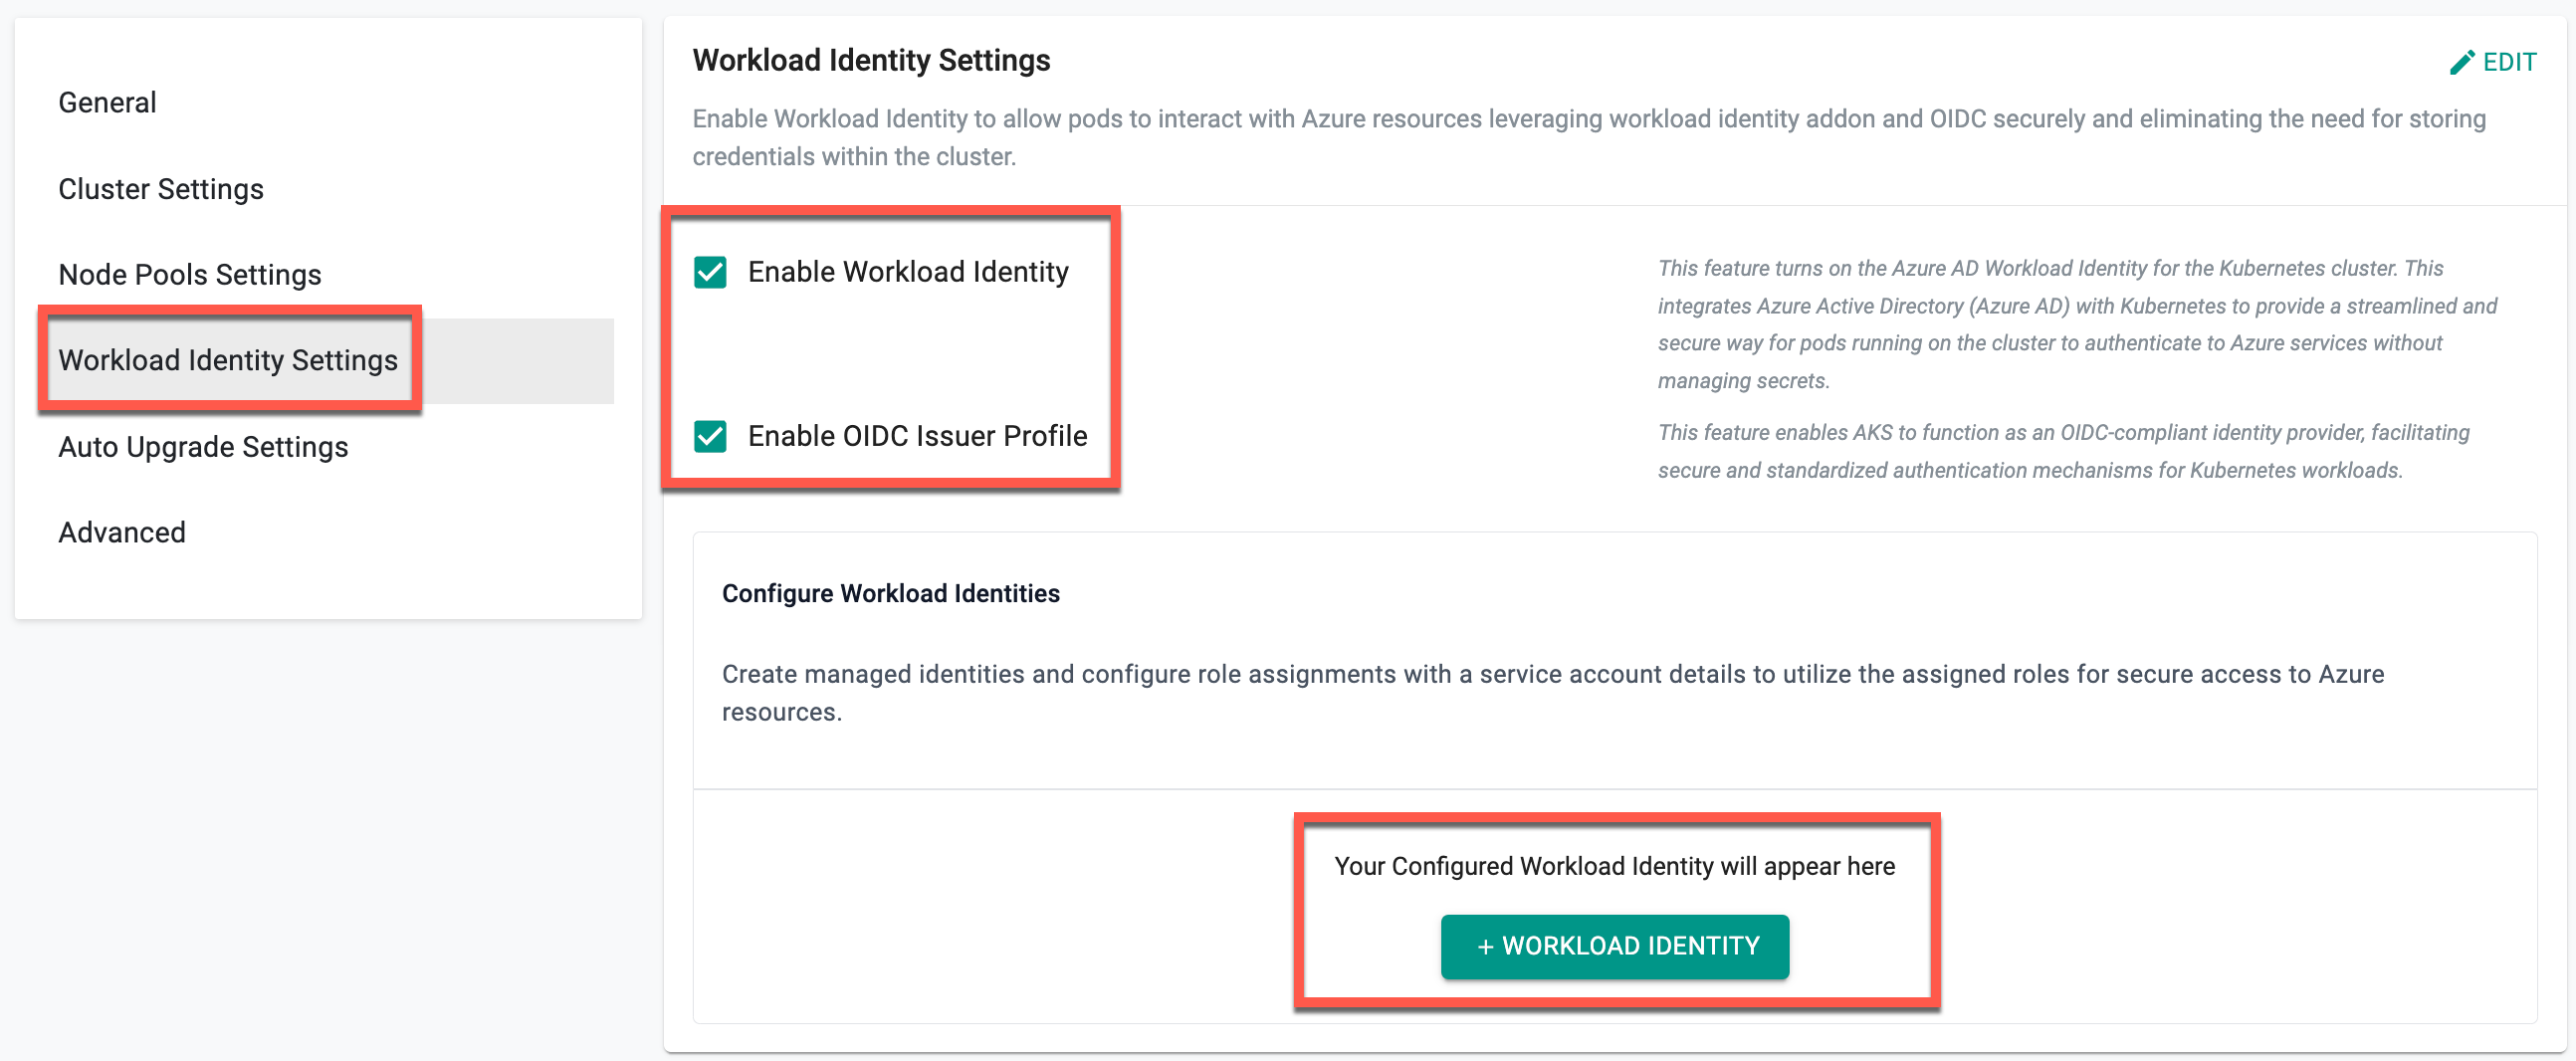
Workload Identity Settings
On the Workload Identity Settings section, users can enable the Workload Identity and OIDC Issuer Profile to securely integrate Kubernetes pods with Azure services. Once both options are enabled, users can add workload identities by creating managed identities, assigning roles, and associating service account details for secure access to Azure resources. For more information, refer to the Workload Identity documentation.
Auto Upgrade Settings
Auto Upgrade Via UI - Coming Soon
The Auto Upgrade Settings allows you to configure and manage automatic upgrades for both Kubernetes clusters and node operating systems. Users can customize upgrade channels and scheduling to align updates with the operational needs while ensuring stability and reliability.
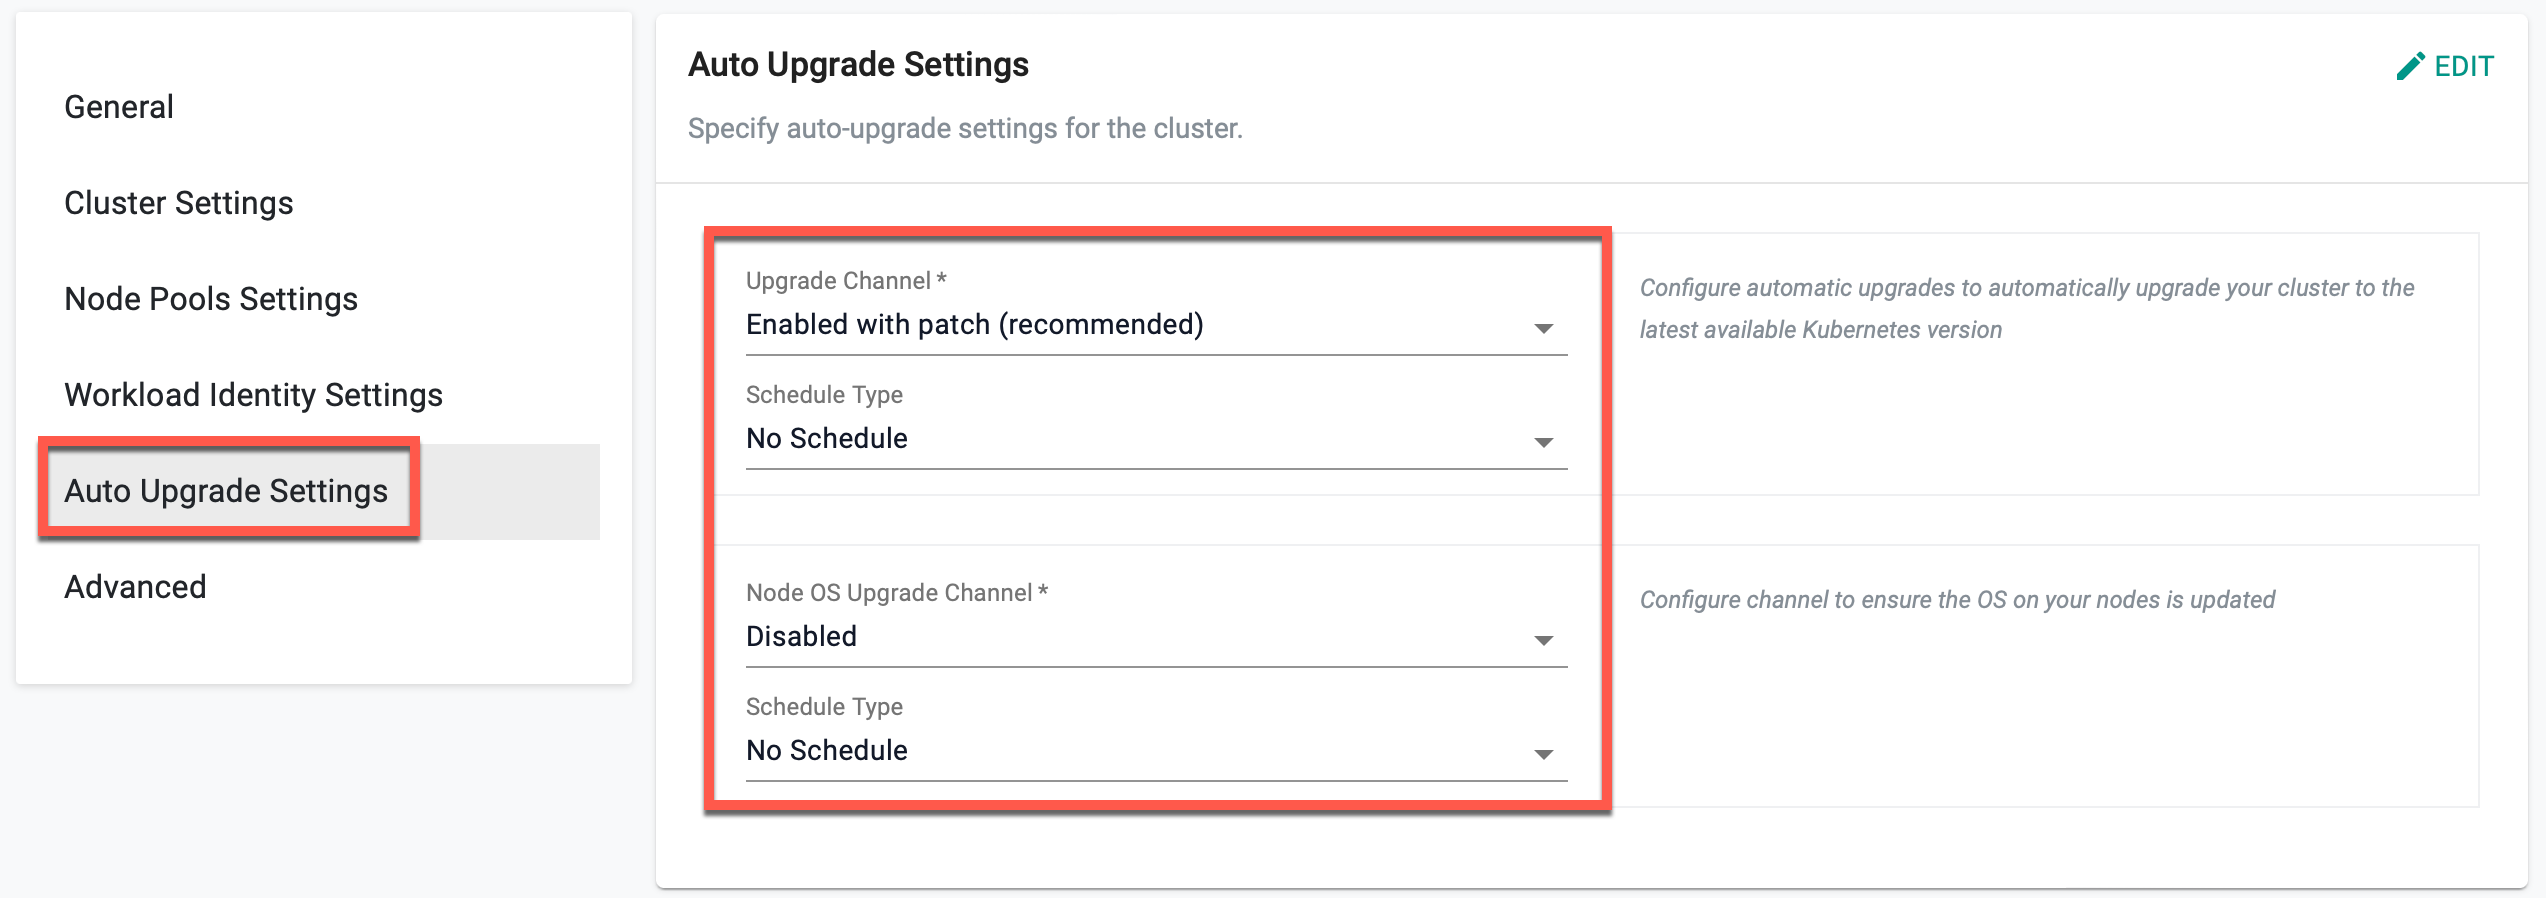
⚙️ Note: By default, the Upgrade Channel is set to Disabled, and the Schedule Type is set to No Schedule for both Cluster and Node OS Upgrades, ensuring updates occur only when manually configured.
For more information, refer to the Auto Upgrade documentation.
Advanced Settings (Optional)
The Advanced Settings section provides configuration options for proxy settings and system component placement within the cluster. These settings allow users to define network connectivity through a proxy and control how Kubernetes components are scheduled across nodes based on taints, tolerations, and node selectors.
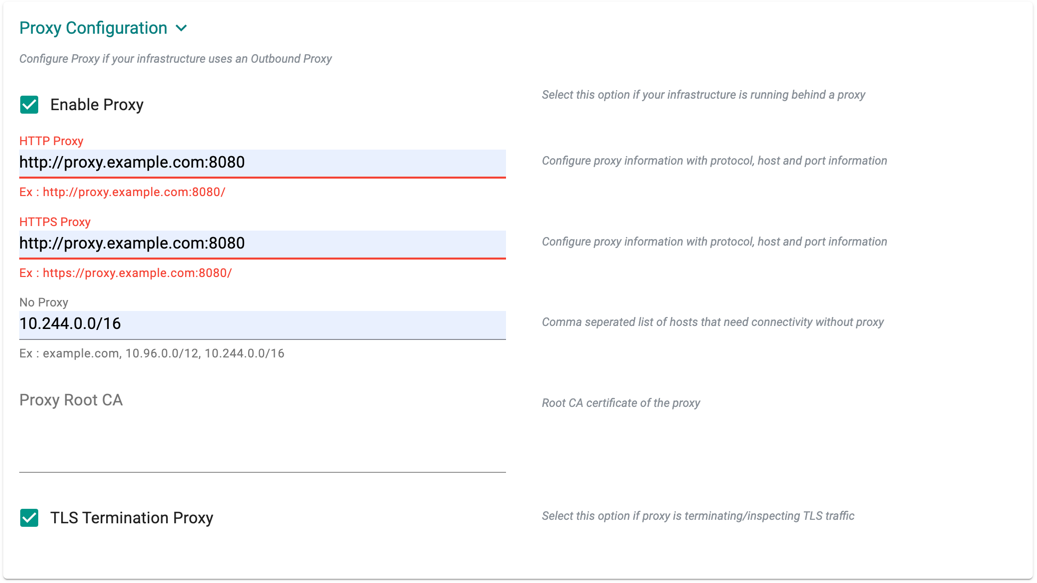
Proxy Configuration
- Select Enable Proxy if the cluster is behind a forward proxy.
- Configure the http proxy with the proxy information (ex: http://proxy.example.com:8080)
- Configure the https proxy with the proxy information (ex: https://proxy.example.com:8080)
- Configure No Proxy with Comma separated list of hosts that need connectivity without proxy. Kubernetes Service IP (from the default namespace) has to be included
- Configure the Root CA certificate of the proxy if proxy is terminating non MTLS traffic
- Enable TLS Termination Proxy if proxy is terminating non MTLS traffic and it is not possible to provide the Root CA certificate of the proxy
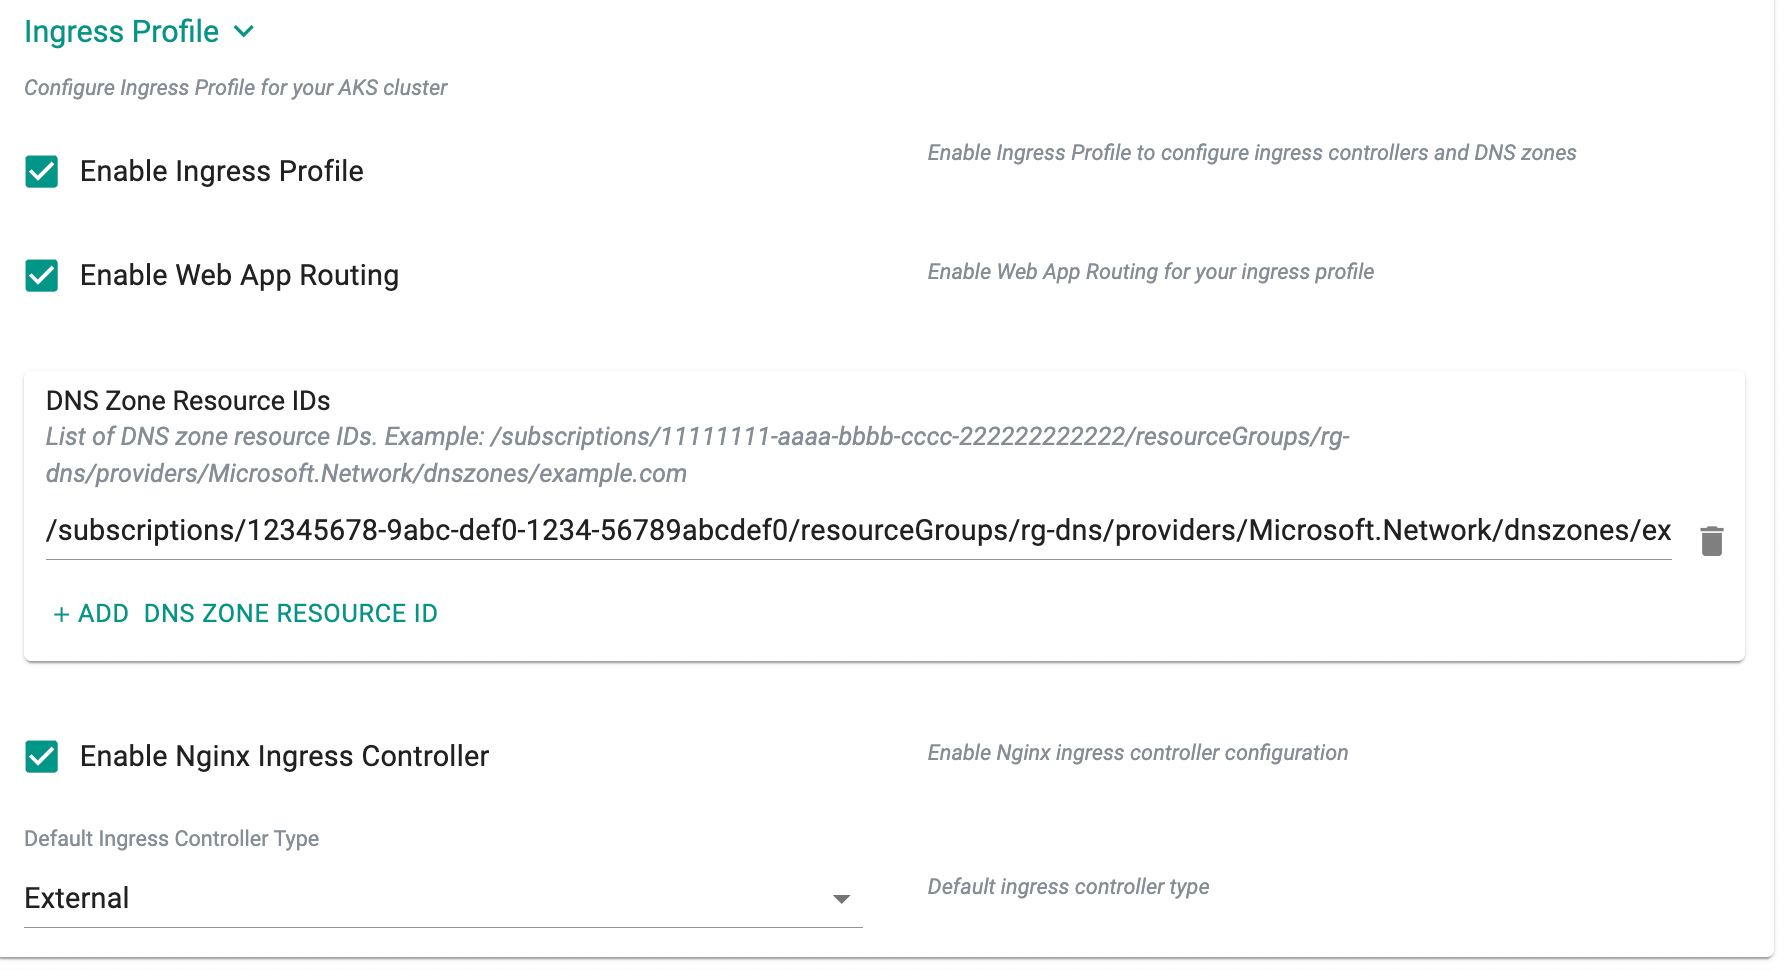
Ingress Profile
Ingress Profile allows configuration of ingress controllers and DNS zones for the AKS cluster. The available options are described below:
| Field | Description | Example Value |
|---|---|---|
| Enable Ingress Profile | Enables ingress profile configuration for the cluster. | Enabled |
| Enable Web App Routing | Enables Web App Routing add-on for simplified ingress and DNS management. | Enabled |
| DNS Zone Resource IDs | Specifies one or more Azure DNS zone resource IDs associated with the ingress profile. | /subscriptions/12345678-9abc-def0-1234-56789abcdef0/resourceGroups/rg-dns/providers/Microsoft.Network/dnszones/example.com |
| Enable Nginx Ingress Controller | Enables configuration of the NGINX ingress controller for the cluster. | Enabled |
| Default Ingress Controller Type (Visible only when Enable Nginx Ingress Controller is enabled) | Specifies how the NGINX ingress controller is exposed. Supported options: None, External, Internal, AnnotationControlled. |
External |
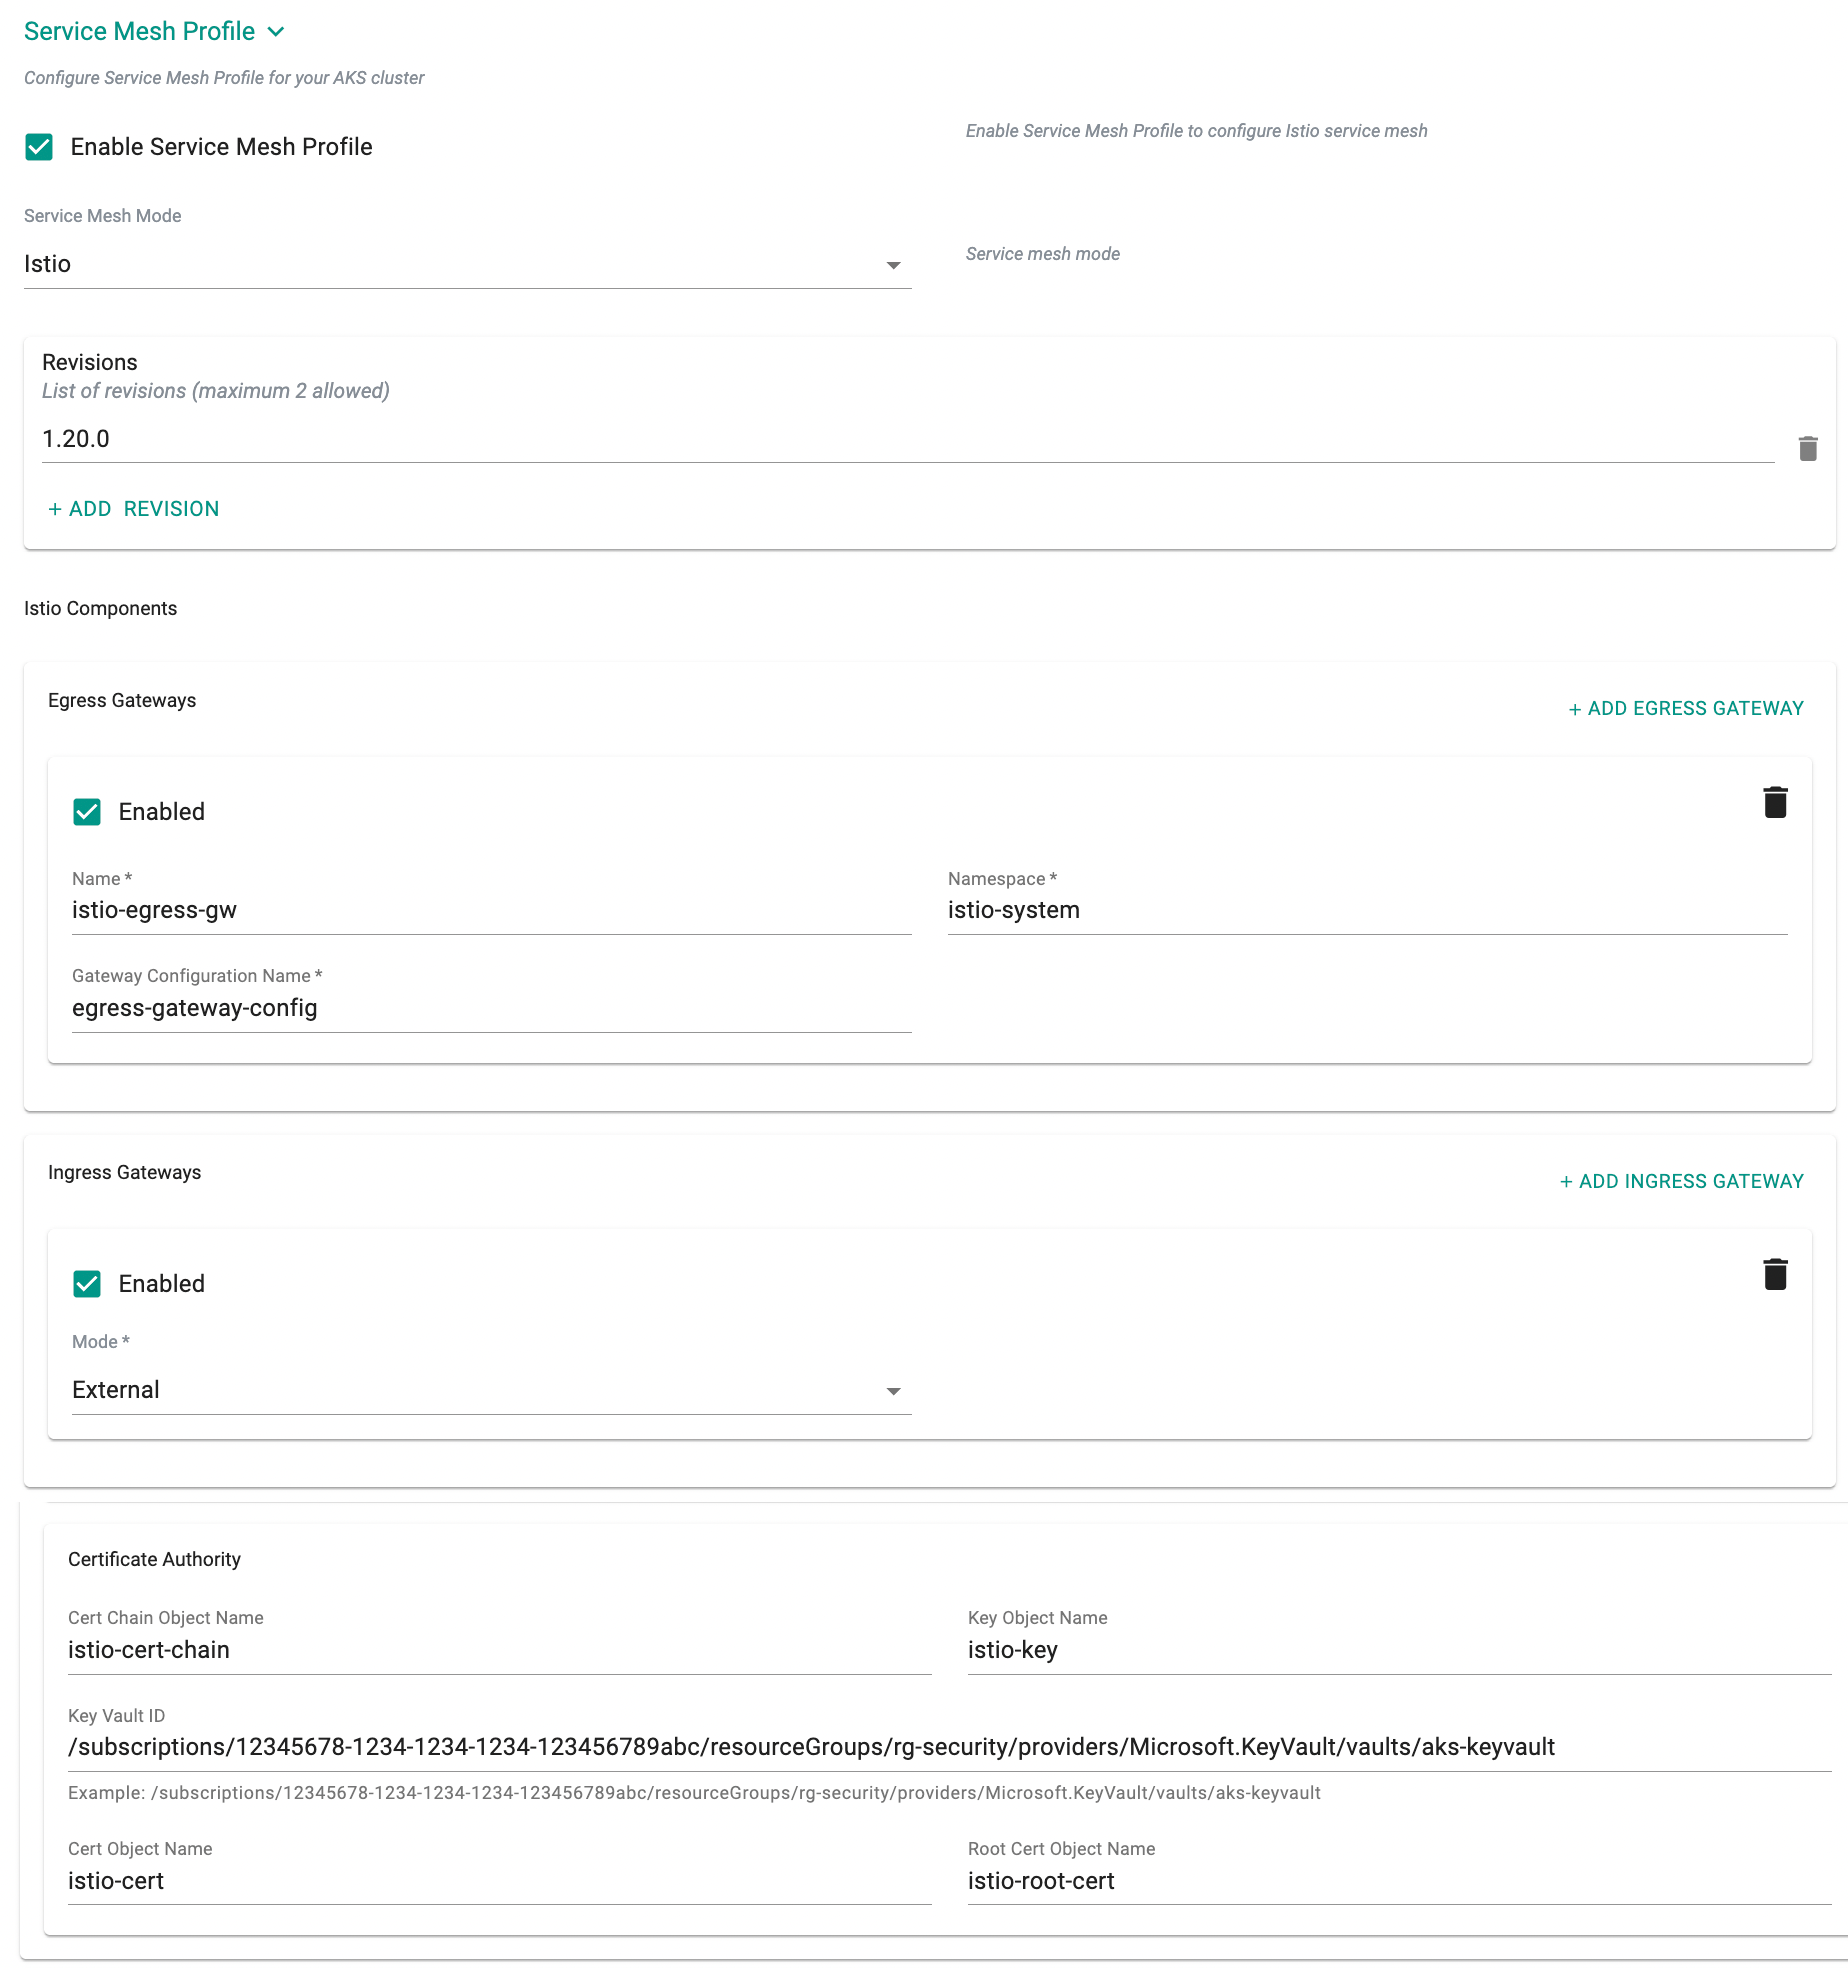
Service Mesh Profile
Service Mesh Profile allows configuration of Istio-based service mesh components for the AKS cluster. When enabled, the following options are available:
| Field | Description | Example Value |
|---|---|---|
| Enable Service Mesh Profile | Enables service mesh configuration for the cluster. | Enabled |
| Service Mesh Mode | Specifies the service mesh implementation. | Istio |
| Revisions | Specifies one or more Istio control plane revisions (maximum 2 allowed). | 1-20-0 |
| Egress Gateway – Enabled | Enables configuration of an egress gateway. | Enabled |
| Egress Gateway – Name | Specifies the name of the egress gateway. | istio-egress-gw |
| Egress Gateway – Namespace | Specifies the Kubernetes namespace where the egress gateway is deployed. | istio-system |
| Egress Gateway – Gateway Configuration Name | Specifies the gateway configuration resource name. | egress-gateway-config |
| Ingress Gateway – Enabled | Enables configuration of an ingress gateway. | Enabled |
| Ingress Gateway – Mode | Specifies the exposure mode of the ingress gateway. Supported options include External and Internal. |
External |
| Cert Chain Object Name | Specifies the certificate chain object name stored in Azure Key Vault. | istio-cert-chain |
| Key Object Name | Specifies the private key object name stored in Azure Key Vault. | istio-key |
| Key Vault ID | Specifies the Azure Key Vault resource ID containing the certificates. | /subscriptions/12345678-1234-1234-1234-123456789abc/resourceGroups/rg-security/providers/Microsoft.KeyVault/vaults/aks-keyvault |
| Cert Object Name | Specifies the certificate object name stored in Azure Key Vault. | istio-cert |
| Root Cert Object Name | Specifies the root certificate object name stored in Azure Key Vault. | istio-root-cert |
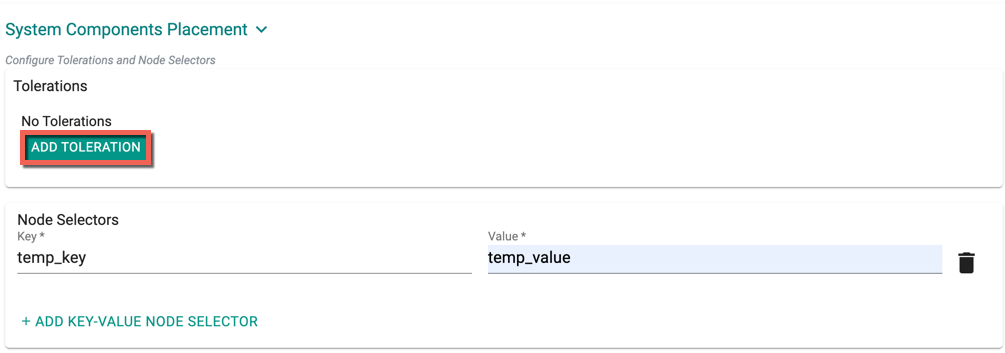
System Components Placement
Users can configure the kubernetes tolerations and nodeSelector in the advanced settings. Tolerations allow the Kubernetes scheduler to schedule pods with matching taints. Users can apply one or more taints to a node and this node will not accept any pods that do not tolerate the taints.
If nodes without taints exists in the cluster, use NodeSelectors to ensure the pods are scheduled to the desired nodes. These tolerations and nodeSelector are configured at the cluster level and are applied to the managed addons and core components. All the pods that are part of managed addons and components contain tolerations and nodeSelector in its YAML spec. Users can use corresponding taints (nodepool taints) and labels (nodepool labels) on the nodepool
System Components Placement can contain a list of tolerations and nodeSelector
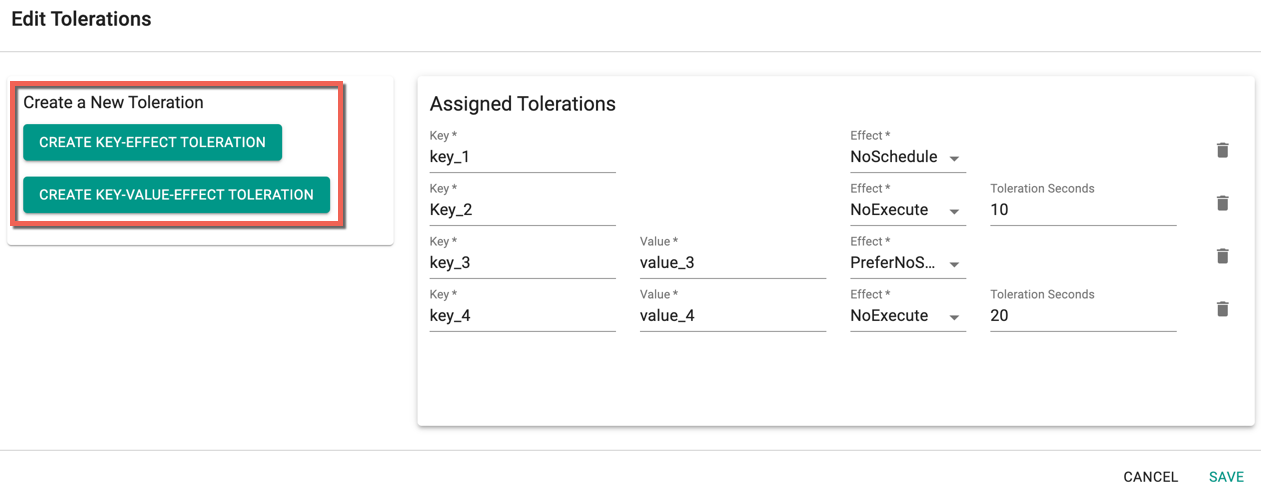
- Click Add Toleration to add one or more tolerations at cluster level
- Create one or more Key-Effect Toleration and Key-Value-Effect-Toleration
- Click Save
You can view the list of tolerations created as shown in the below example
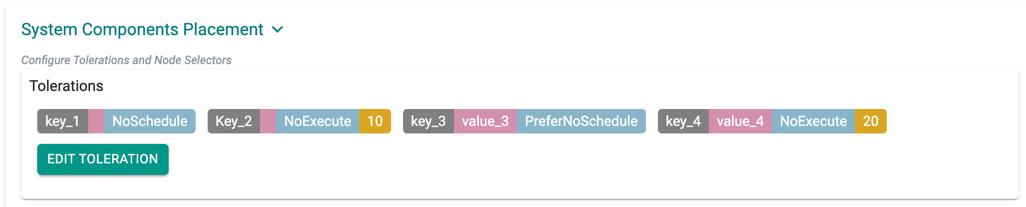
Important
Managed Add-ons and core components will be placed in Nodes with matching taints. If none of the node has taints, all the add-ons and core components will be split to all the available nodes
- Click Add Key-Value Node Selector to add one or more node selectors
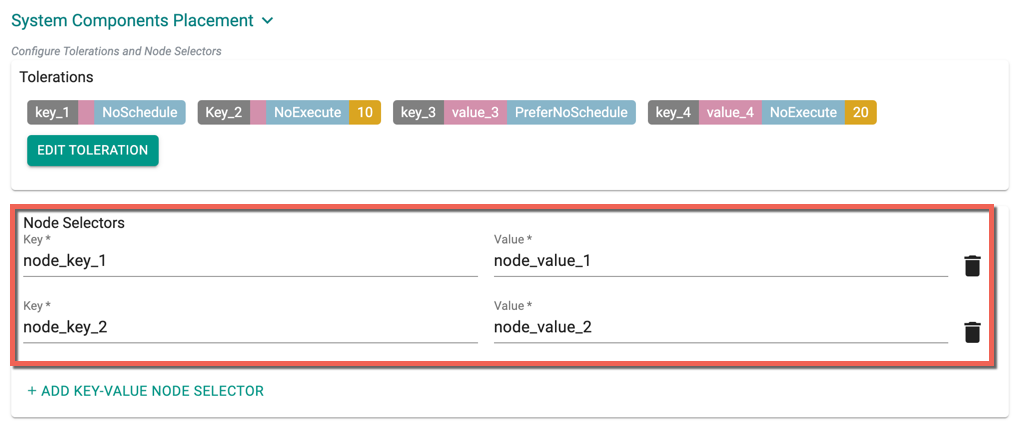
Important
The labels that are passed as part of the nodepool level are matched using the Nodepool Key Value pairs
- Enabling the Daemon Set Overrides allows the users to add additional tolerations for the Rafay daemon sets to match the taints available in the nodes.
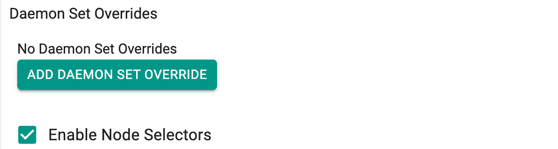
Recommendation
Use the tolerations in daemon set overrides, ensuring that daemon sets are run on every nodepool
- Click Add Daemon Set Override to create one or more Key-effect(s) and Key-value(s). If the daemon sets are matching the toleration along with the taints already available, all the daemon sets gets deployed on the nodes
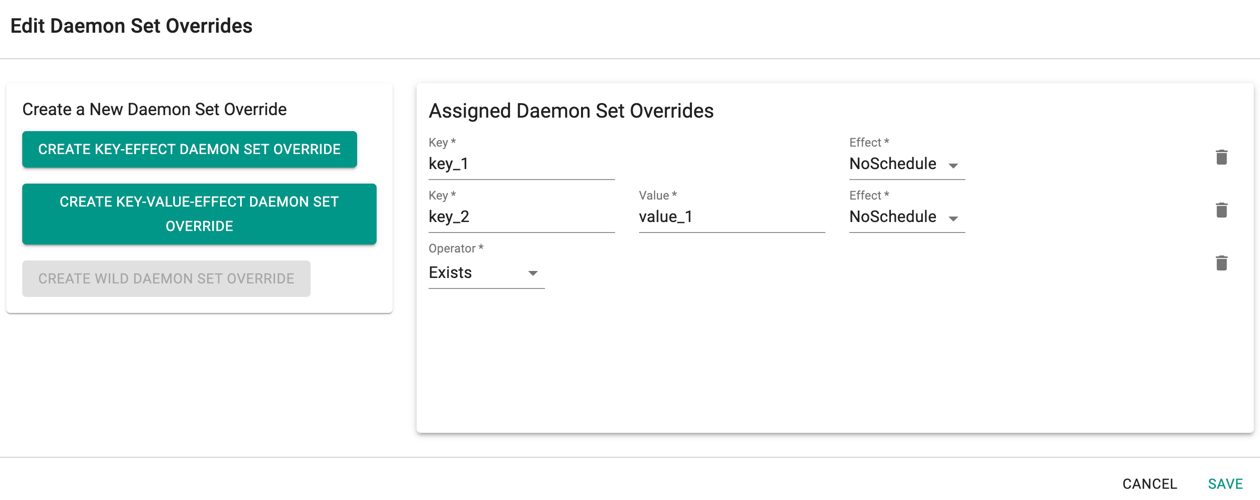
- Click Save
Provision the Cluster
Once all the required config details are provided, perform the below steps
- Click Save Changes and proceed to cluster provisioning
- The cluster is ready for provision. Click Provision

Important
As part of Azure AKS provisioning, a virtual machine will be spun up and used for bootstrapping system components. Once the bootstrap is completed, this virtual machine will be deleted.
Bootstrap VM Configuration
By default, a smaller VM size and image are used for the bootstrap node. You can override these defaults by configuring bootstrapVmParams in the cluster spec to specify a VM size and image that aligns with your organization's standards (for example, a hardened or CIS-compliant image).
The following parameters are supported:
| Field | Description |
|---|---|
bootstrapVmParams.vmSize |
Azure VM size to use for the bootstrap node (e.g. Standard_B4ms) |
bootstrapVmParams.image.id |
Full Azure resource ID of the custom image or gallery image version |
bootstrapVmParams.image.osState |
OS state of the image. Supported values: Generalized, Specialized |
Example cluster spec with bootstrap VM params:
apiVersion: rafay.io/v1alpha1
kind: Cluster
metadata:
  name: <cluster-name>
  project: <project-name>
spec:
  blueprint: default-aks
  blueprintversion: latest
  cloudprovider: <cloud-credential-name>
  clusterConfig:
    apiVersion: rafay.io/v1alpha1
    kind: aksClusterConfig
    metadata:
      name: <cluster-name>
    spec:
      bootstrapVmParams:
        image:
          id: /subscriptions/<subscription-id>/resourceGroups/<resource-group>/providers/Microsoft.Compute/galleries/<gallery-name>/images/<image-definition>/versions/<version>
          osState: Generalized
        vmSize: Standard_B4ms
      managedCluster:
        apiVersion: "2025-01-01"
        identity:
          type: UserAssigned
          userAssignedIdentities:
            ? /subscriptions/<subscription-id>/resourceGroups/<resource-group>/providers/Microsoft.ManagedIdentity/userAssignedIdentities/<identity-name>
            : {}
        location: <azure-region>
        properties:
          apiServerAccessProfile:
            enablePrivateCluster: true
          autoUpgradeProfile:
            nodeOsUpgradeChannel: None
            upgradeChannel: none
          dnsPrefix: <cluster-name>-dns
          enableRBAC: true
          kubernetesVersion: 1.33.7
          networkProfile:
            dnsServiceIP: 10.0.0.10
            loadBalancerSku: standard
            networkPlugin: azure
            networkPolicy: azure
            serviceCidr: 10.0.0.0/16
          powerState:
            code: Running
        sku:
          name: Base
          tier: Free
        type: Microsoft.ContainerService/managedClusters
      nodePools:
      - apiVersion: "2025-01-01"
        name: primary
        properties:
          count: 1
          enableAutoScaling: true
          maxCount: 1
          maxPods: 110
          minCount: 1
          mode: System
          orchestratorVersion: 1.33.7
          osType: Linux
          type: VirtualMachineScaleSets
          vmSize: Standard_DS2_v2
          vnetSubnetID: /subscriptions/<subscription-id>/resourceGroups/<network-resource-group>/providers/Microsoft.Network/virtualNetworks/<vnet-name>/subnets/<subnet-name>
        type: Microsoft.ContainerService/managedClusters/agentPools
      resourceGroupName: <resource-group>
  type: aks
Customize Cluster
Click SAVE & CUSTOMIZE to customize the cluster. Users can also use the self service wizard to create a "baseline cluster configuration", view the YAML based specification, update/save, and use the updated configuration to provision an AKS cluster. This can be very useful for advanced cluster customization or for advanced features that are only supported via the "cluster configuration file"
Step 1
Click SAVE & CUSTOMIZE
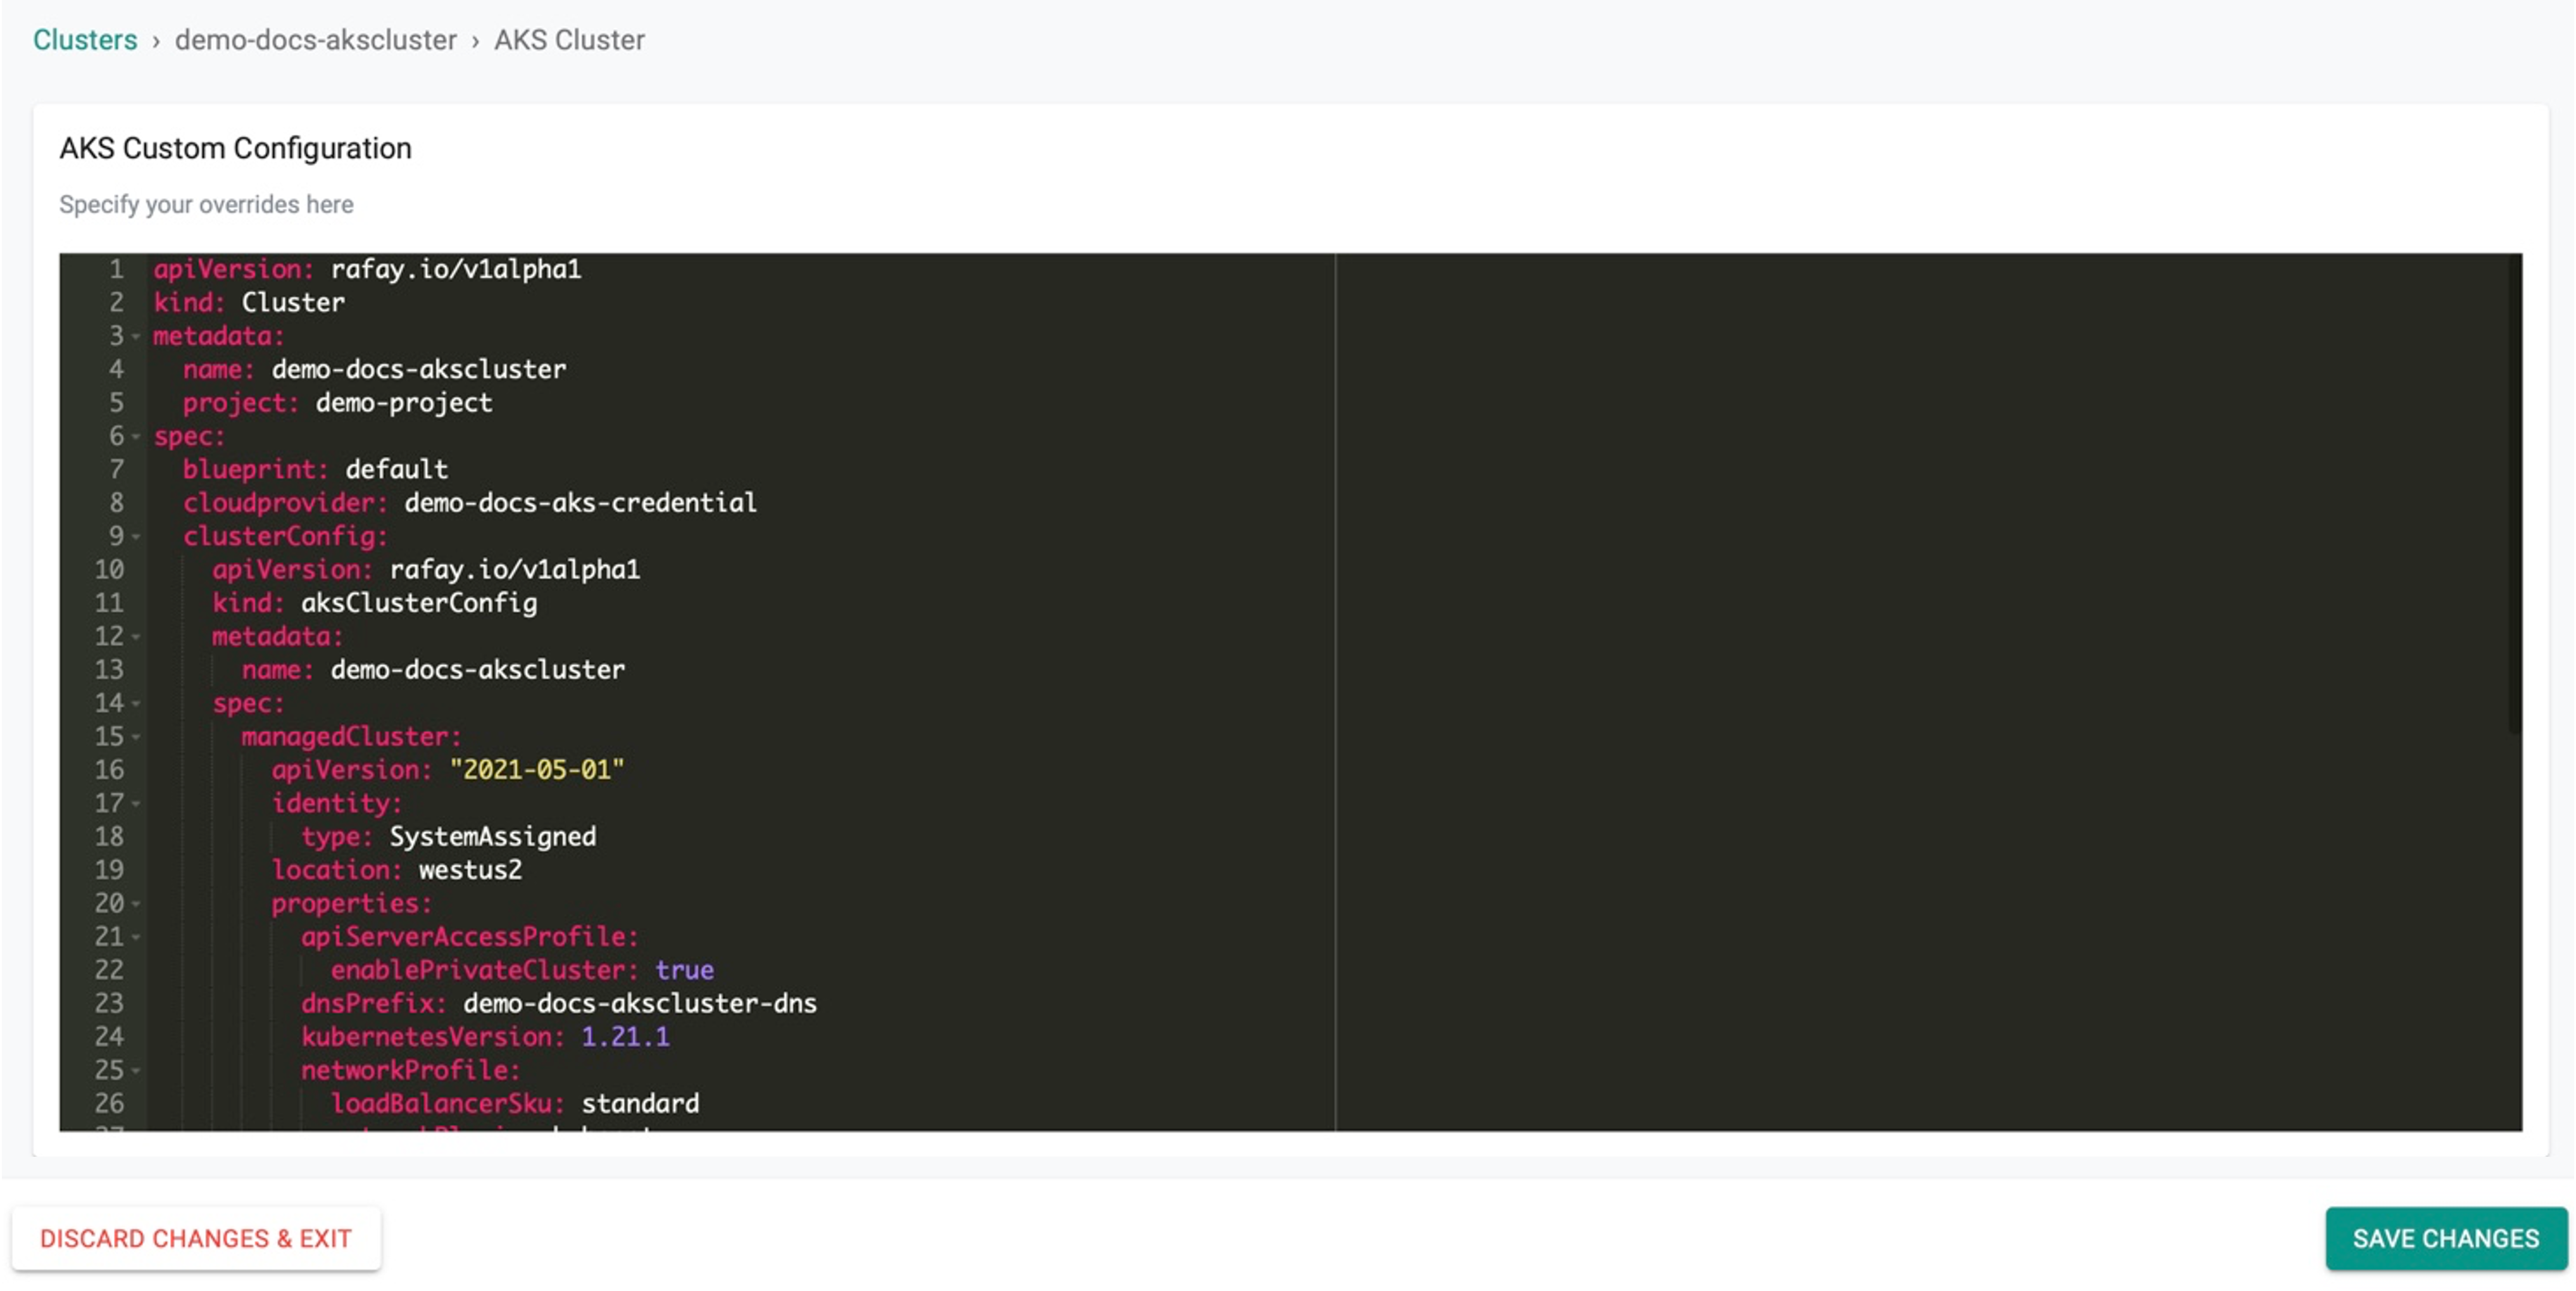
Step 2
This will present the user with the baseline cluster configuration in a YAML viewer. The user has two options for customizing the cluster configuration before provisioning using the self service wizard.
(a) Copy the configuration, make changes offline and paste the updated configuration and Save (OR) (b) Make the required changes inline in the YAML viewer and Save
Example Configuration Snippet: Setting Kubelet Args for Node Pools Using Save and Customize
nodePools:
- apiVersion: "2022-07-01"
location: eastus
name: primary
properties:
    count: 2
    enableAutoScaling: true
    kubeletConfig:
      containerLogMaxFiles: 10
      containerLogMazSizeMB: 25
    maxCount: 2
    maxPods: 110
    minCount: 1
    mode: System
    orchestratorVersion: 1.29.9
    osType: Linux
    type: VirtualMachineScaleSets
    vmSize: Standard_DS2_v2
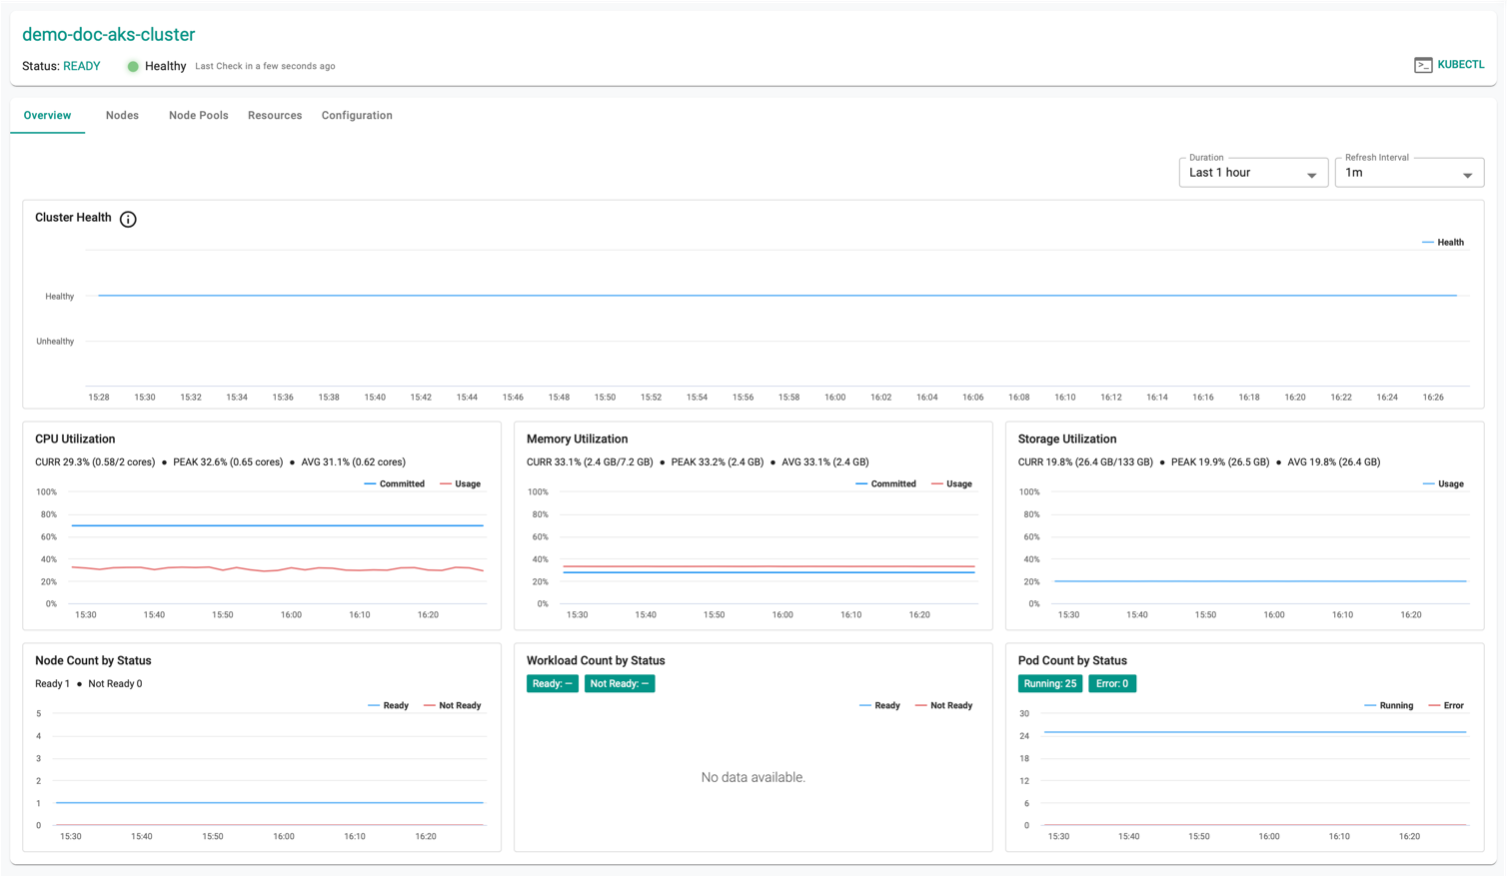
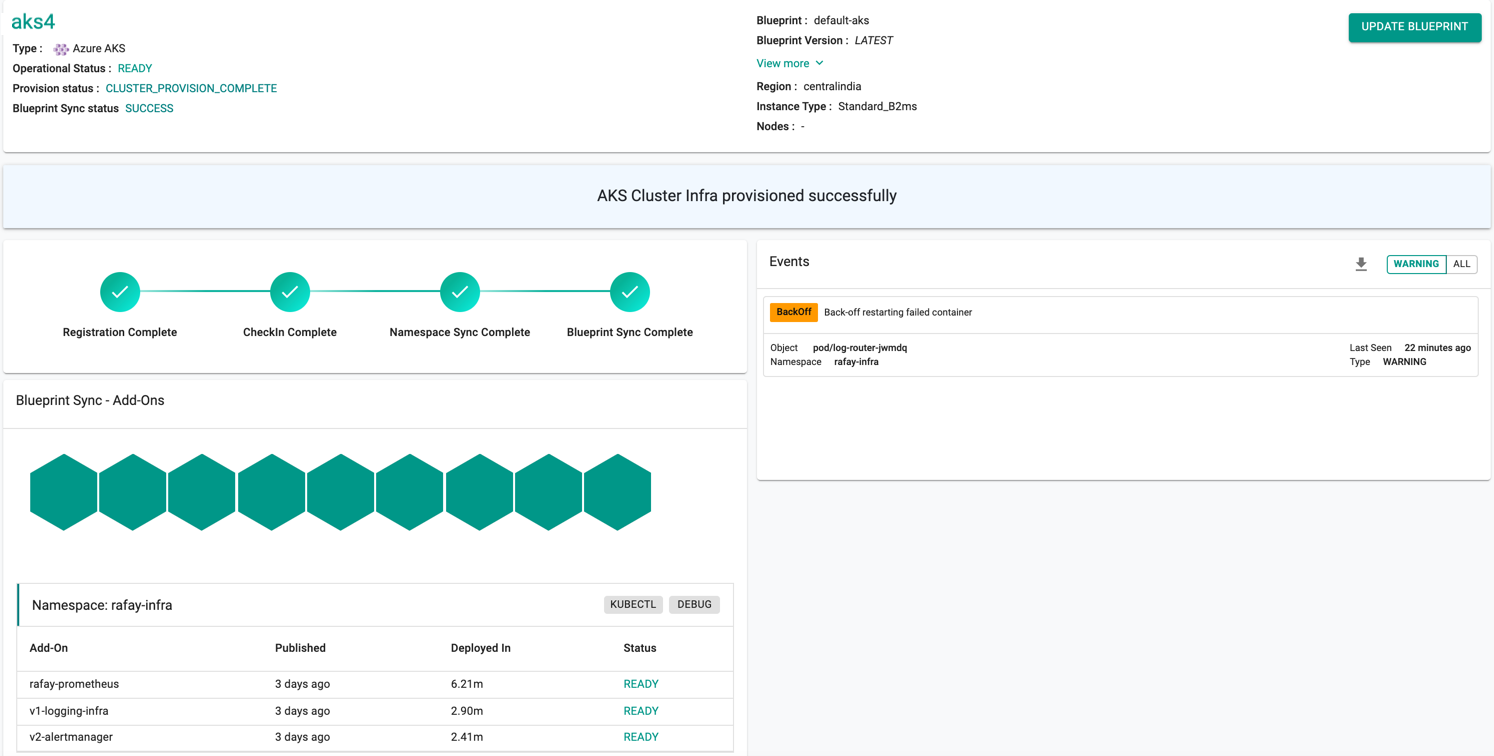
Successful Provisioning
Once all the steps are complete, the cluster is successfully provisioned as per the specified configuration. Users can now view and manage the Azure AKS Cluster in the specified Project in the Controller. On successfully provisioning, the user can view the dashboards
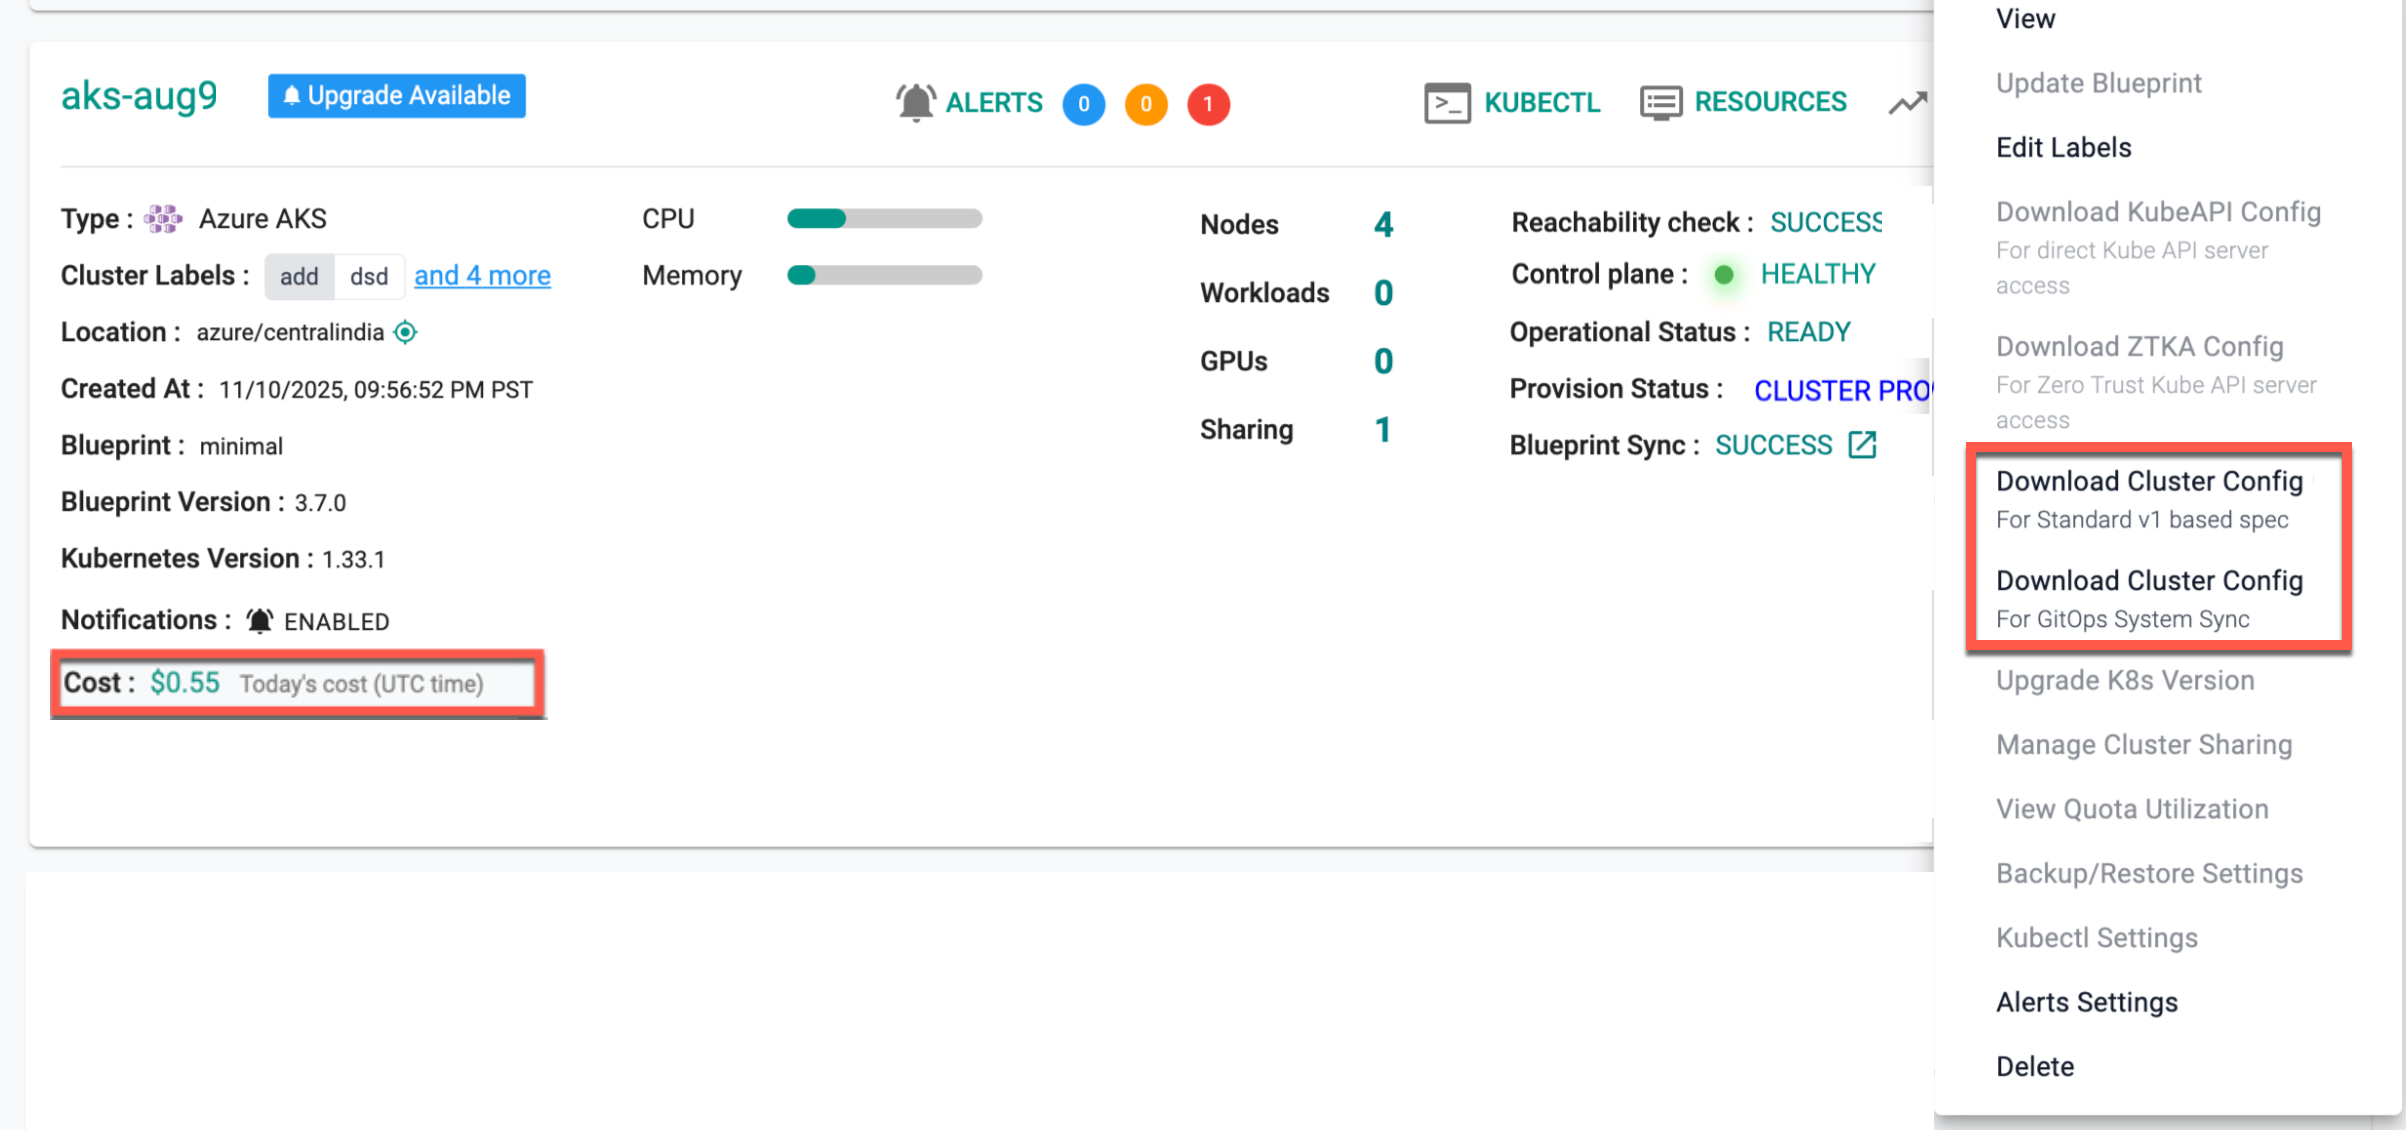
Download Config
Download Cluster Config (Standard v1 Spec)
Downloads the cluster configuration in the standard v1 specification format, either from the console, using the RCTL CLI, or programmatically through the REST APIs.
Download Cluster Config (For GitOps System Sync)
Downloads the cluster configuration formatted for GitOps System Sync, either from the console, using the RCTL CLI, or programmatically through the REST APIs.
On successful cluster provisioning, users can view the detailed operations and workflow of the cluster by clicking the Operation Status Ready icon. The screen shows all the stages that occurred during cluster deployment. Click View more to know the Region, Instance Type, and number of Nodes
AAD Cluster Config
When using the Azure-provided Kubeconfig with Azure role-based access control (RBAC) enabled, the user needs to have one of four Azure roles assigned to them, depending on specific requirements.
- Azure Kubernetes Service RBAC Reader
- Azure Kubernetes Service RBAC Writer
- Azure Kubernetes Service RBAC Admin
- Azure Kubernetes Service RBAC Cluster Admin
For more information on each role, refer this page
Failed Provisioning
Cluster provisioning can fail if the user had misconfigured the cluster configuration (e.g. wrong cloud credentials) or encountered soft limits in their Azure account for resources. When this occurs, the user is presented with an intuitive error message. Users are allowed to edit the configuration and retry provisioning
Note: The Region field in the General settings is disabled when the user try to modify the failed cluster configuration details
Refer Troubleshooting to explore different scenarios where troubleshooting is needed.
Automated Cluster Creation
Users can also automate the cluster creation process without any form of inbound access to their VNet and these can be created via config file.