Part 3: Blueprint
What Will You Do
In this part of the self-paced exercise, you will create a custom cluster blueprint with a Karpenter add-on, based on declarative specifications.
Step 1: Create Namespace
In this step, you will create a namespace for Karpenter. The "namespace.yaml" file located in
The following items may need to be updated/customized if you made changes to these or used alternate names.
- value: karpenter-cluster
kind: ManagedNamespace
apiVersion: config.rafay.dev/v2
metadata:
  name: karpenter
  description: namespace for karpenter
  labels:
  annotations:
spec:
  type: RafayWizard
  resourceQuota:
  placement:
    placementType: ClusterSpecific
    clusterLabels:
    - key: rafay.dev/clusterName
      value: karpenter-cluster
- Open Terminal (on macOS/Linux) or Command Prompt (Windows) and navigate to the folder where you forked the Git repository
- Navigate to the folder "
/getstarted/karpenter/namespace" - Type the command below. Be sure to update the project name with the name of your project.
rctl create namespace -f namespace.yaml -p <project-name>
If you did not encounter any errors, you can optionally verify if everything was created correctly on the controller.
- Navigate to the "defaultproject" project in your Org
- Select Infrastructure -> Namespaces
- You should see an namesapce called "karpenter"

Step 2: Create Addons
In this step, you will create two custom addons, one for the Karpenter Controller and a second for the Karpenter NodePool and EC2NodeClass. The specification files for this section are located in
The following details are used to build the Karpenter addon declarative specification.
- "v1" because this is our first version
- The addon is part of the "defaultproject"
- Name of addon is "karpenter-addon"
- The addon will be deployed to a namespace called "karpenter"
- You will be using a "custom-values.yaml" as an override which is located in the folder "
/getstarted/karpenter/addon"
apiVersion: infra.k8smgmt.io/v3
kind: Addon
metadata:
  name: karpenter-addon
  project: karpenter
spec:
  artifact:
    artifact:
      catalog: default-rafay
      chartName: karpenter
      chartVersion: 1.0.1
      valuesPaths:
      - name: file://custom-values.yaml
    options:
      maxHistory: 1
      timeout: 1m0s
    type: Helm
  namespace: karpenter
  sharing:
    enabled: false
  version: v1
- Open Terminal (on macOS/Linux) or Command Prompt (Windows) and navigate to the folder where you forked the Git repository
- Navigate to the folder "
/getstarted/karpenter/addon" - Type the command below
rctl apply -f karpenter-addon.yaml
If you did not encounter any errors, you can optionally verify if everything was created correctly on the controller.
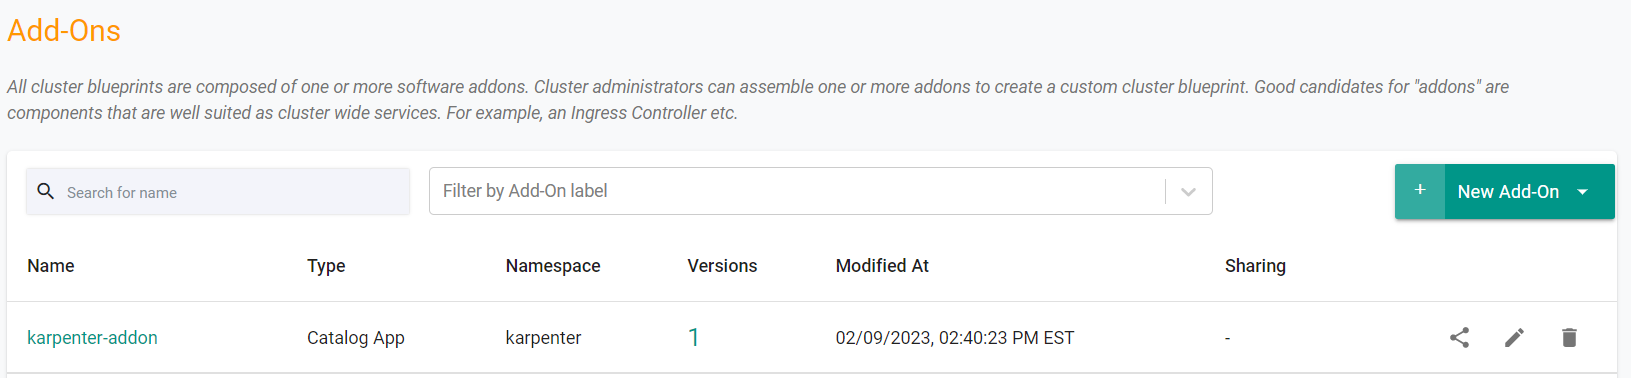
- Navigate to the "defaultproject" project in your Org
- Select Infrastructure -> Addons
- You should see an addon called "karpenter-addon"
Next, we will create the second custom addon for the Karptenter NodePool and EC2NodeClass.
Note that the name of the role we are using was created in Part 1.
Note that the "cluster-name" is set to match the name of the cluster and the AWS tags that were specified in the cluster spec file.
apiVersion: karpenter.sh/v1
kind: NodePool
metadata:
  name: default
spec:
  template:
    spec:
      requirements:
        - key: kubernetes.io/arch
          operator: In
          values: ["amd64"]
        - key: kubernetes.io/os
          operator: In
          values: ["linux"]
        - key: karpenter.sh/capacity-type
          operator: In
          values: ["spot"]
        - key: karpenter.k8s.aws/instance-category
          operator: In
          values: ["t"]
        - key: karpenter.k8s.aws/instance-generation
          operator: Gt
          values: ["2"]
      nodeClassRef:
        group: karpenter.k8s.aws
        kind: EC2NodeClass
        name: default
  limits:
    cpu: 1000
  disruption:
    consolidationPolicy: WhenEmptyOrUnderutilized
    budgets:
    - nodes: "100%"
      reasons:
      - "Empty"
      - "Drifted"
    expireAfter: 720h # 30 * 24h = 720hconsolidateAfter: 1m
    consolidateAfter: 1m
---
apiVersion: karpenter.k8s.aws/v1
kind: EC2NodeClass
metadata:
  name: default
spec:
  amiSelectorTerms:
    - alias: al2@latest
  tags:
    email: [email protected]
    env: dev
  role: "KarpenterNodeRole-Rafay"
  subnetSelectorTerms:
    - tags:
        cluster-name: "{{{ .global.Rafay.ClusterName }}}"
  securityGroupSelectorTerms:
    - tags:
        cluster-name: "{{{ .global.Rafay.ClusterName }}}"
The following details are used to build the provisioner addon declarative specification.
- "v1" because this is our first version
- The addon is part of the "defaultproject"
- Name of addon is "provisioner-addon"
- The addon will be deployed to a namespace called "karpenter"
- You will be using the "nodepool.yaml" which is located in the folder "
/getstarted/karpenter/addon"
The following items may need to be updated/customized if you made changes to these or used alternate names.
- project: defaultproject
- namespace: karpenter
kind: AddonVersion
metadata:
  name: v1
  project: defaultproject
spec:
  addon: provisioner-addon
  namespace: karpenter
  template:
    type: NativeYaml
    yamlFile: nodepool.yaml
- Open Terminal (on macOS/Linux) or Command Prompt (Windows) and navigate to the folder where you forked the Git repository
- Navigate to the folder "
/getstarted/karpenter/addon" - Type the command below
rctl create addon version -f nodepool-addon.yaml
If you did not encounter any errors, you can optionally verify if everything was created correctly on the controller.
- Navigate to the "defaultproject" project in your Org
- Select Infrastructure -> Addons
- You should see an addon called "nodepool-addon"

Step 3: Create Blueprint
In this step, you will create a custom cluster blueprint with the Karpenter addon and the Nodepool addon. The "blueprint.yaml" file contains the declarative specification.
- Open Terminal (on macOS/Linux) or Command Prompt (Windows) and navigate to the folder where you forked the Git repository
- Navigate to the folder "
/getstarted/karpenter/blueprint"
The following items may need to be updated/customized if you made changes to these or used alternate names.
- project: "defaultproject"
apiVersion: infra.k8smgmt.io/v3
kind: Blueprint
metadata:
  name: karpenter-blueprint
  project: defaultproject
spec:
  base:
    name: minimal
  type: custom
  customAddons:
  - name: karpenter-addon
    version: v1
  - name: nodepool-addon
    version: v1
    dependson:
    - karpenter-addon
  version: v1
- Type the command below
rctl apply -f blueprint.yaml
If you did not encounter any errors, you can optionally verify if everything was created correctly on the controller.
- Navigate to the "defaultproject" project in your Org
- Select Infrastructure -> Blueprint
- You should see an blueprint called "karpenter-blueprint

Step 4: Update Cluster Blueprint
In this step, you will update the cluster to use the previously created custom blueprint with the Karpenter addon and the Provisioner addon.
- Open Terminal (on macOS/Linux) or Command Prompt (Windows)
- Navigate to the folder "
/getstarted/karpenter/cluster" - Edit the blueprint section "cluster.yaml" file to use the newly created blueprint, update the blueprint name and add the version
apiVersion: infra.k8smgmt.io/v3
kind: Cluster
metadata:
  name: karpenter-cluster
  project: defaultproject
spec:
  blueprintConfig:
    name: karpenter-blueprint
    version: v1
  cloudCredentials: aws-cloud-credential
  config:
    addons:
    - name: kube-proxy
      version: latest
    - name: vpc-cni
      version: latest
    - name: coredns
      version: latest
    - configurationValues: |-
        controller:
          tolerations:
            - effect: NoSchedule
              key: nodeInfra
              operator: Exists
      name: aws-ebs-csi-driver
      version: latest
    iam:
      serviceAccounts:
      - attachPolicy:
          Statement:
          - Action:
            - ec2:CreateLaunchTemplate
            - ec2:CreateFleet
            - ec2:RunInstances
            - ec2:CreateTags
            - iam:PassRole
            - iam:CreateInstanceProfile
            - iam:TagInstanceProfile
            - iam:AddRoleToInstanceProfile
            - iam:RemoveRoleFromInstanceProfile
            - iam:DeleteInstanceProfile
            - ec2:DeleteLaunchTemplate
            - ec2:TerminateInstances
            - ec2:DescribeLaunchTemplates
            - ec2:DescribeSpotPriceHistory
            - ec2:DescribeImage
            - ec2:DescribeImages
            - ec2:DescribeInstances
            - ec2:DescribeSecurityGroups
            - ec2:DescribeSubnets
            - ec2:DescribeInstanceTypes
            - ec2:DescribeInstanceTypeOfferings
            - ec2:DescribeAvailabilityZones
            - ssm:GetParameter
            - eks:DescribeCluster
            - pricing:DescribeServices
            - pricing:GetAttributeValues
            - pricing:GetProducts
            - iam:GetInstanceProfile
            Effect: Allow
            Resource: '*'
          Version: "2012-10-17"
        metadata:
          name: karpenter
          namespace: karpenter
      withOIDC: true
    identityMappings:
      arns:
      - arn: "arn:aws:iam::<ACCOUNT-NUMBER>:role/KarpenterNodeRole-Rafay"
        group:
        - system:bootstrappers
        - system:nodes
        username: system:node:{{EC2PrivateDNSName}}
    managedNodeGroups:
    - amiFamily: AmazonLinux2
      desiredCapacity: 1
      instanceType: t3.large
      labels:
        nodes: infra
      maxSize: 2
      minSize: 0
      name: infra-nodegroup
      taints:
      - effect: NoSchedule
        key: nodeInfra
      version: "1.29"
    metadata:
      name: karpenter-cluster
      region: us-west-2
      tags:
        cluster-name: karpenter-cluster
        email: <EMAIL>
        env: <ENV>
      version: "1.29"
    vpc:
      autoAllocateIPv6: false
      cidr: 192.168.0.0/16
      clusterEndpoints:
        privateAccess: true
        publicAccess: false
  systemComponentsPlacement:
    nodeSelector:
      node: infra
    tolerations:
    - effect: NoSchedule
      key: nodeInfra
      operator: Exists
  type: aws-eks
rctl apply -f cluster.yaml
If you did not encounter any errors, you can optionally verify if everything was created correctly on the controller.
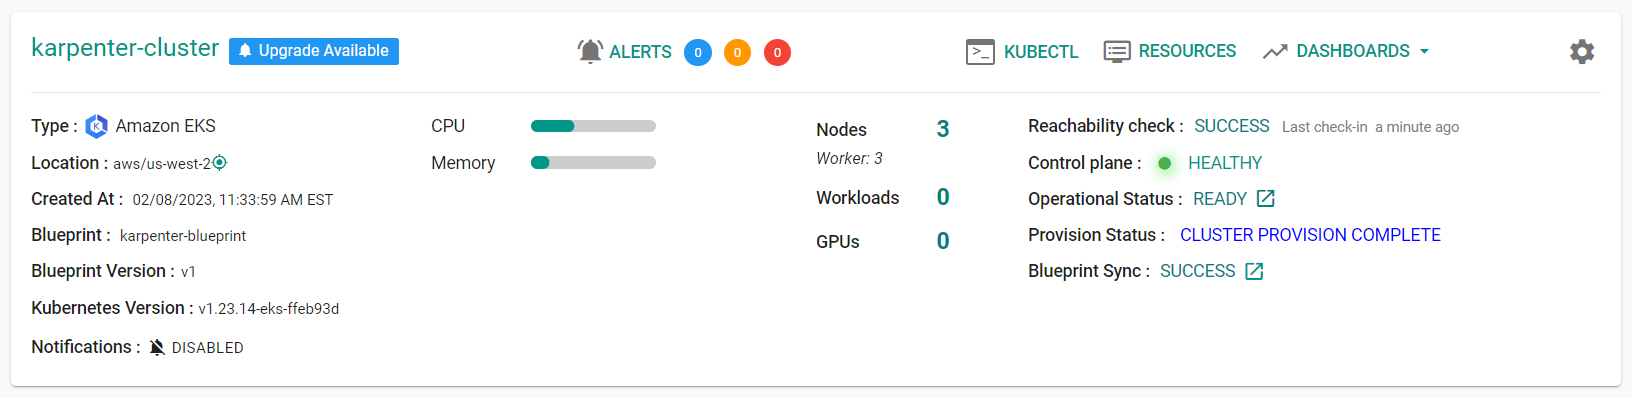
- Navigate to the "defaultproject" project in your Org
- Select Infrastructure -> Clusters
- You should see the cluster is now using the "karpenter-blueprint
- Navigate to Infrastructure -> Clusters
- Click on "KUBECTL" in the "karpenter-cluster" cluster card
- Type the command below
kubectl get pods --namespace karpenter
- You should see a result like the following.
NAME                               READY   STATUS    RESTARTS   AGE
karpenter-addon-5fc854c49f-h7pnj   1/1     Running   0          3m18s
Recap
As of this step, you have created a "cluster blueprint" with Karpenter and a NodePool/EC2NodeClass as addons, and applied this blueprint to the existing cluster. You are now ready to move onto the next step where you will deploy a test workload to scale the cluster with Karpenter.