Part 1: Create & Execute
In the first part of this exercise, you will create a Fleet Plan that will be used for testing purposes on clusters. This involves creating the Fleet Plan, executing it, and monitoring the progress of the Fleet Job.
What Will You Do
In Part 1, you will focus on creating and configuring the Fleet Plan object. The following tasks are involved:
- Create a Fleet Plan object.
- Create an operation within the Fleet Plan.
- Create an Action within the operation of the Fleet Plan.
- Configure a prehook for the Cluster Runner within the operation of the Fleet Plan.
- Set up a post hook for the Cluster Runner within the operation of the Fleet Plan.
Note: With the Cluster Runner configuration, the prehook on the target cluster is executed by the Agent running on the Controller. This setup offers flexibility and is suitable when there are restrictions on running additional pods, such as the GitOps Agent, on the cluster to handle the hook execution.
Next, you will repeat the same tasks for the Agent Runner:
- Create a Fleet Plan object.
- Define an operation within the Fleet Plan.
- Create an Action within the operation of the Fleet Plan.
- Configure a prehook for the Agent Runner within the operation of the Fleet Plan.
- Set up a post hook for the Agent Runner within the operation of the Fleet Plan.
Note: With the Agent Runner configuration, the prehook on the target cluster is executed by the GitOps Agent running on the EKS Cluster. This setup offers flexibility and is ideal when there are no restrictions on running additional pods like the GitOps Agent, which handles the hook execution on the cluster where it is running.
By completing these tasks, you will gain a comprehensive understanding of how to configure hooks for both the Cluster and Agent Runners in your fleet plan.
Select a method to create and execute your Fleet Plan for EKS clusters from the tabs below.
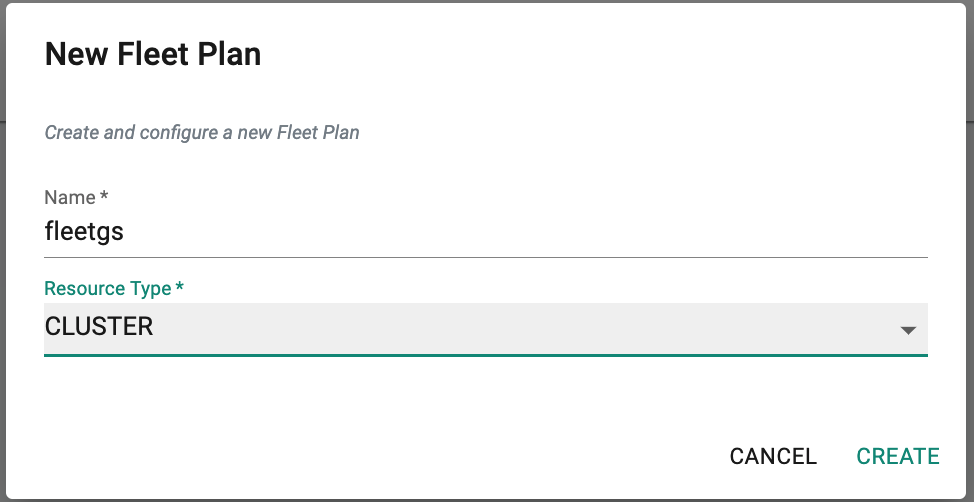
Create Fleet Plan
In this step, we will create a Fleet plan
- Navigate to the project in your Org.
- Select Infrastructure -> Fleet Plan.
- Click New Fleet Plan.
- Enter a name for the Fleet plan.
- Select the Resoure Type Cluster.
- Click Create.
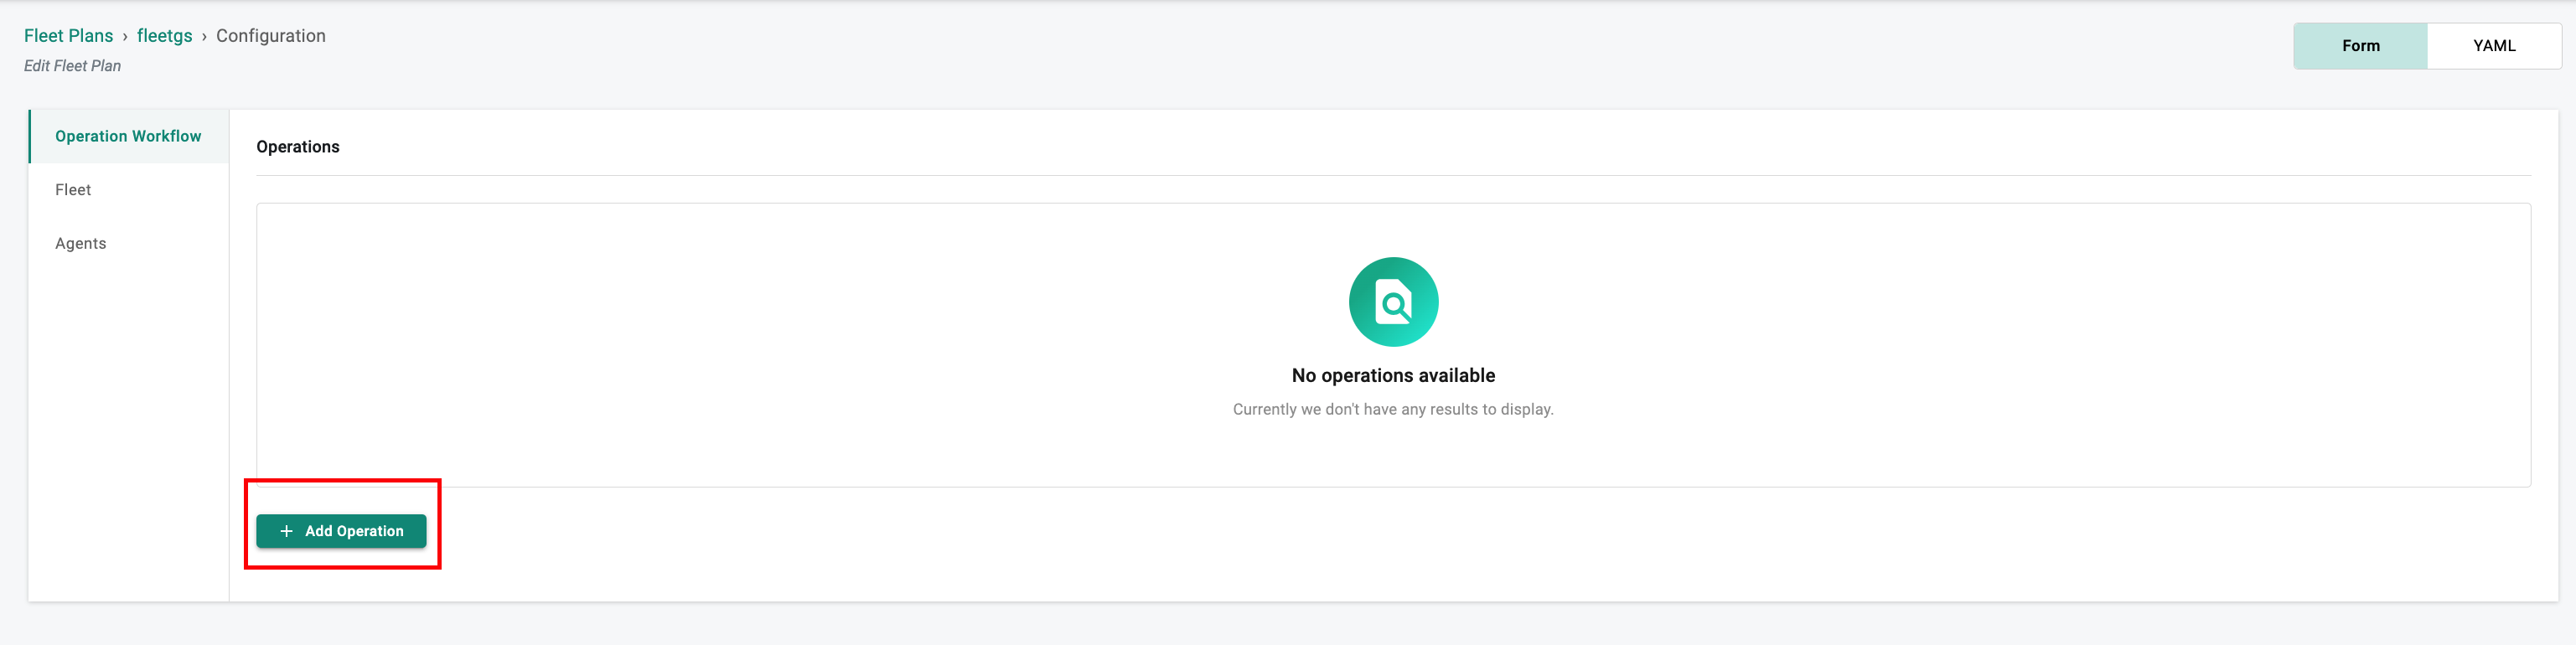
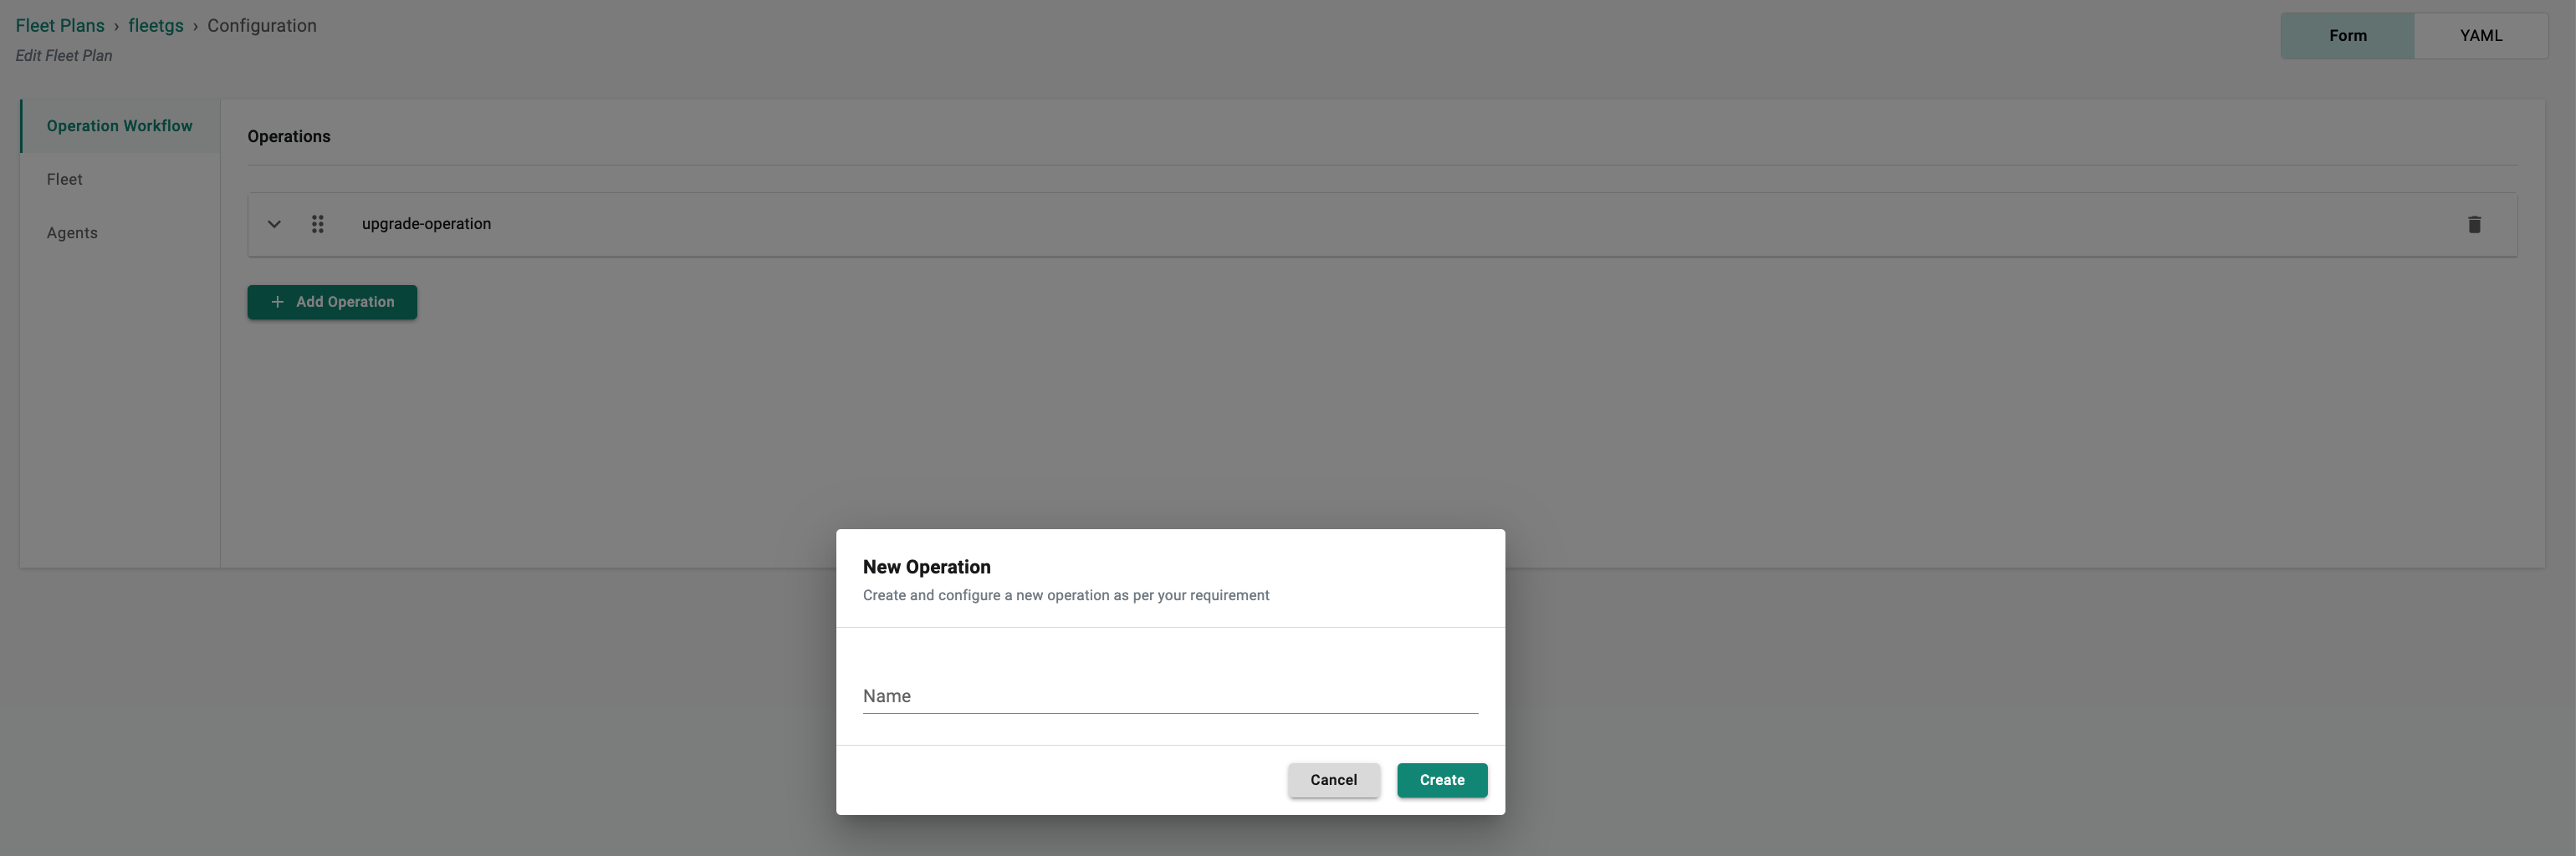
Create an operation within the above Fleet Plan.
- Click on "Add Operation" within the Fleet Plan created above.
- Enter a name of the Operation.
- Click Create.
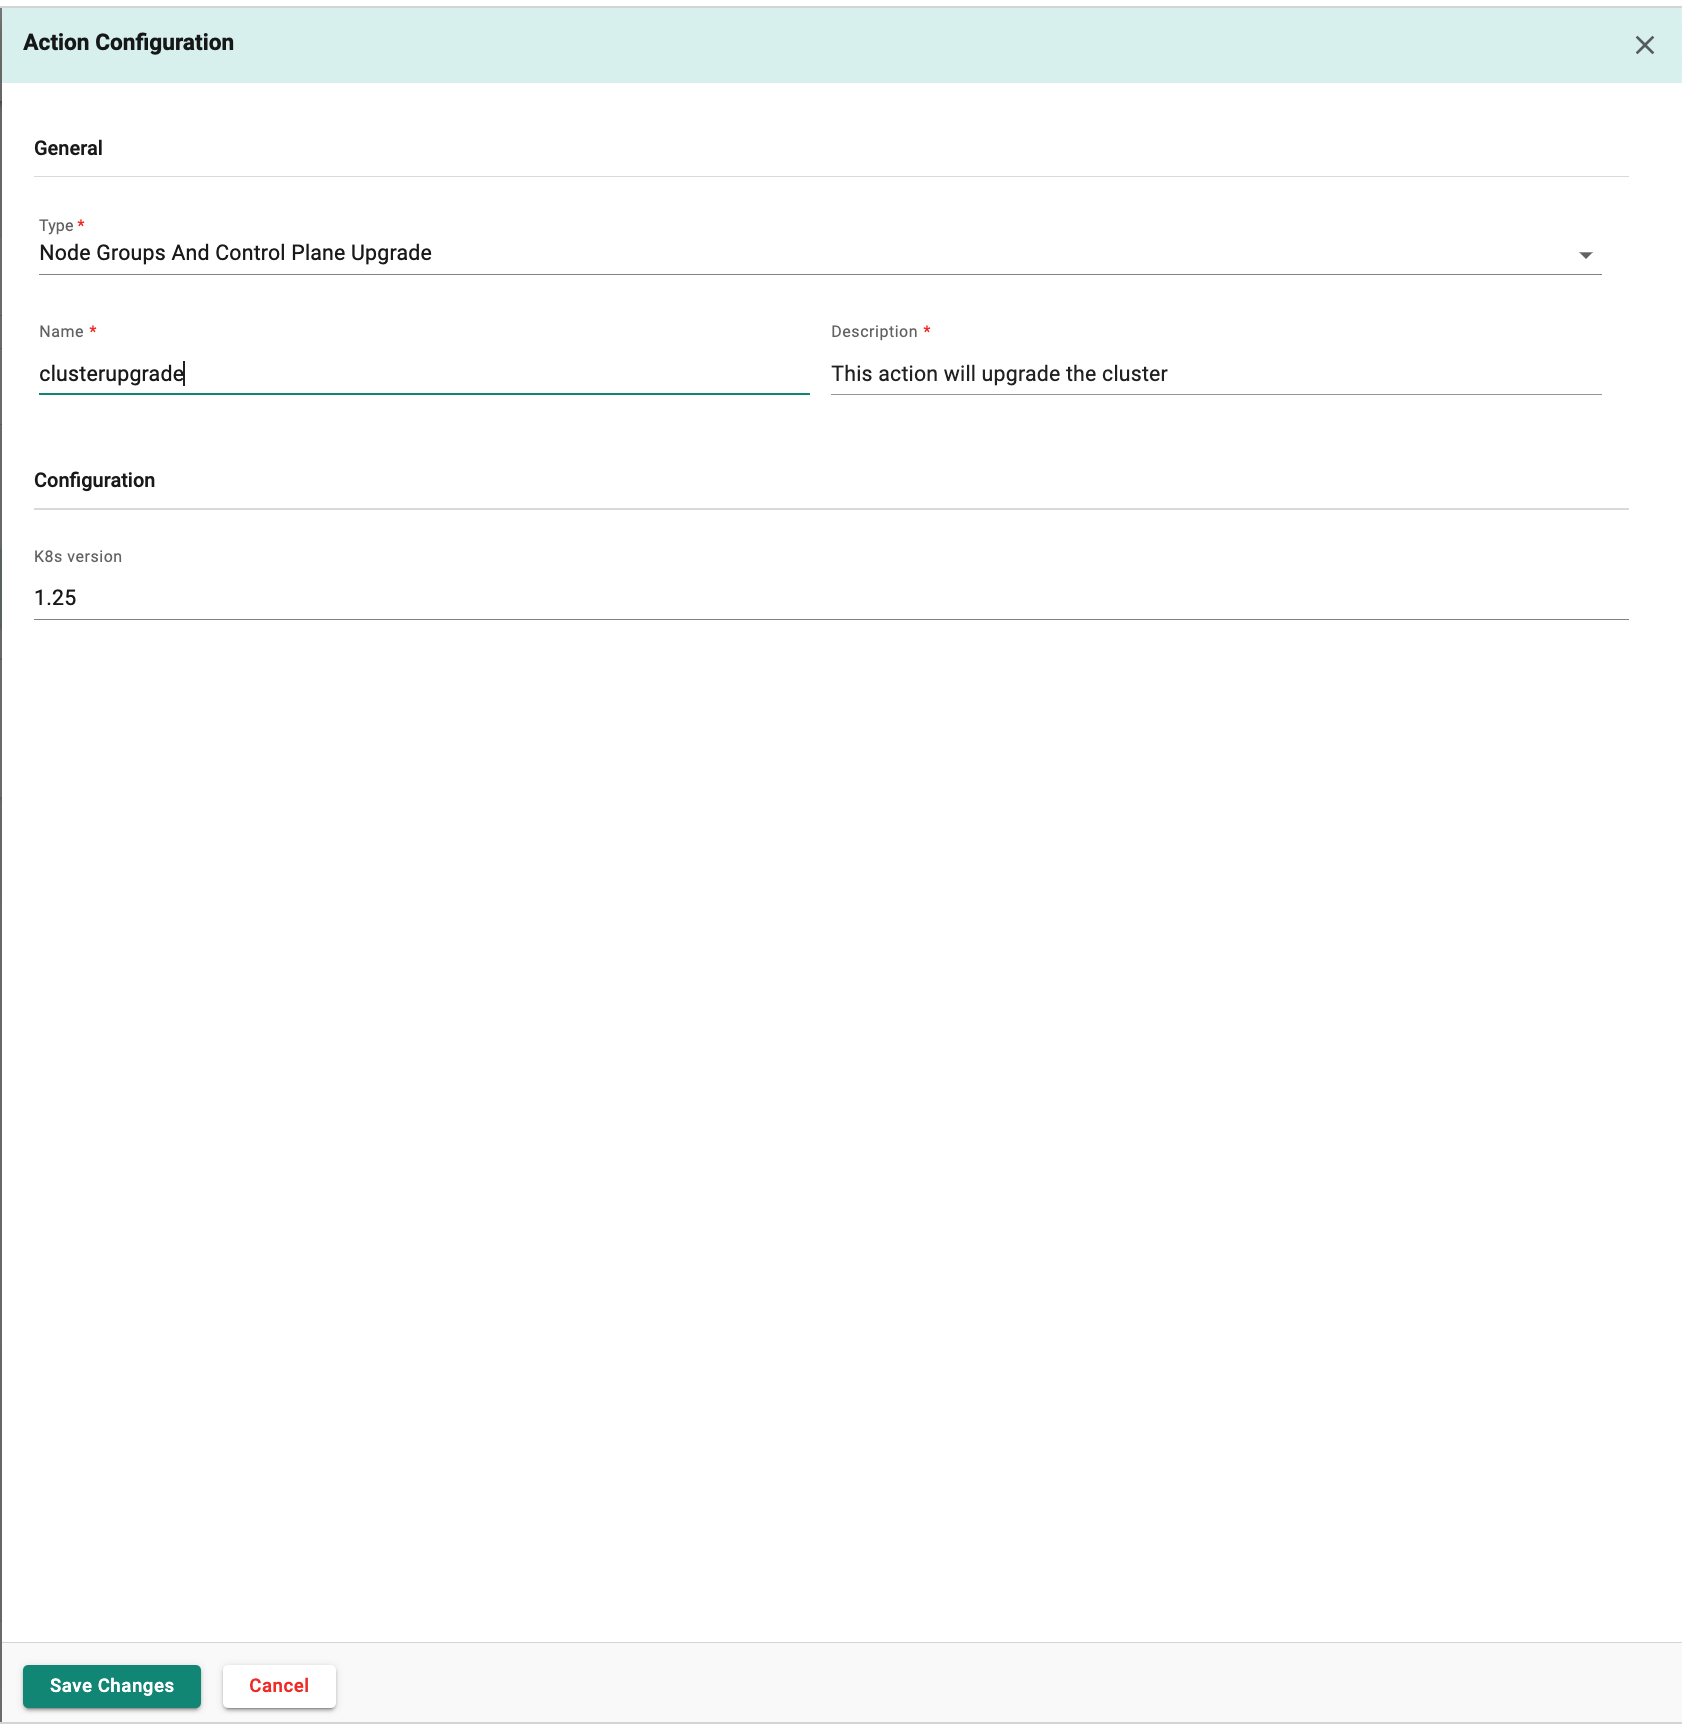
Action: Cluster Upgrade
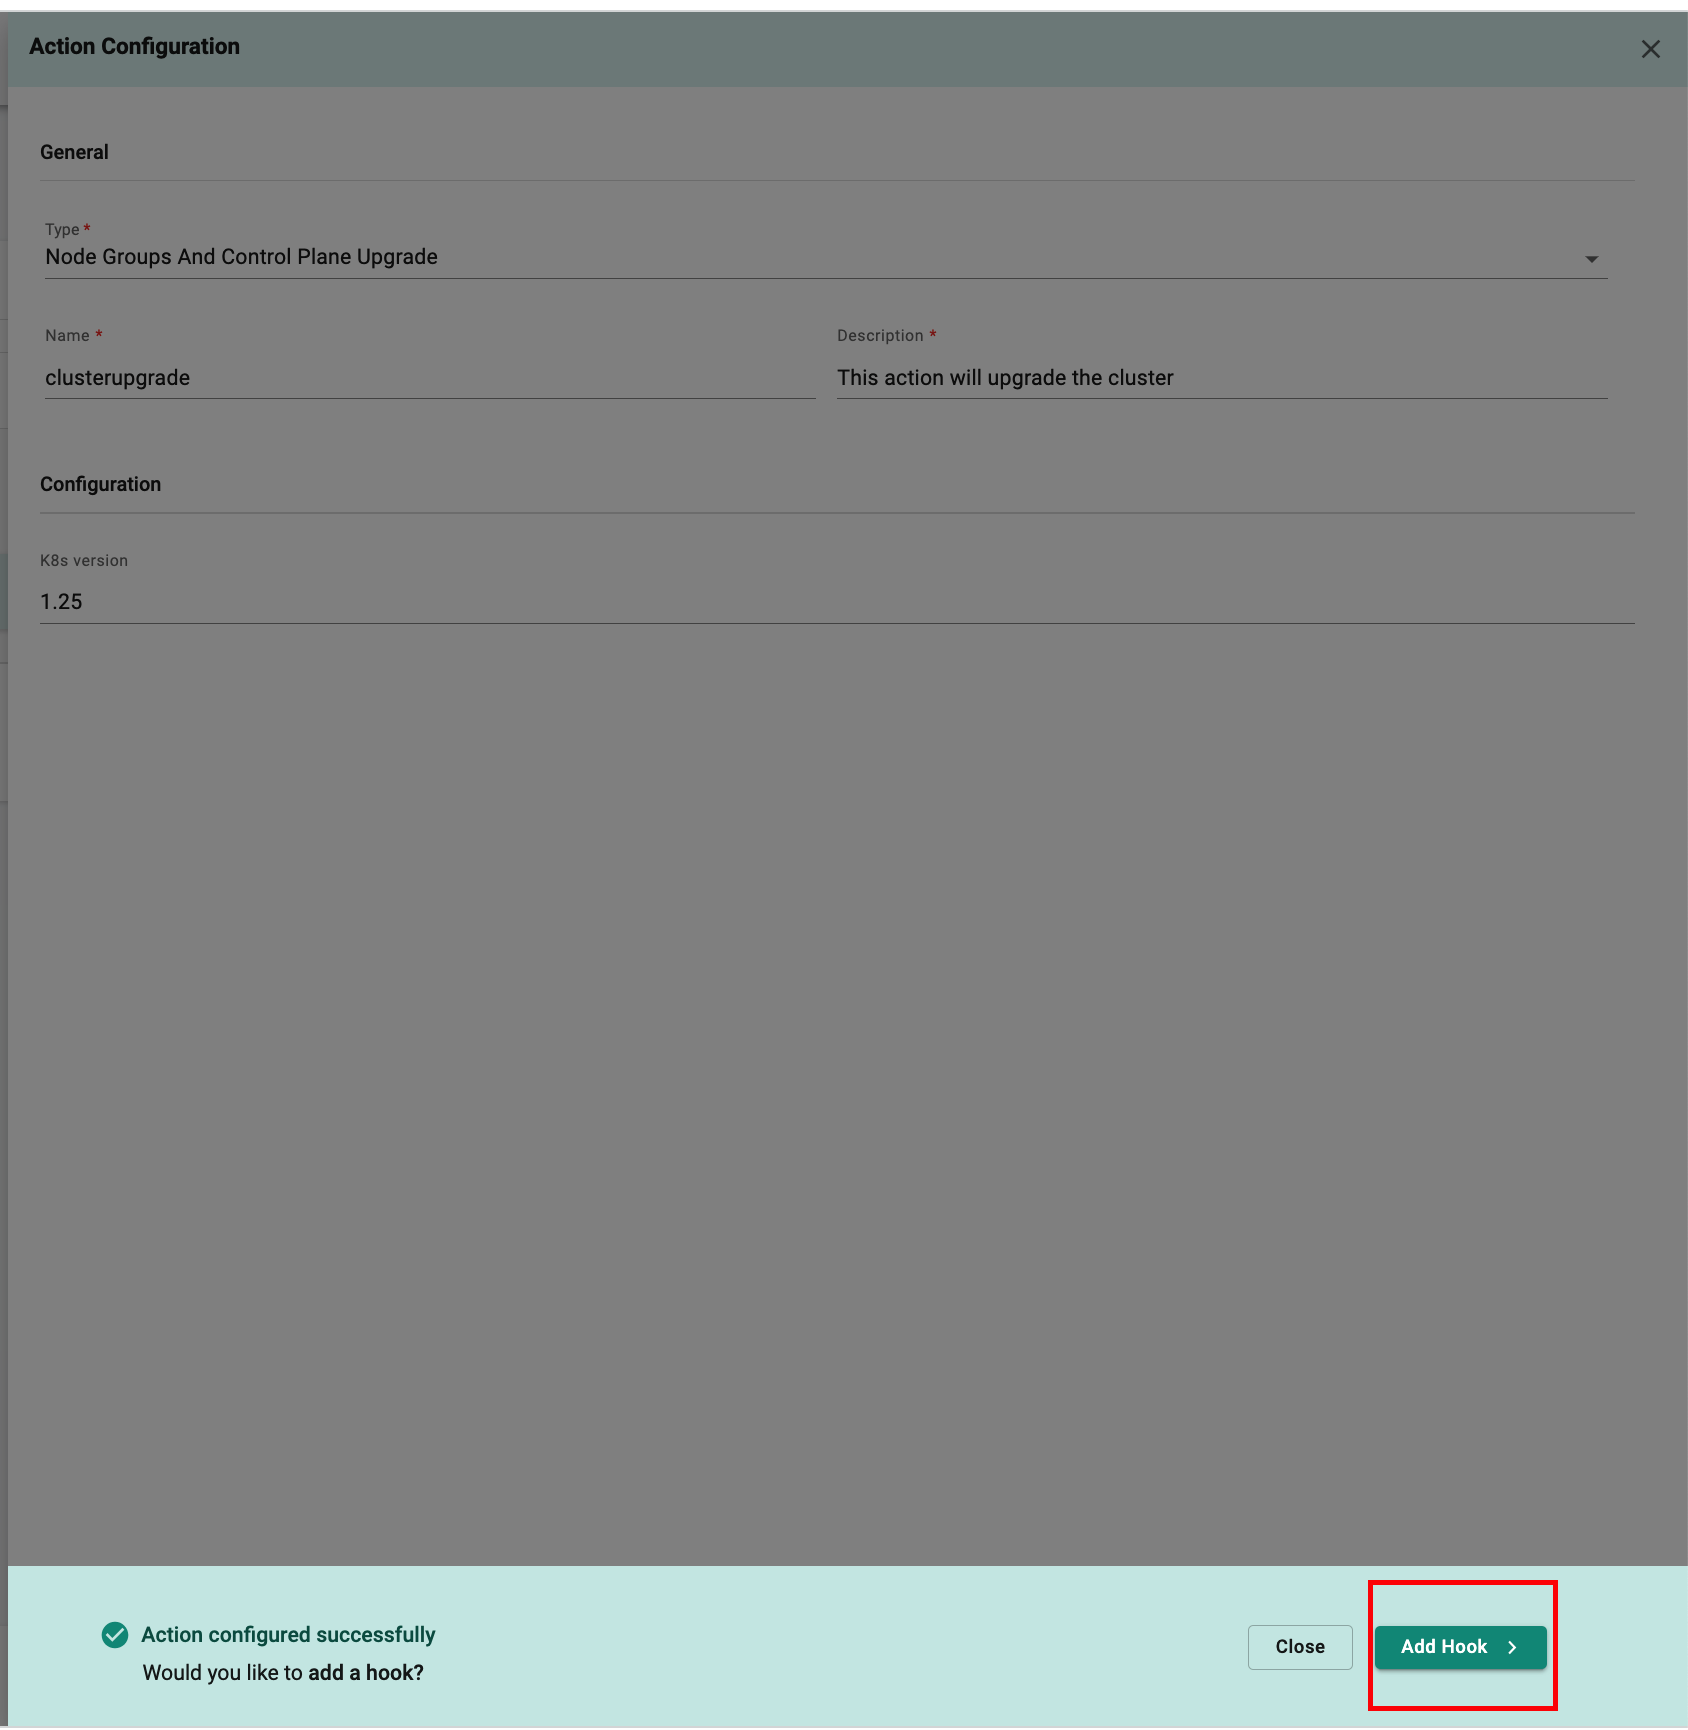
- After creating the Operation, let's proceed with configuring the Action.
- In the Action Configuration, select the desired type of Action.
- For this guide,we will choose "Node Groups and Control Plane Upgrade" from the dropdown menu.
- Provide a name for the action.
- Specify the Kubernetes version for upgrading the clusters. For this exercise, let's upgrade the clusters from version 1.24 to 1.25.
- Click on "Add Hook" to configure the pre hook.
- Choose the "Pre-hook" option in the hook Configuration form.
- Provide a name for the pre-hook.
- Optionally, add a relevant description for the pre-hook.
- Choose "Cluster" as the Runner Config.
- Specify the container image to be used in the pre-hook configuration.
- In this guide, we will utilize a tool called "kube-no-trouble" that can identify deprecated APIs depending on how you deploy your resources.
- Specify the necessary arguments for running the "kube-no-trouble" tool.
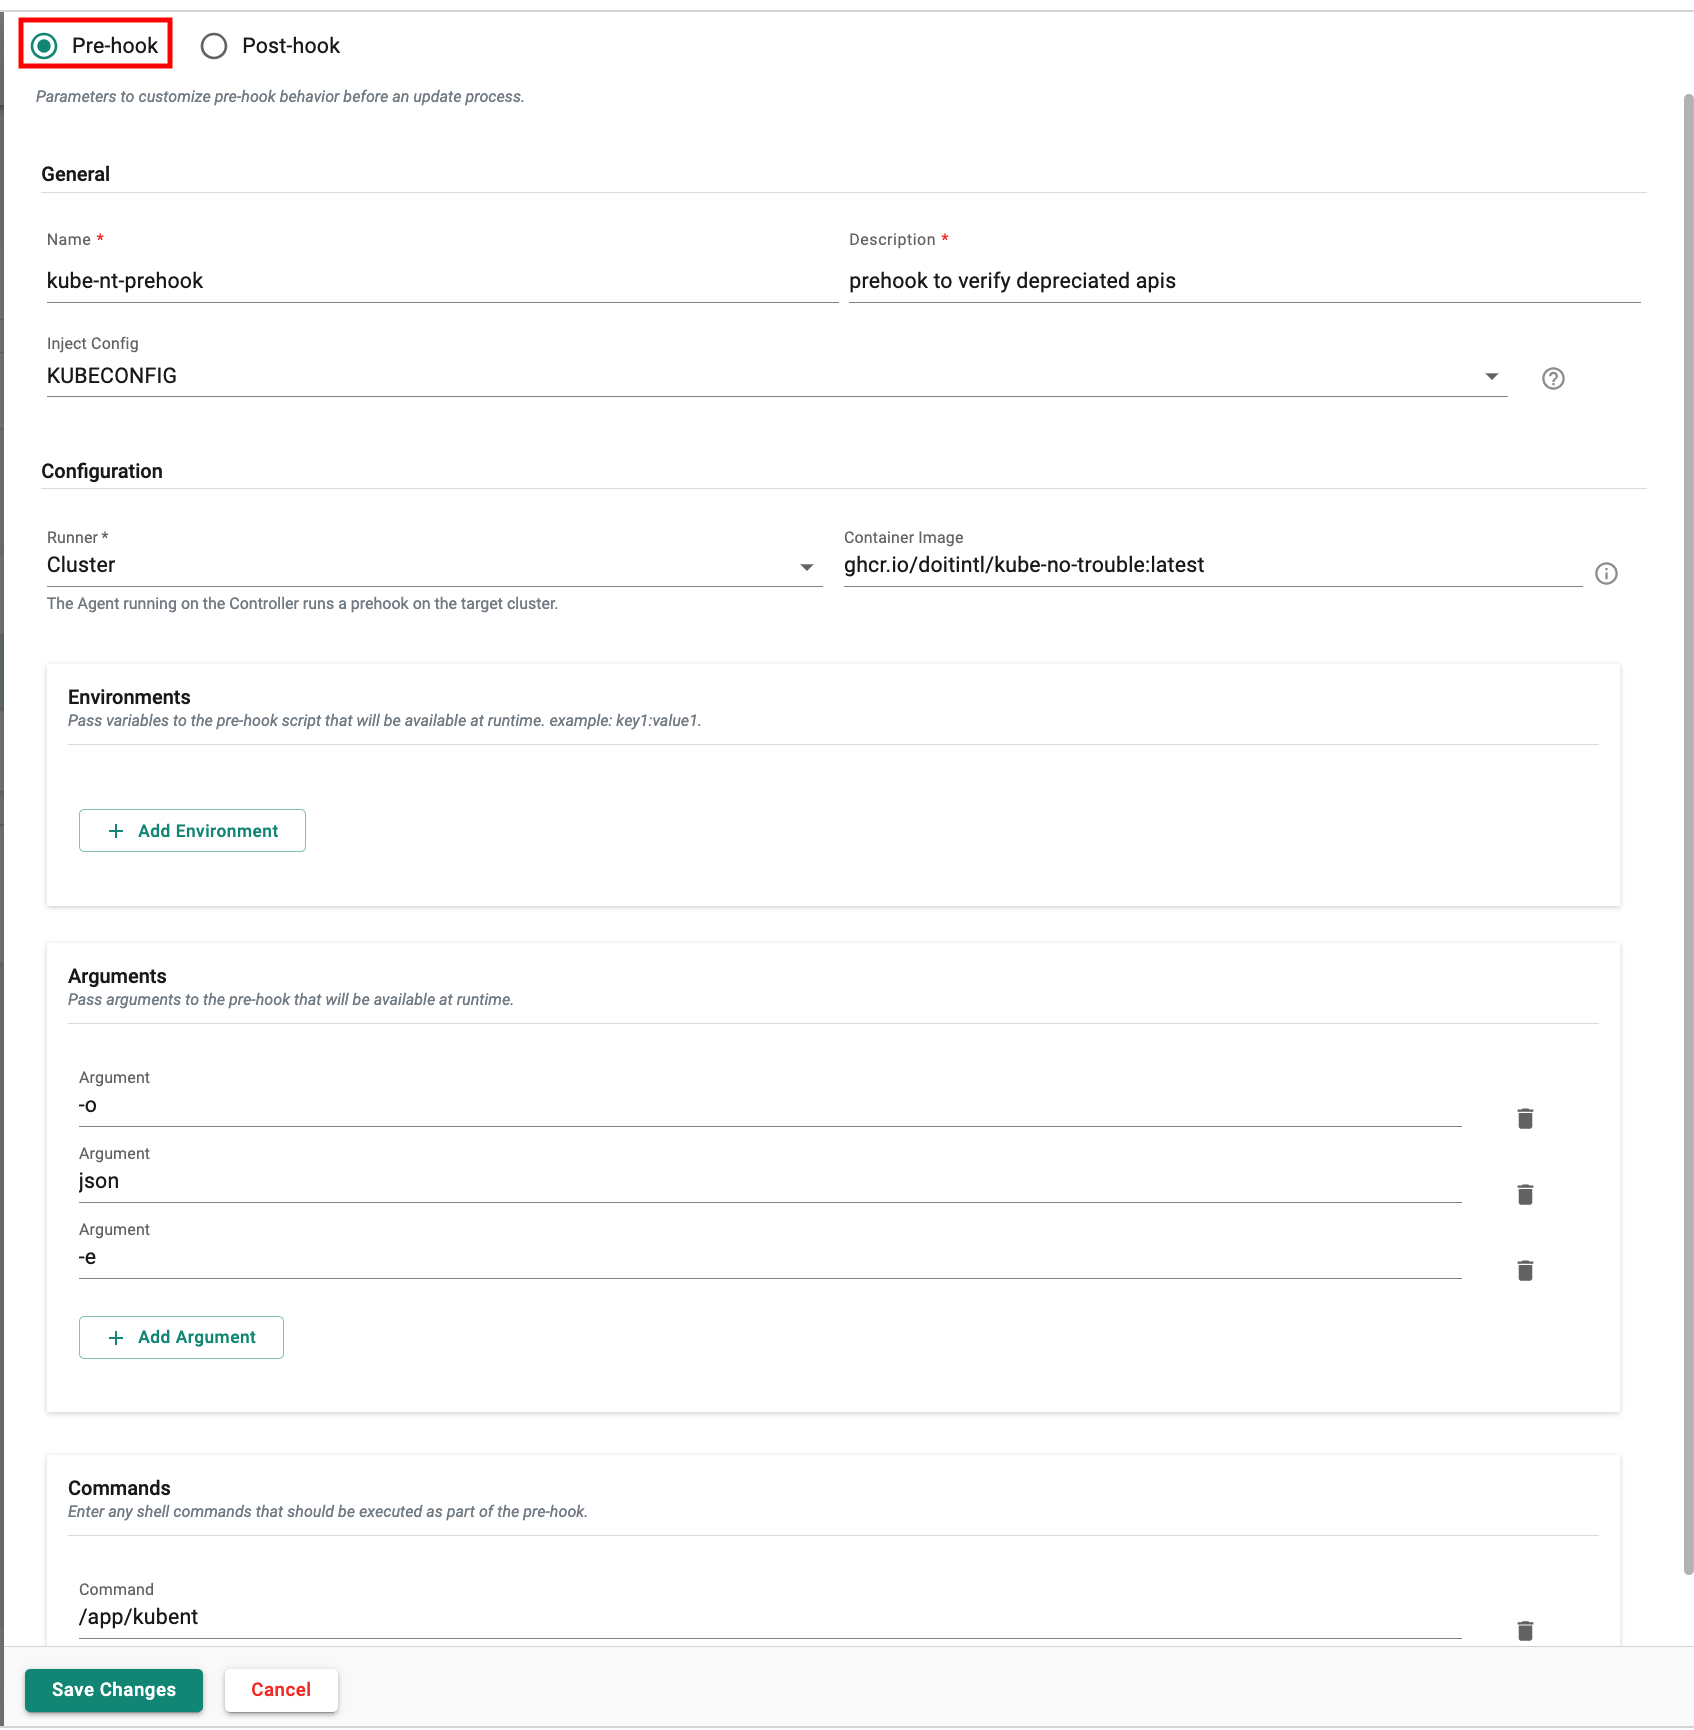
- To configure the post-hook, click on the "Save and Add Another Hook" button.
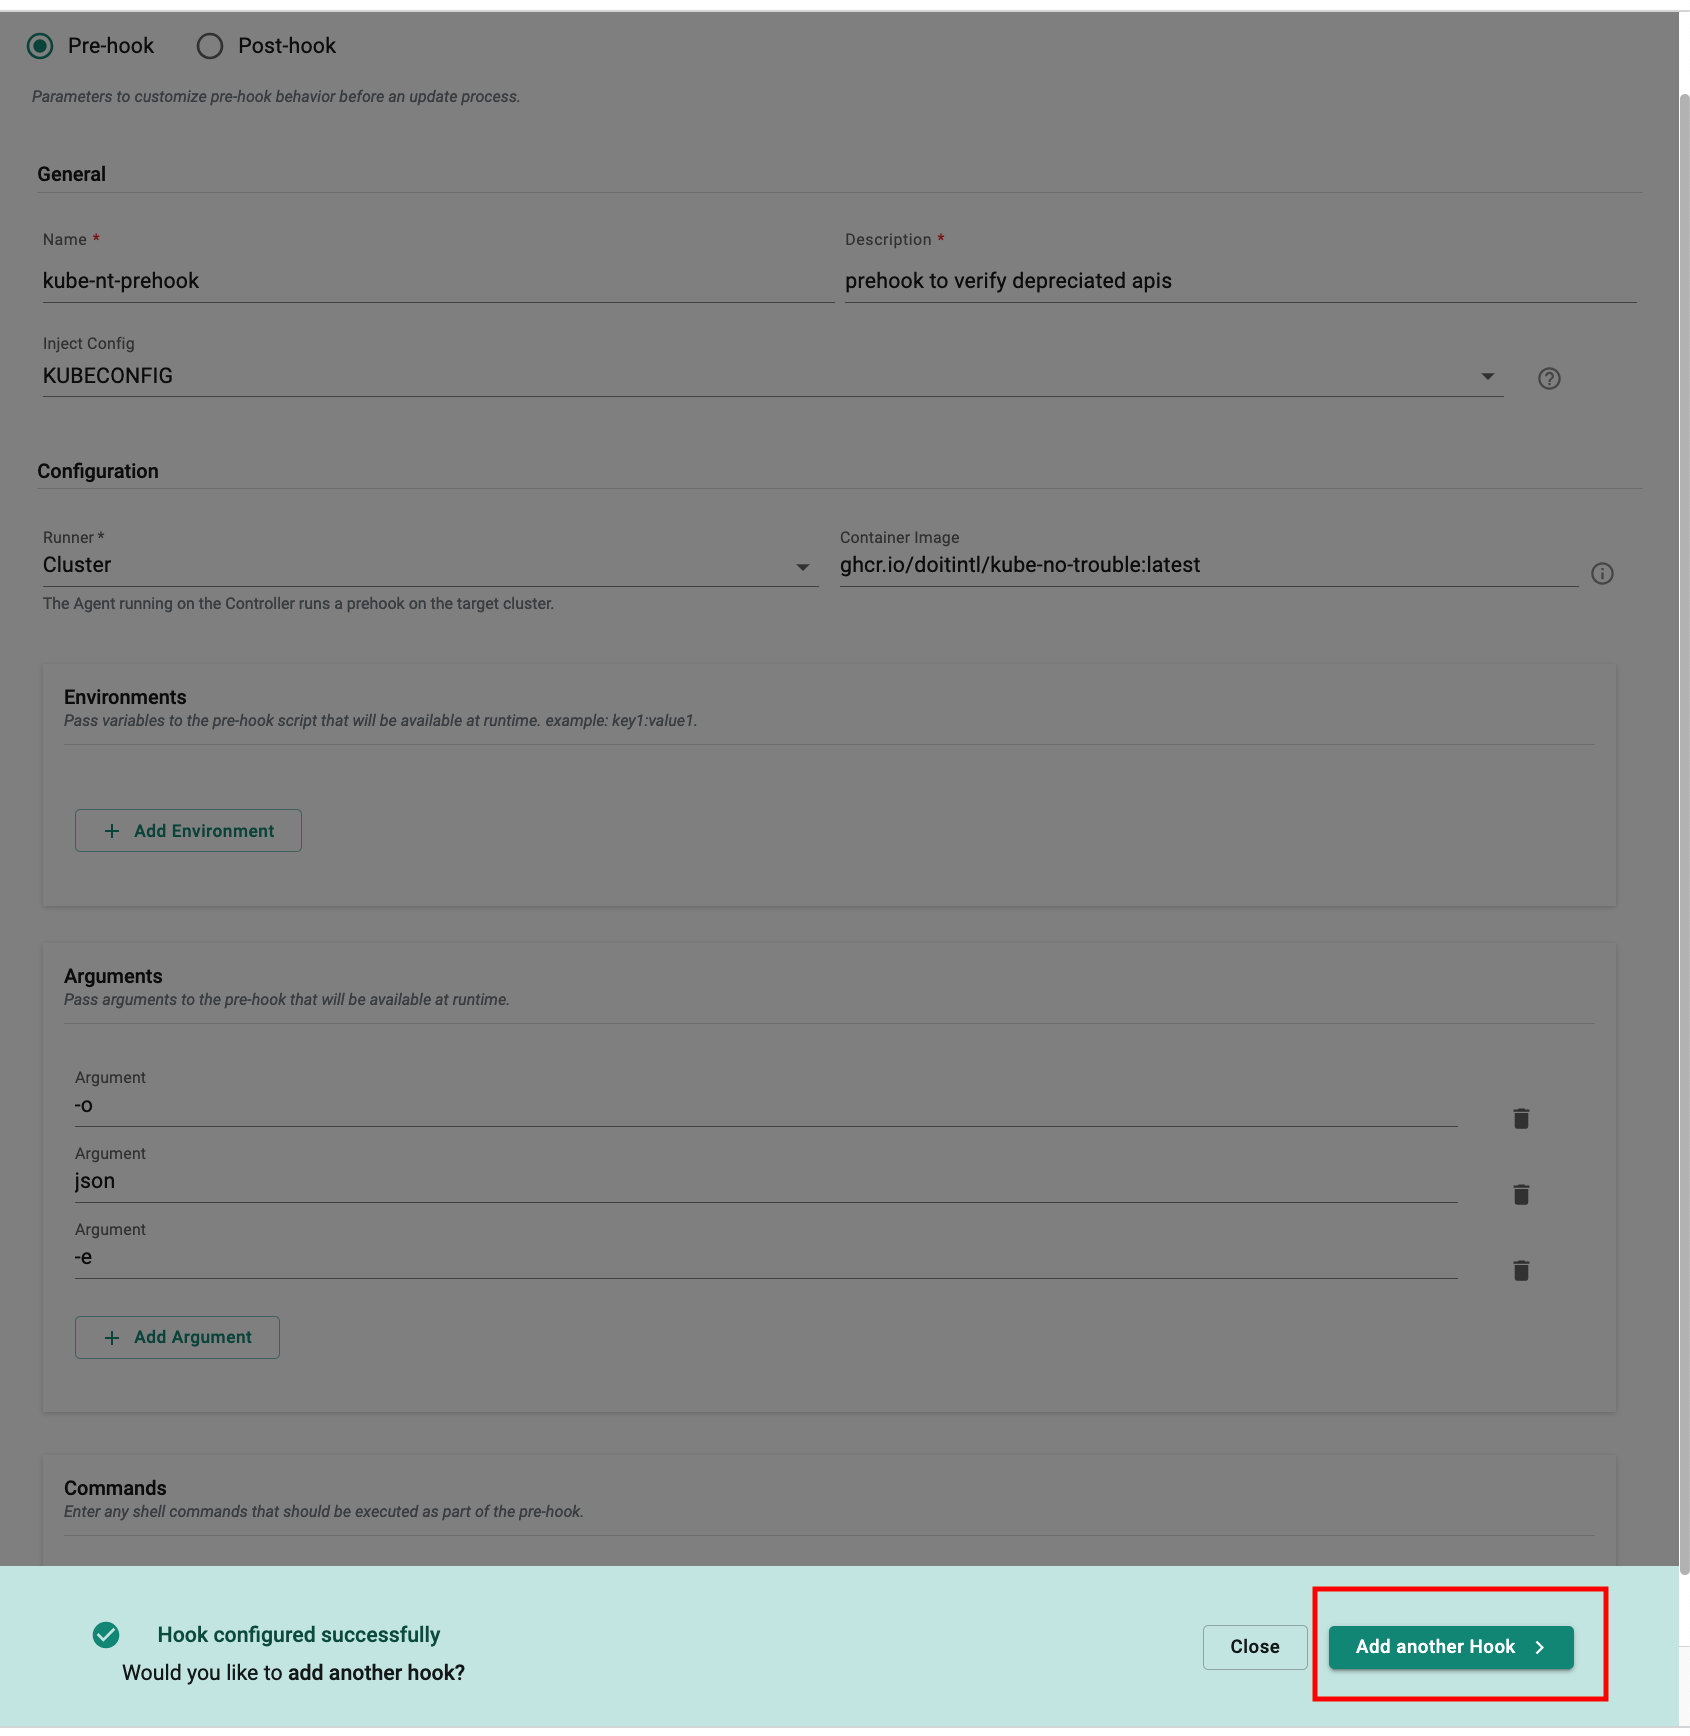
- Choose the "Post-hook" option in the hook configuration form.
- Provide a name for the post-hook.
- Optionally, add a relevant description for the post-hook.
- Choose "Cluster" as the Runner Config.
- Specify the container image to be used in the post-hook configuration.
- In this guide, we will make use of the "kubectl" tool in the post hook configuration to verify the status of nodes after upgrading the cluster, ensuring that they are in the "Ready" state.
- Specify the necessary arguments and commands for running the "kubectl" command.
- Click save
- In the Selector by default Labels will selected.
- Select the Projects that you want clusters to add in the fleet plan.
- Choose the labels for the clusters from the desired projects that you want to add to the fleet plan.
- As you can see in the screenshot, the configuration has selected two clusters with the label "cluster type aws-eks." This means that the configuration has selected two clusters.

- Click on the "Save" button.
- Congratulations! You now have a Fleet Plan that is ready to be executed or run.
Running Fleet Plan.
Once the fleet plan has been created, let's proceed to execute it and keep track of the progress.
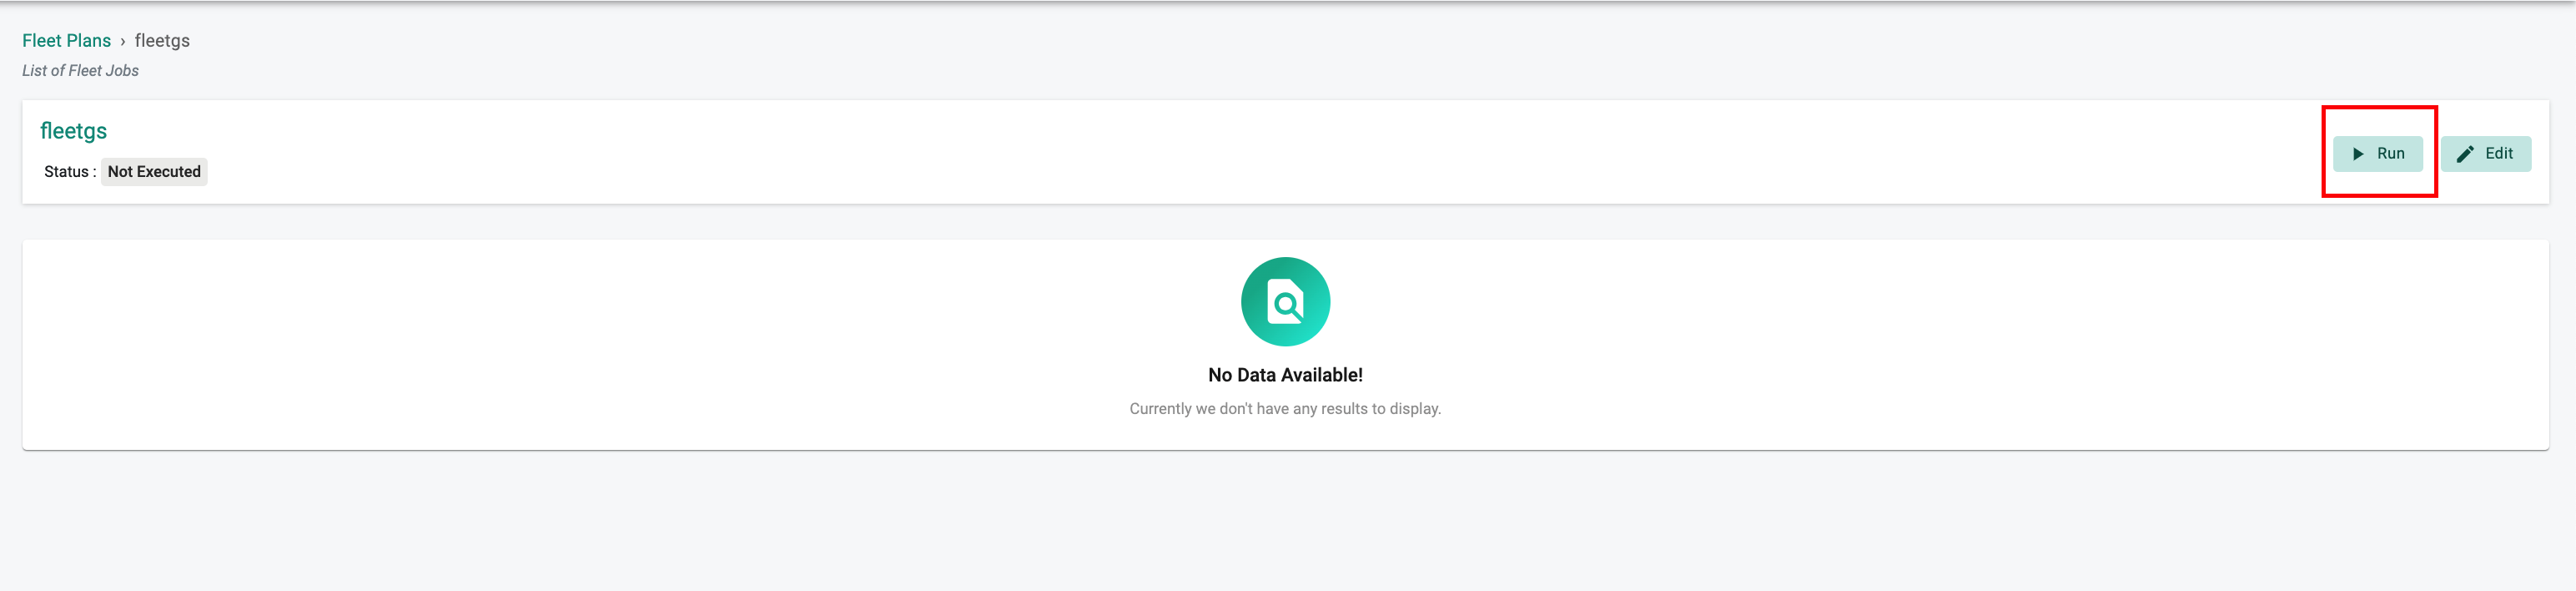
- Go to the created fleet plan.
- Select the "Run" option.
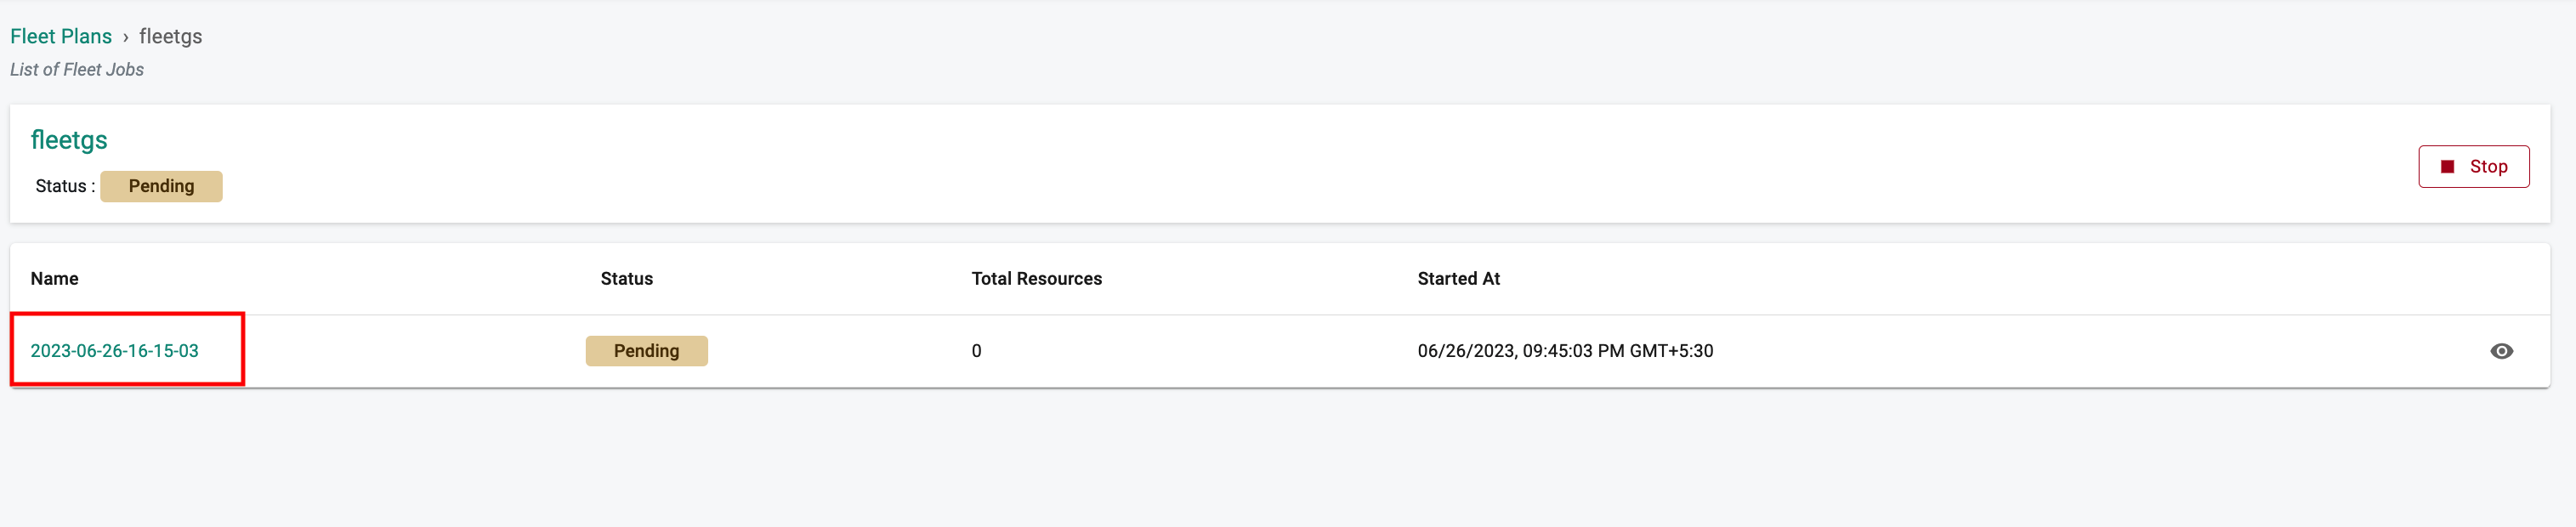
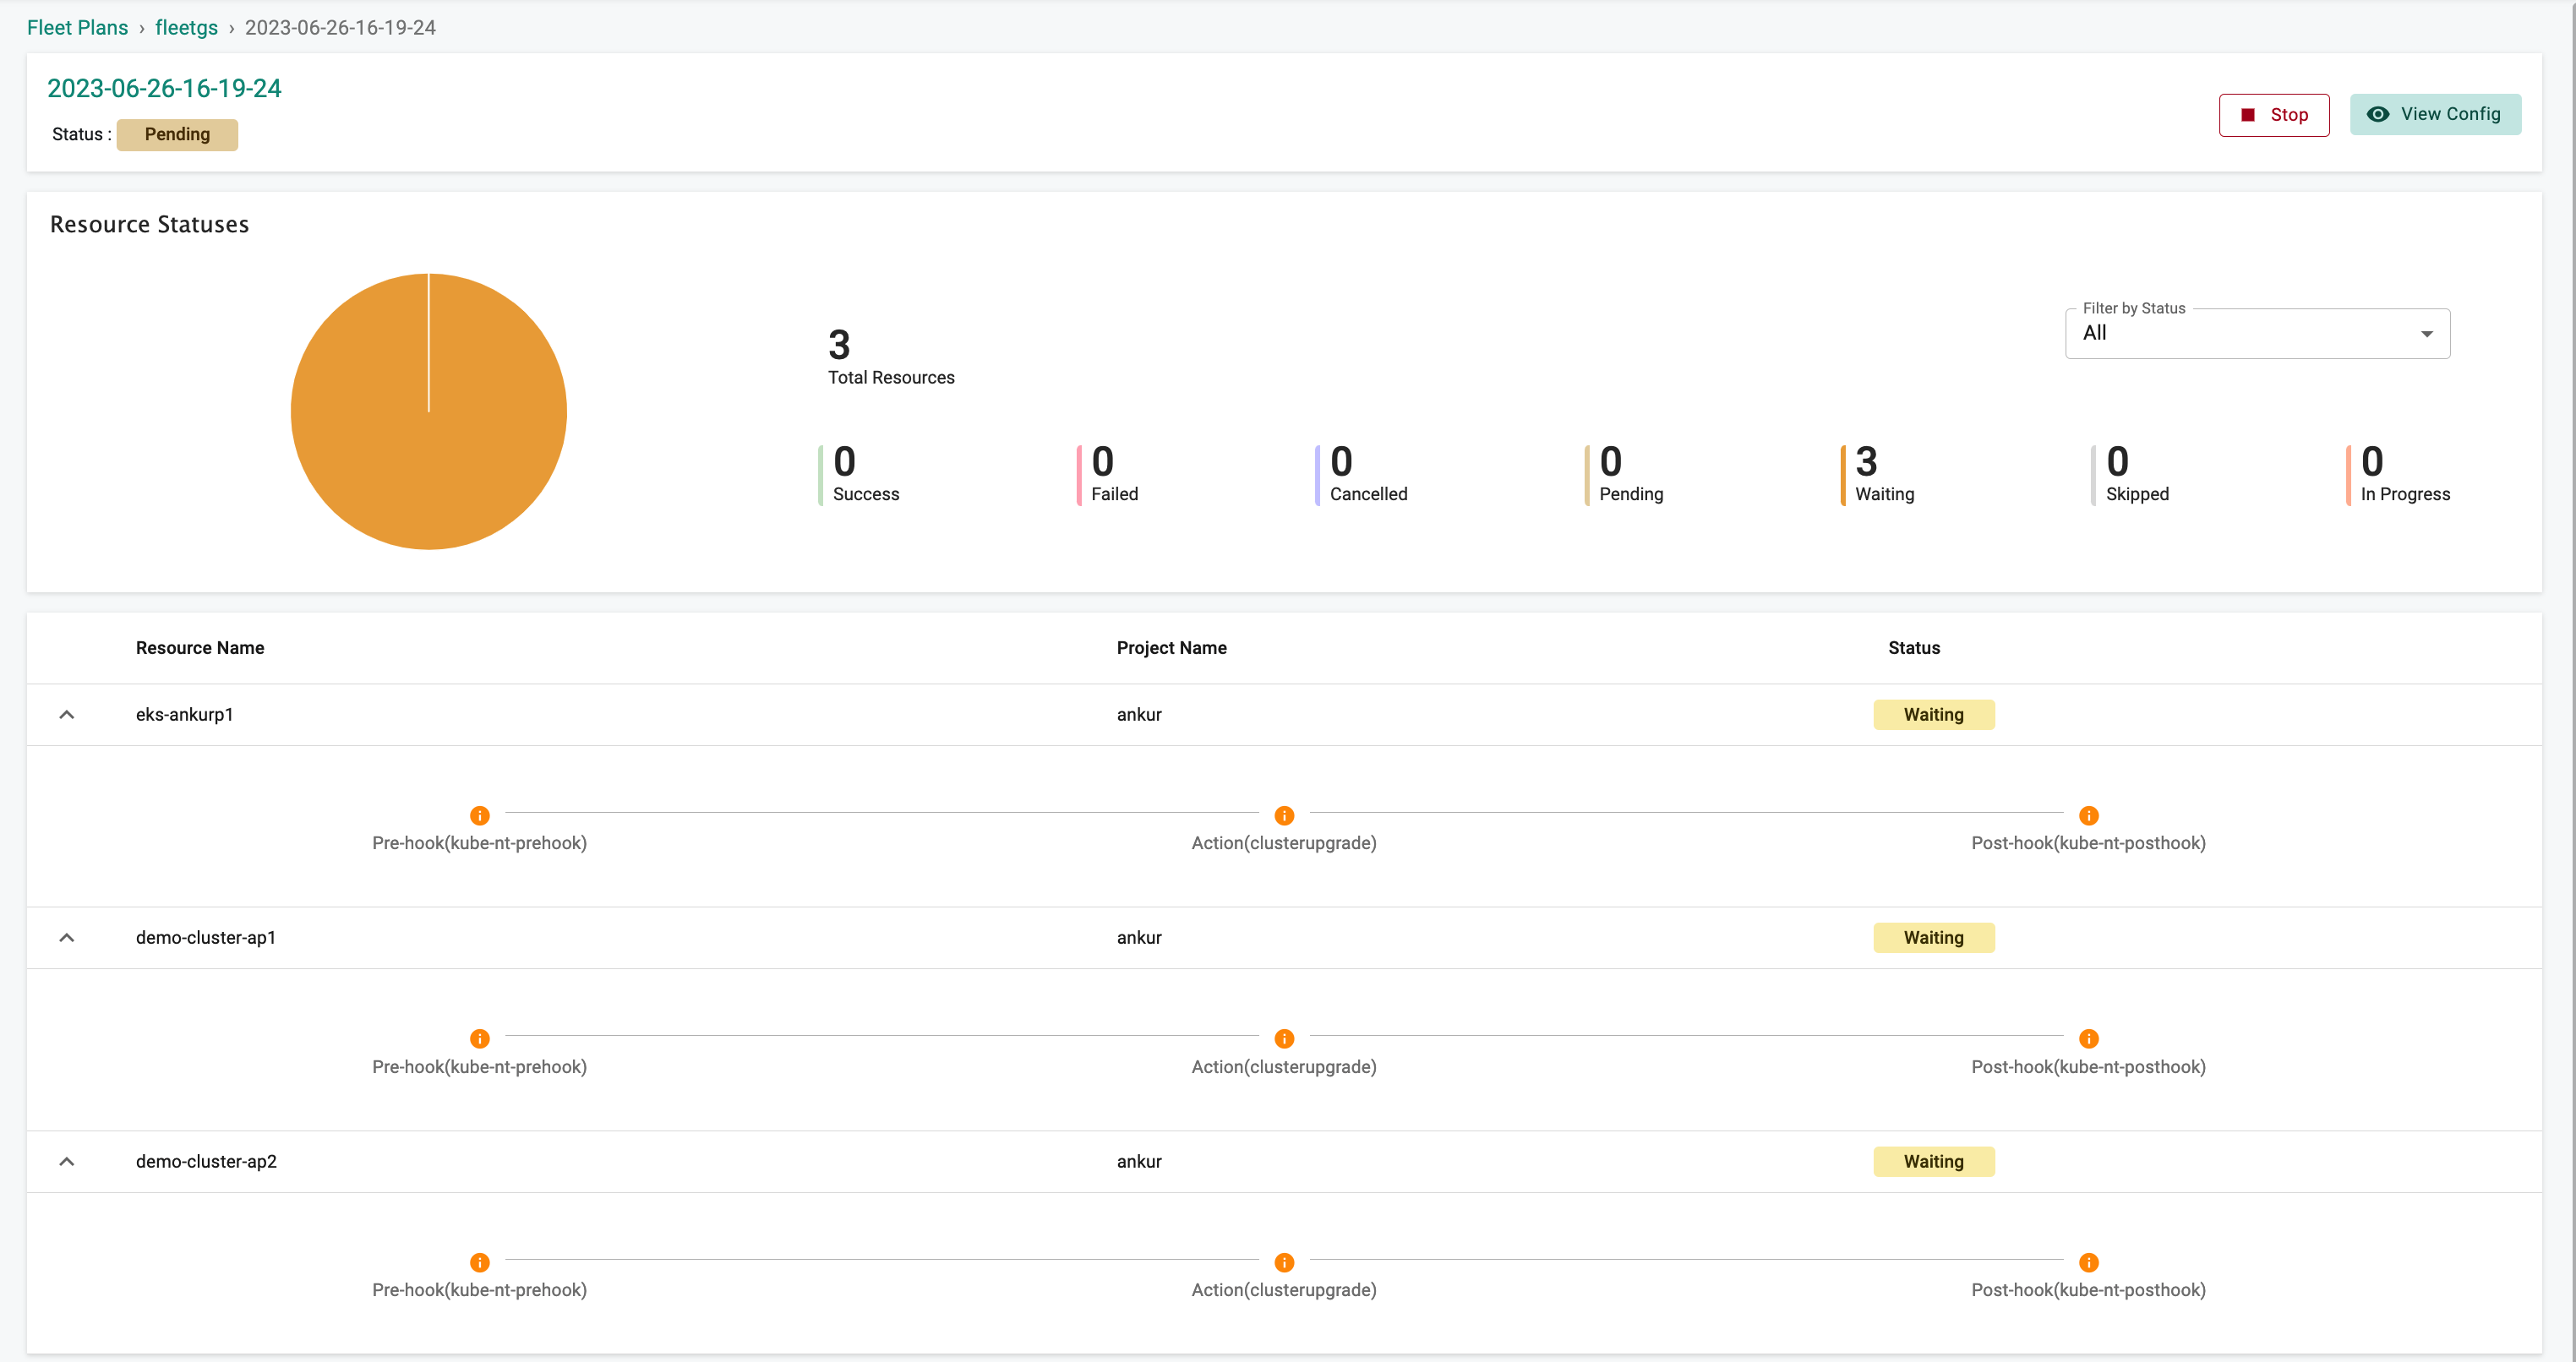
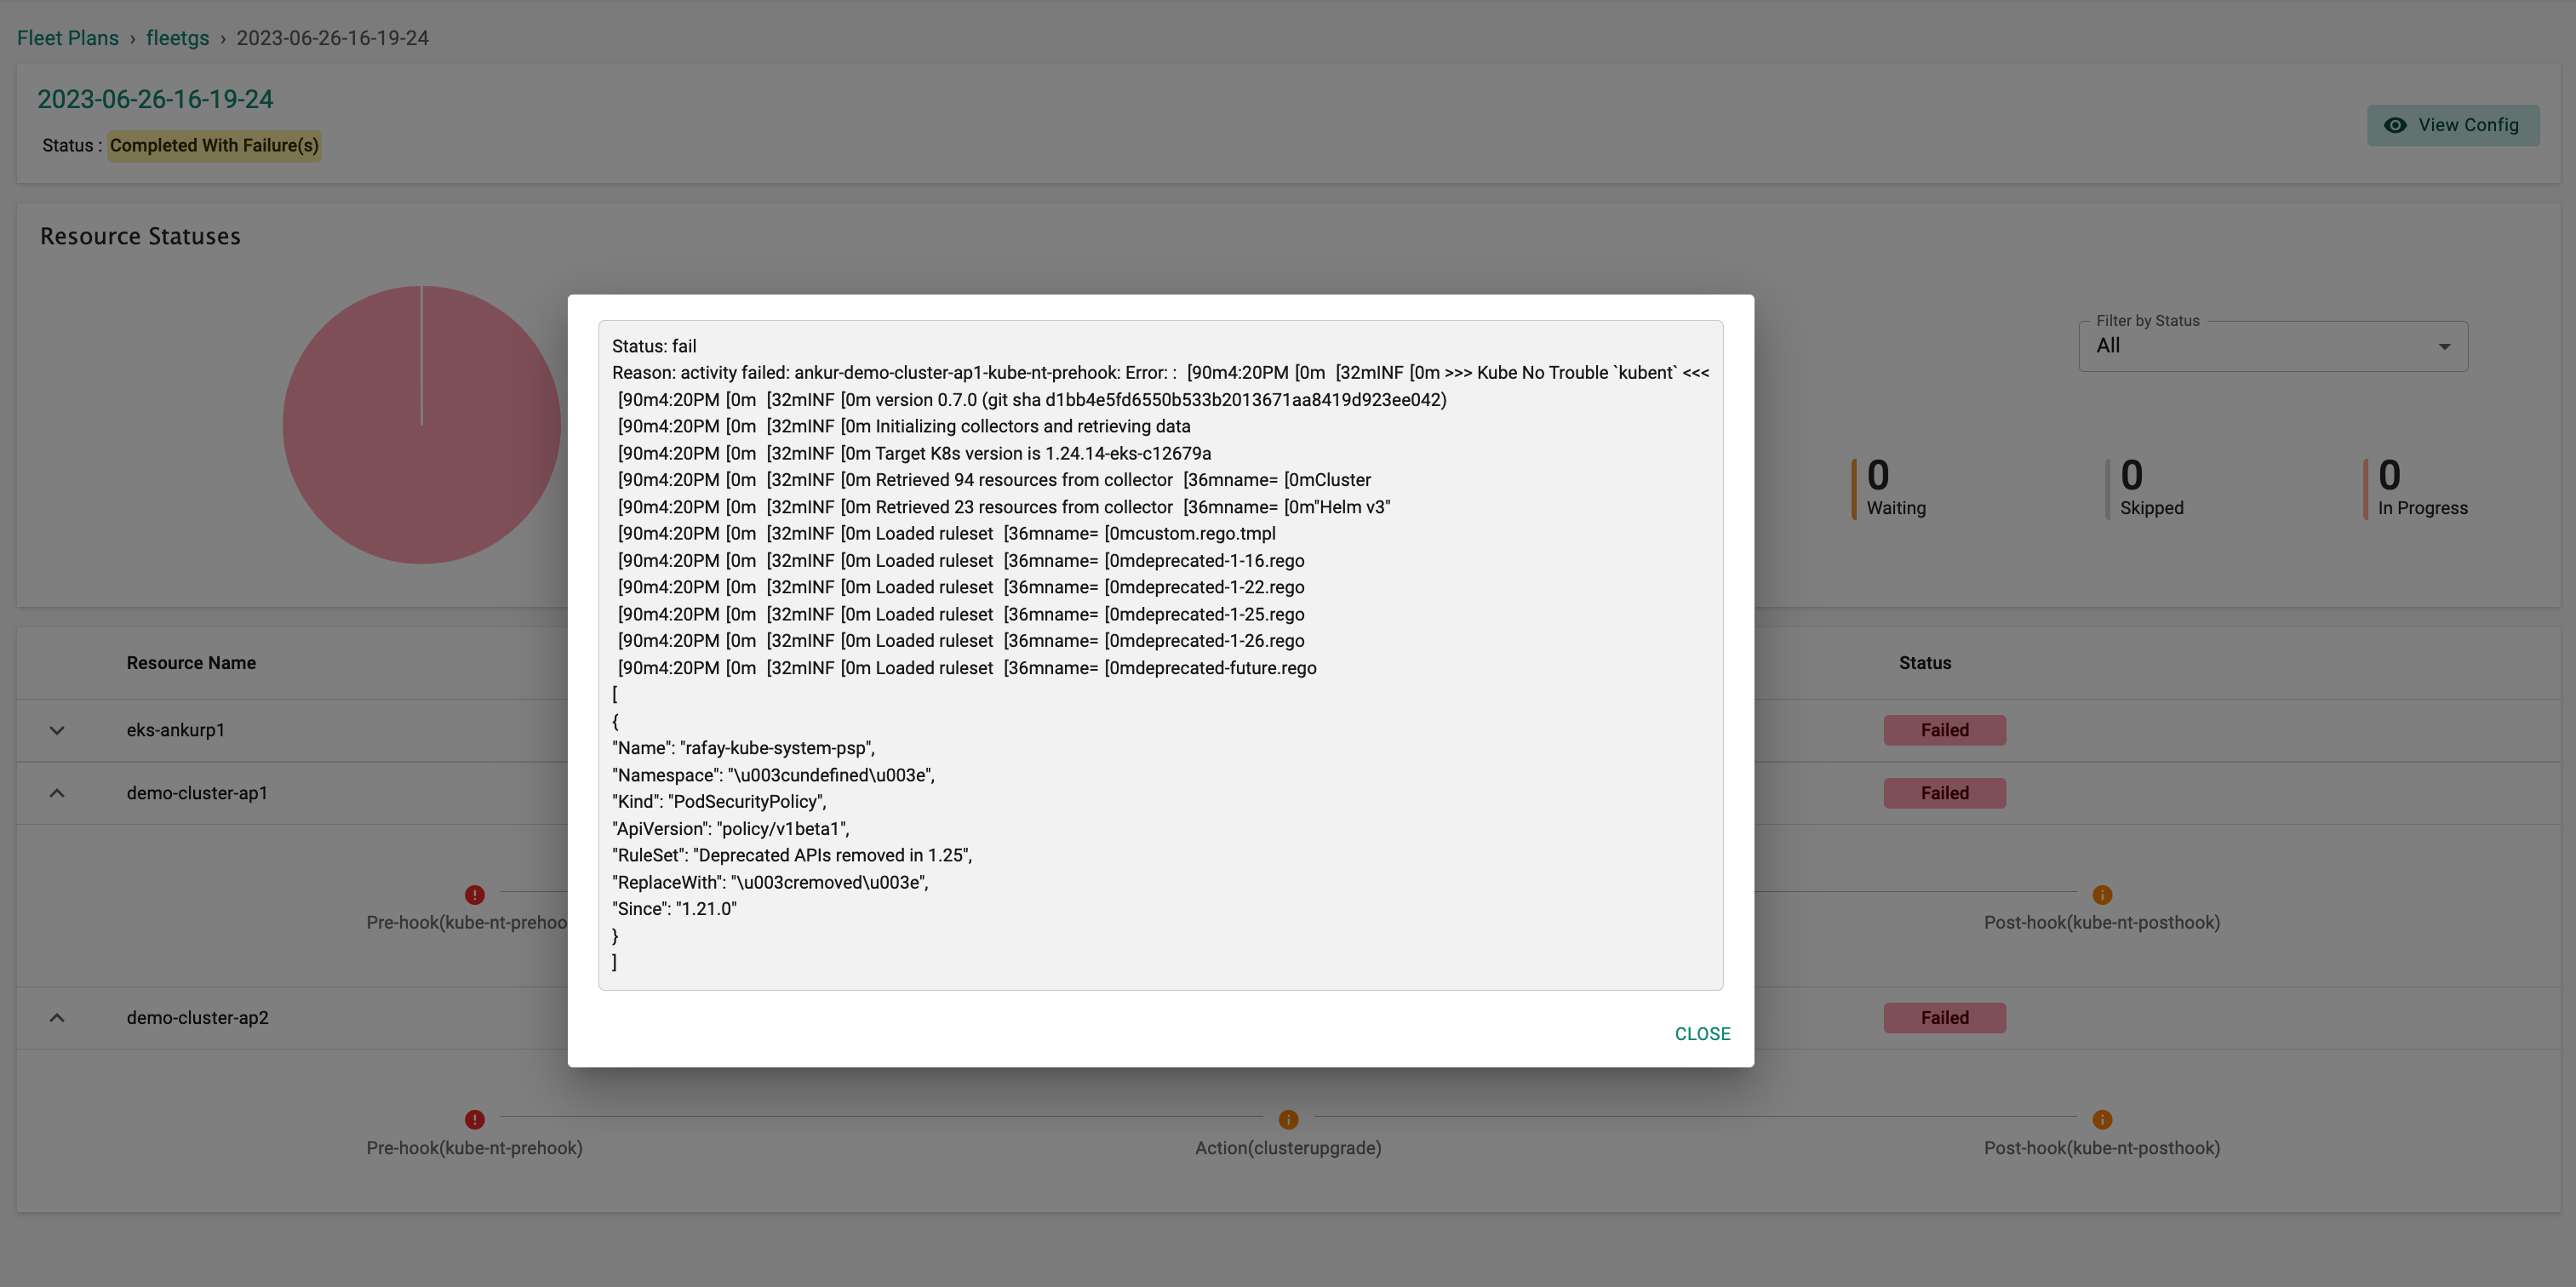
- After initiating the fleet job, you can track its progress by clicking on the respective fleet job and expanding the resource details.
- To view the job details, click on the fleet job and drill down for more information.
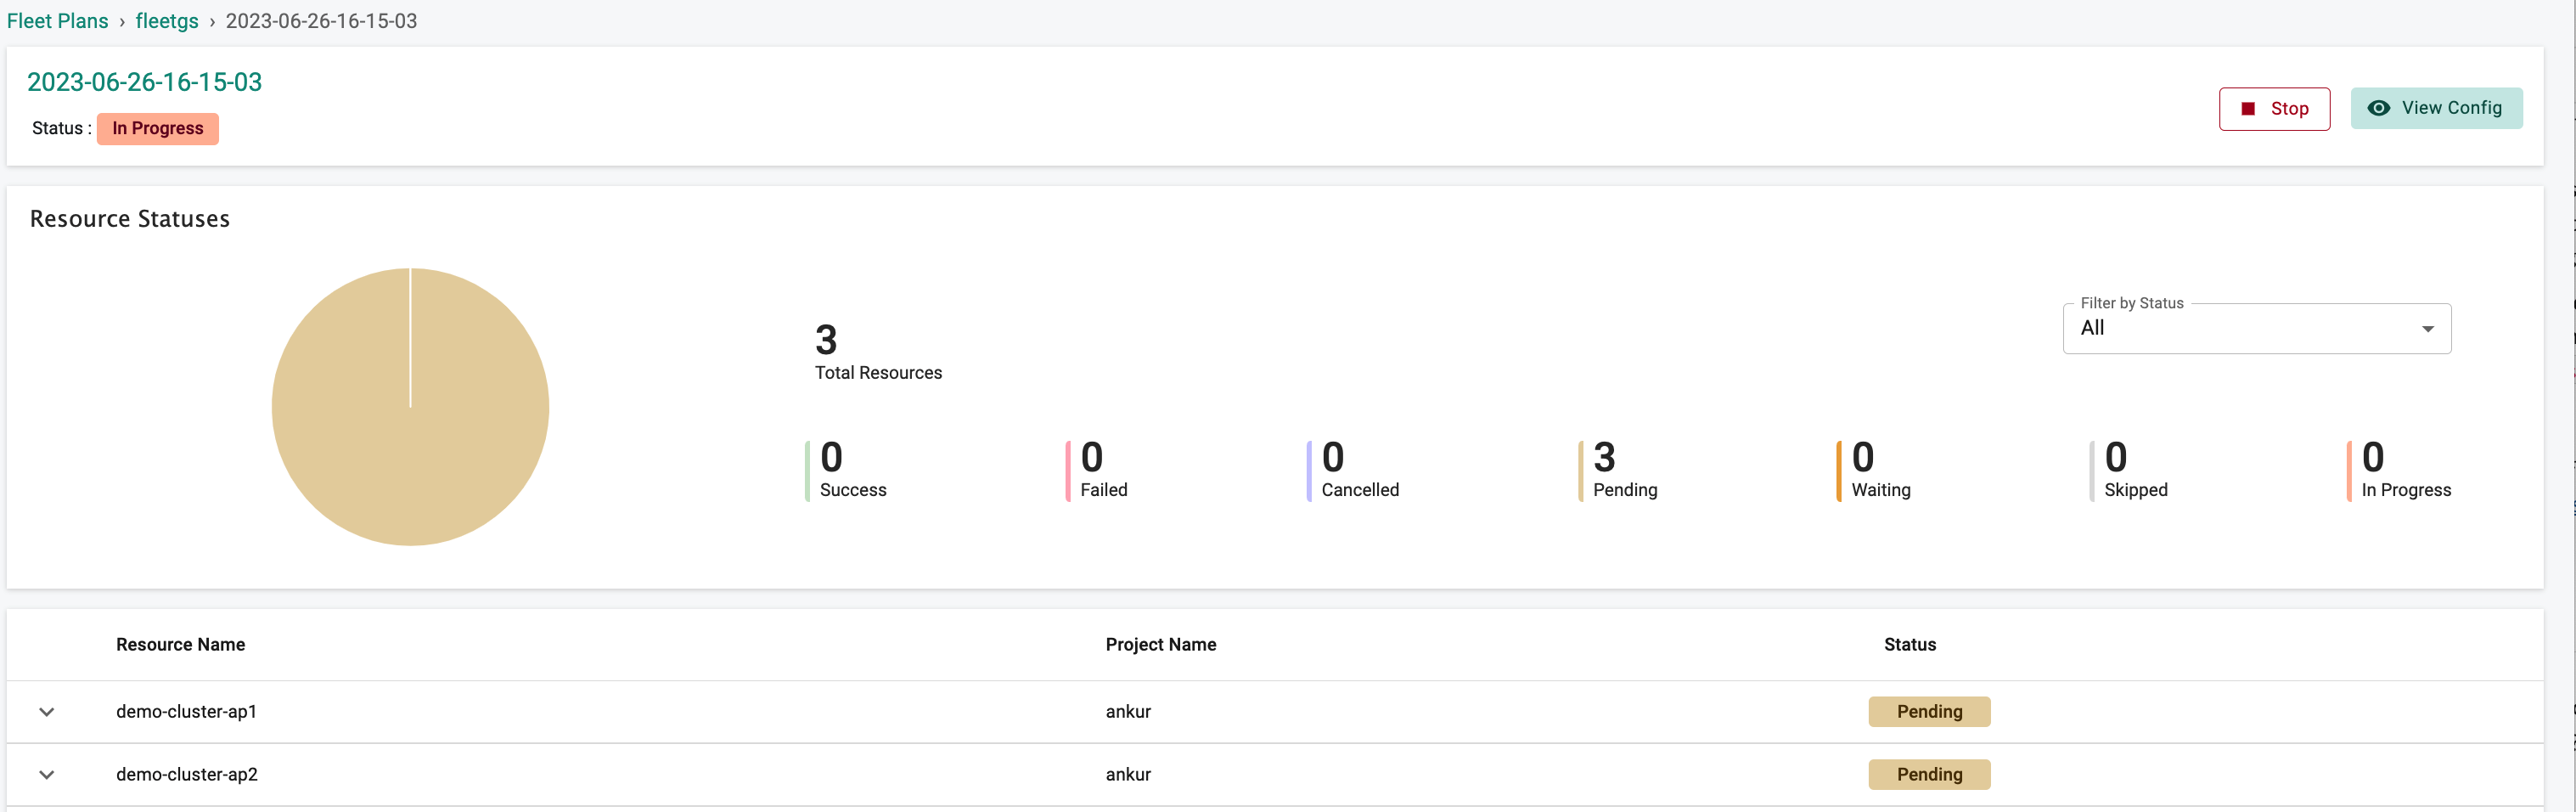
- To monitor the progress of prehooks, actions, and posthooks, expand each cluster resource
In the event that the fleet job fails due to a prehook failure caused by the identification of a deprecated API on the cluster, further actions will be halted.
Now, let's examine the successful fleet plan in which we attempted to update the cluster blueprint as an action. Additionally, a different prehook was used, which only displays the deprecated APIs without triggering a failure. By employing this approach, the fleet plan progresses to the action phase and effectively updates the blueprints in the fleet's selected clusters.
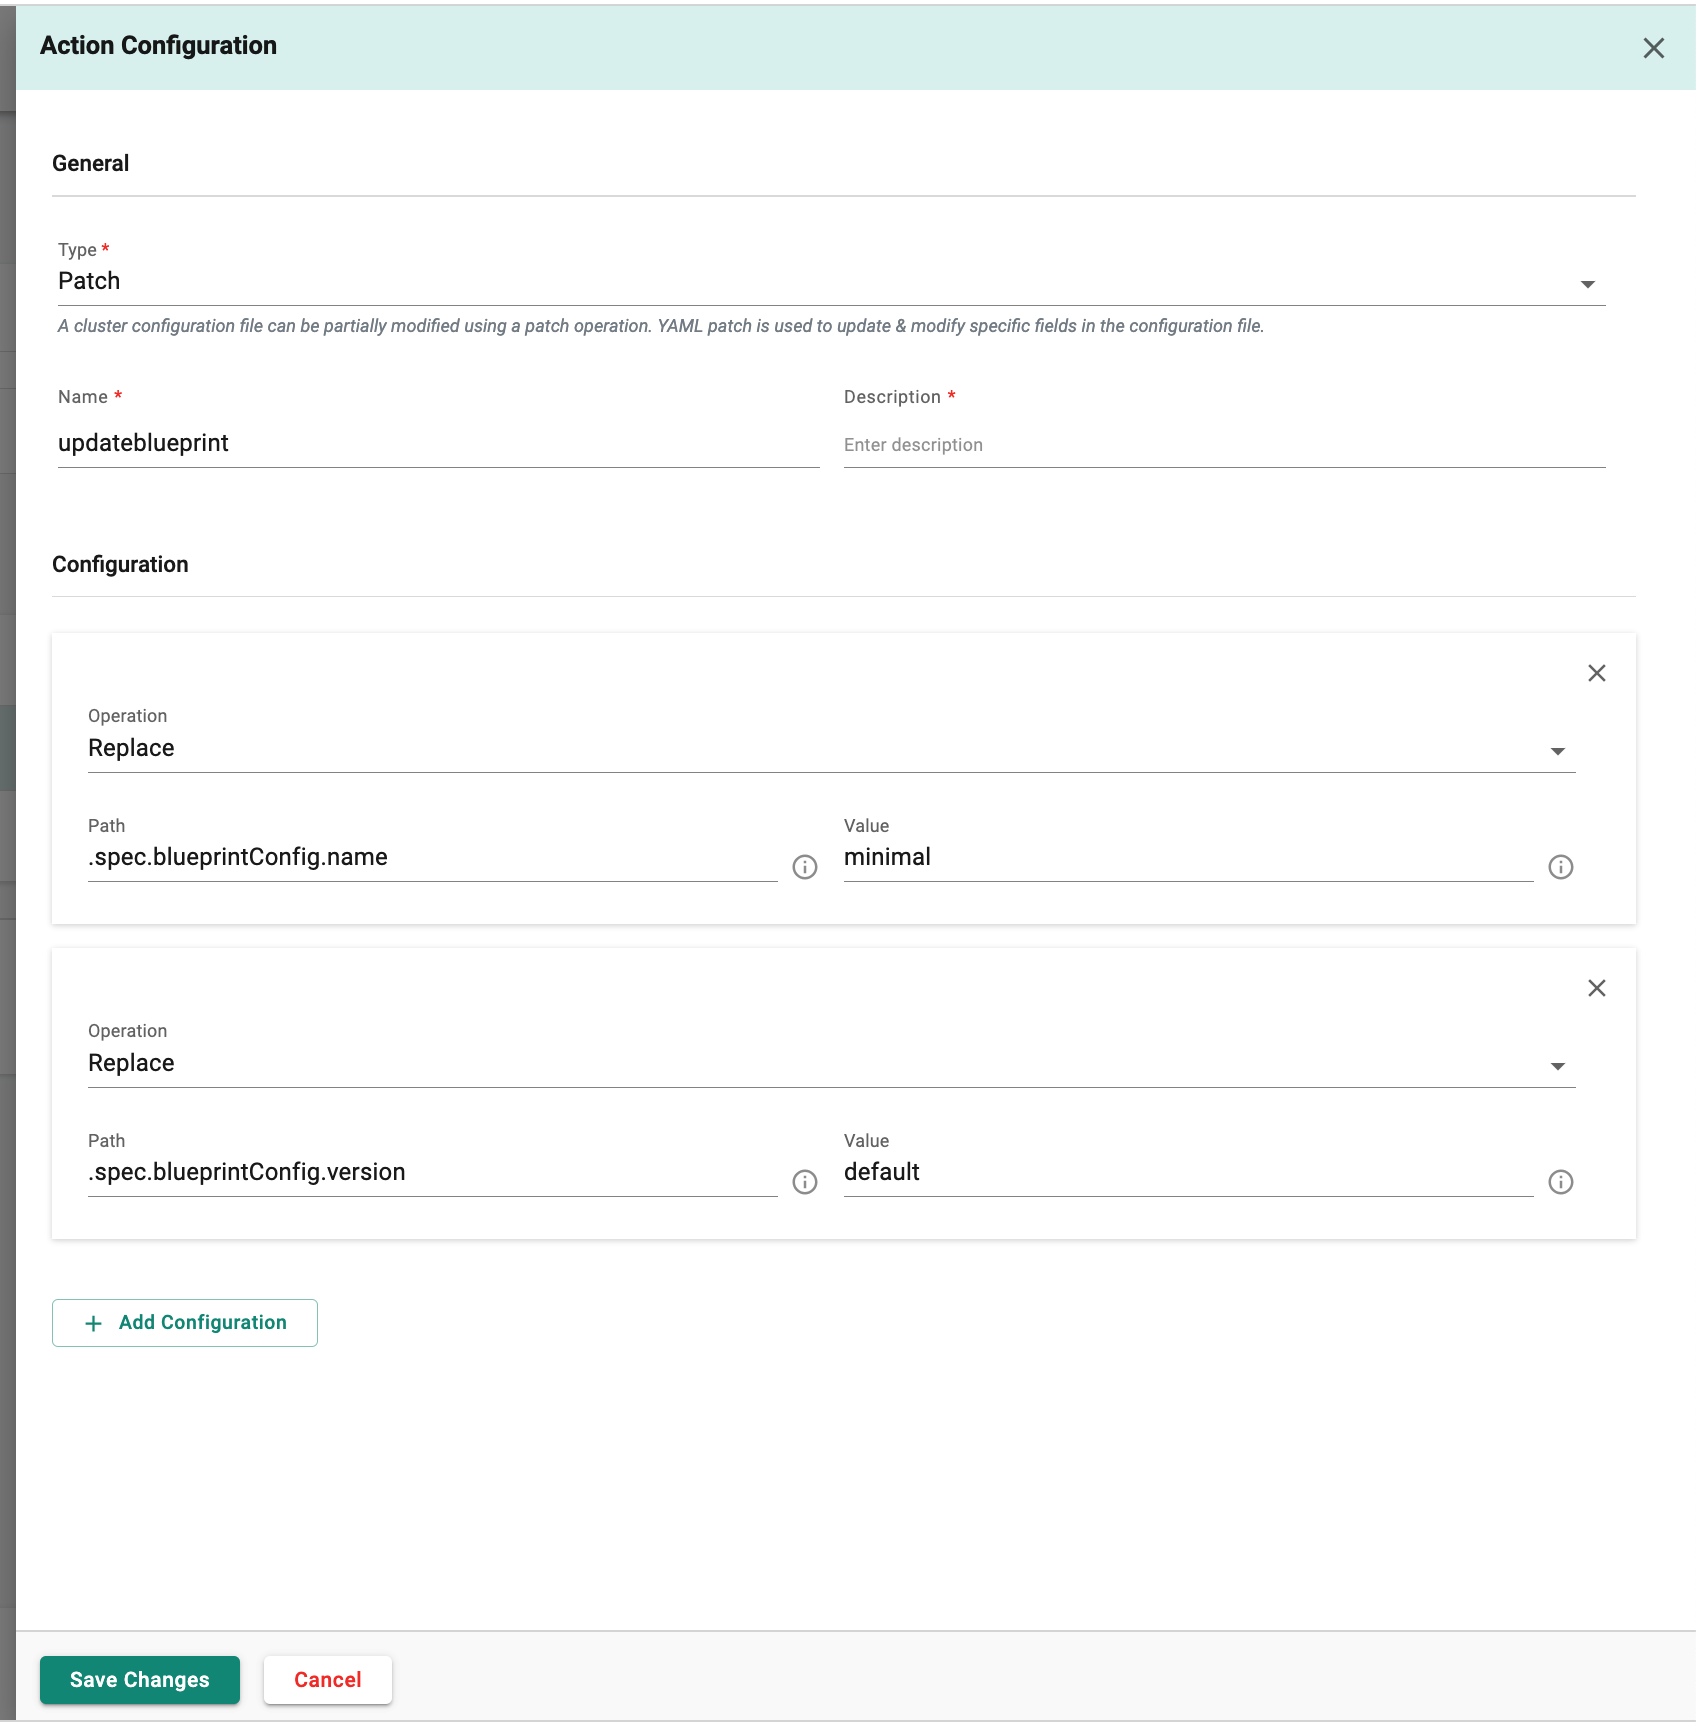
Action: Cluster Blueprint Update
This action involves updating the cluster blueprint from the default blueprint to the minimal blueprint
Prehook Configuration
In this example, we demonstrate the usage of the kubepug tool within the hook to perform Kubernetes object validation against the Kubernetes version. This tool efficiently generates a list of Deprecated APIs without causing any failures within the hook.

Execution of the Second Fleet Plan
Once the second fleet plan has been created, let's proceed to execute it and keep track of the progress.
- Go to the created fleet plan.
- Select the "Run" option.
- After initiating the fleet job, you can track its progress by clicking on the respective fleet job and expanding the resource details.

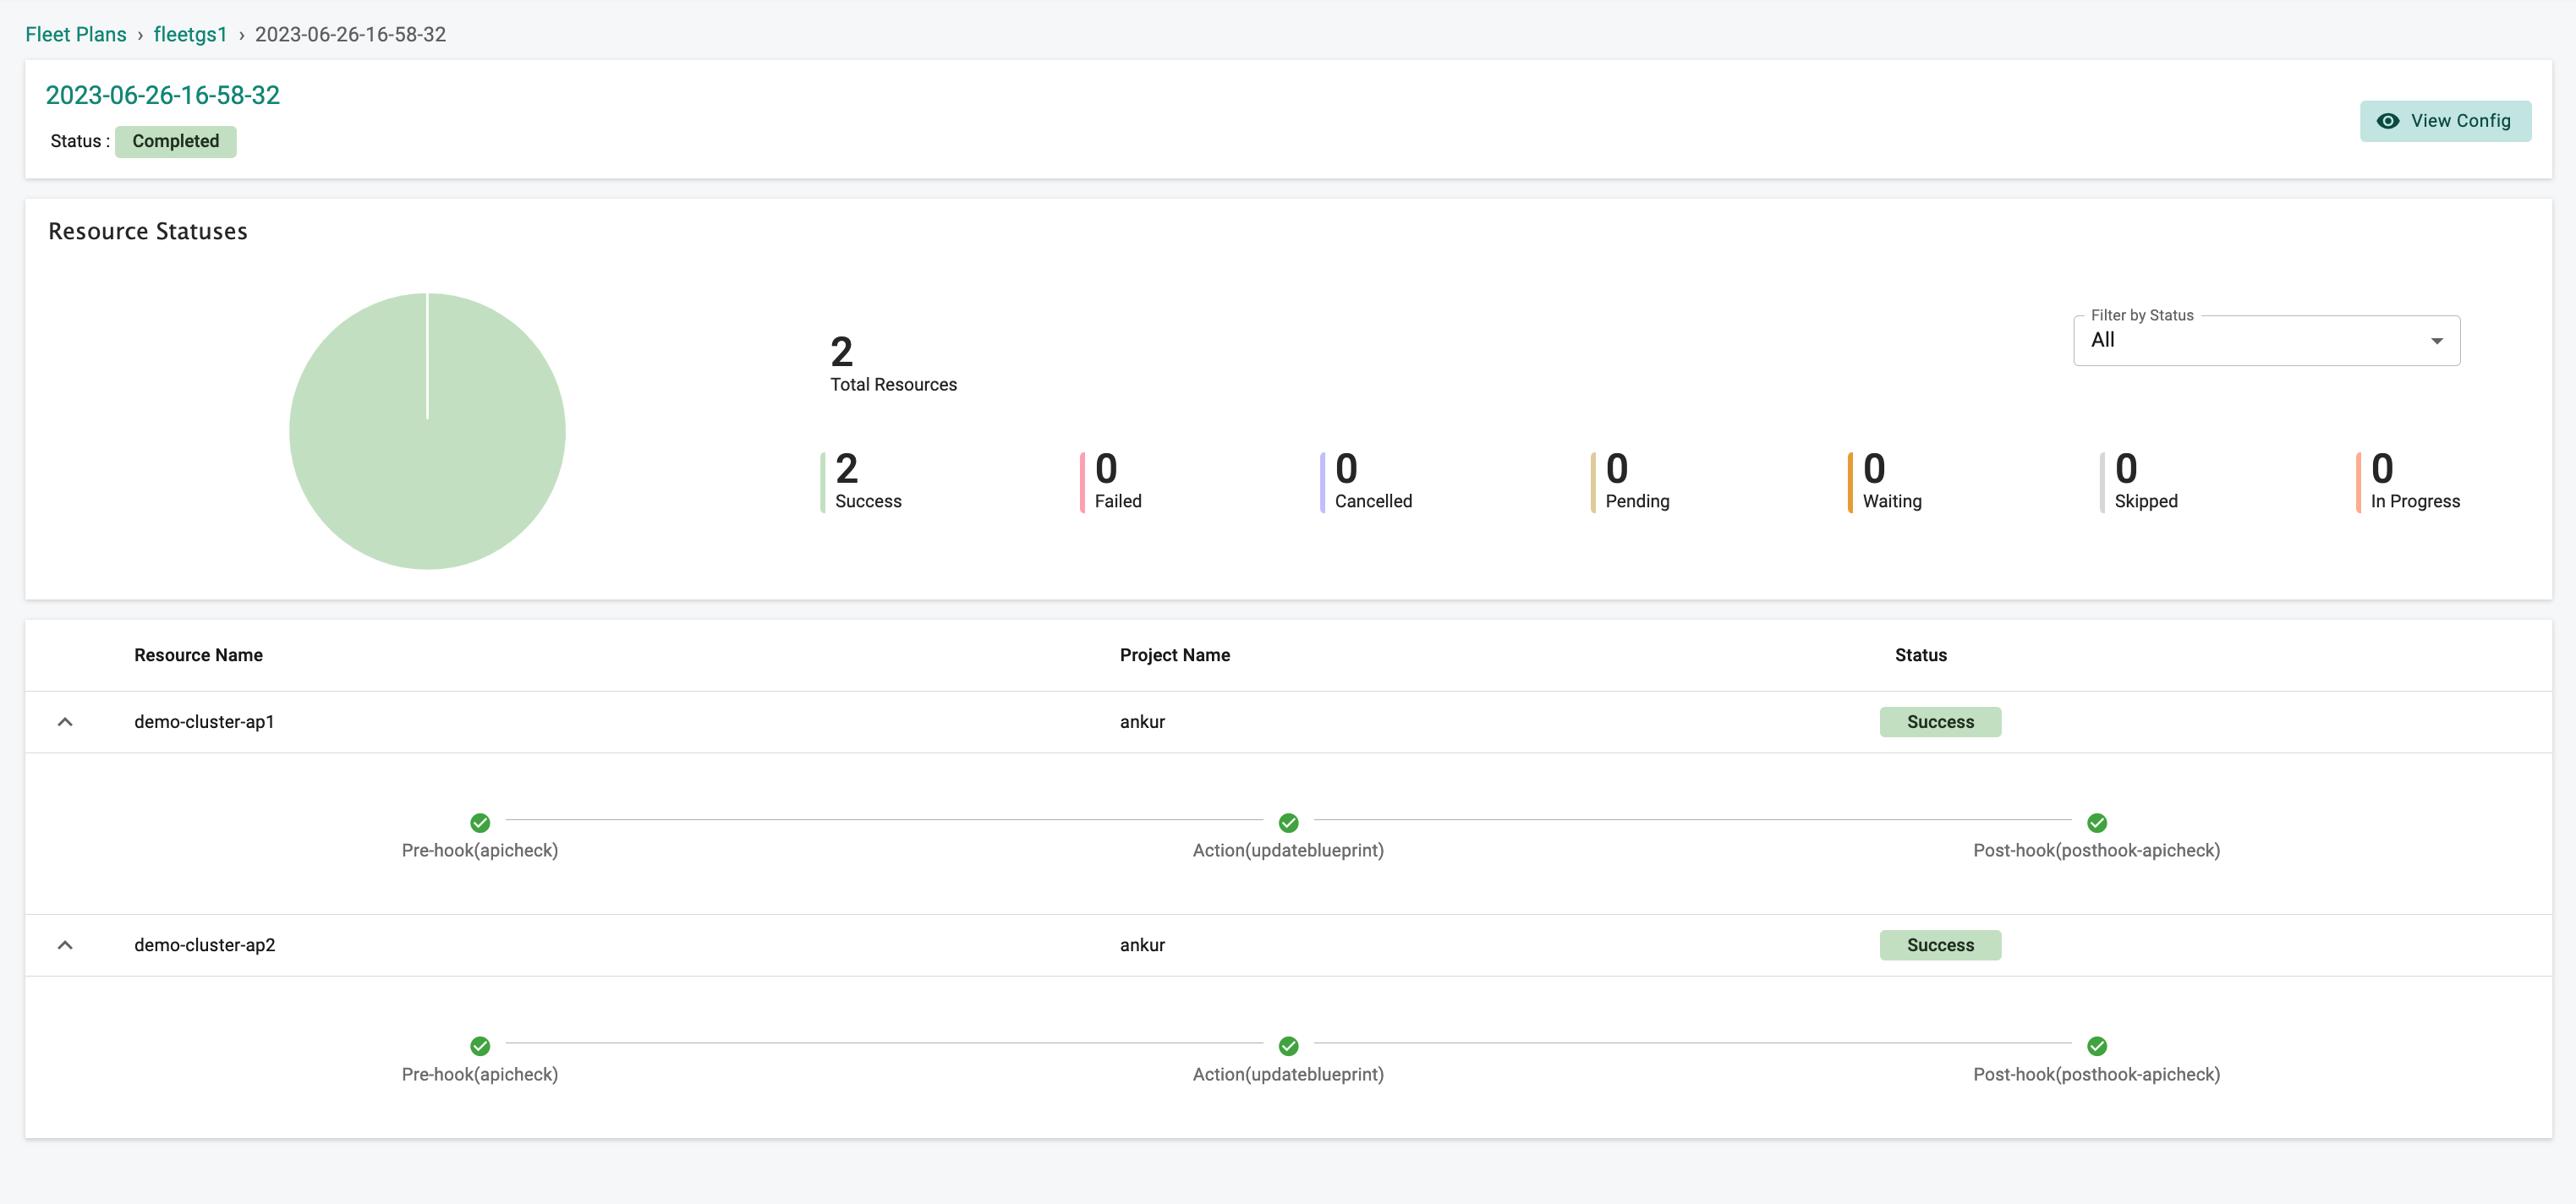
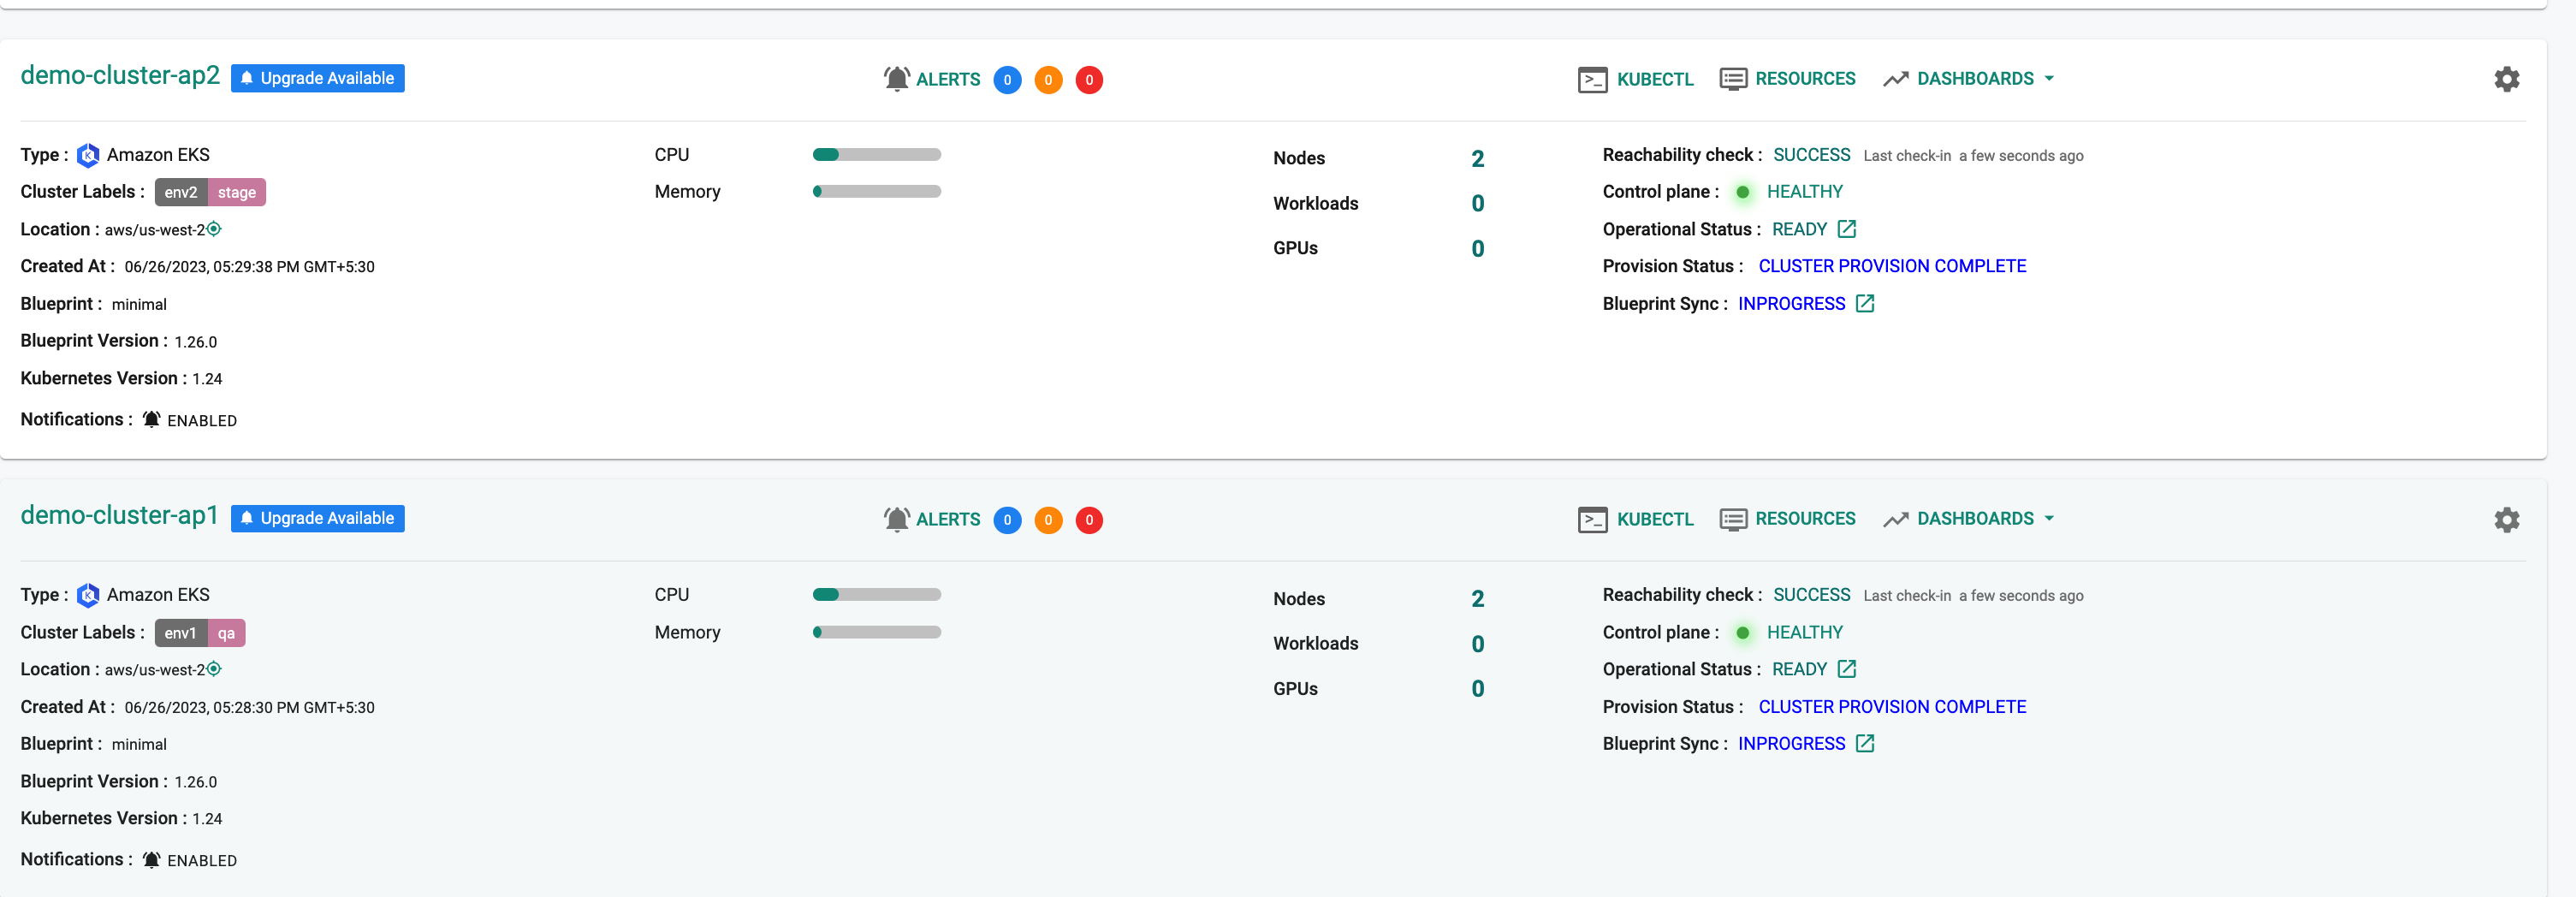
- Afterward, proceed to the
Clusterstab and verify the successful completion of the blueprint update, as illustrated below.
In this step, we will give the RCTL CLI a "declarative Fleet Plan specification." Then, we will use the RCTL CLI to send a command to the controller that starts the creation process and enables future actions on the fleet plan and job.
Save the Fleet Plan specification file below to your computer as "fleet-plan.yaml"
kind: FleetPlan
apiVersion: infra.k8smgmt.io/v3
metadata:
  name: fleetgs1
  project: ankur
spec:
  fleet:
    kind: clusters
    labels:
      rafay.dev/clusterType: aws-eks
    projects:
      - name: ankur
  operationWorkflow:
    operations:
      - name: cluster-update-blueprint
        prehooks:
          - name: apicheck
            containerConfig:
              runner: cluster
              image: ctadeu/kubepug:latest
            arguments:
              - --k8s-version=v1.26.5
        action:
          type: patch
          name: updateblueprint
          patchConfig:
            - op: replace
              path: .spec.blueprintConfig.name
              value: minimal
            - op: replace
              path: .spec.blueprintConfig.version
              value: default
        posthooks:
          - name: posthook-apicheck
            containerConfig:
              runner: cluster
              image: ctadeu/kubepug:latest
            arguments:
              - --k8s-version=v1.26.5
Update the following sections of the specification file with details to match your environment.
- Update the "project" with the name of your project
- You have the flexibility to utilize different hook configurations based on your specific requirements. The provided sample file serves as a reference and demonstrates the usage of the "kubepug" tool.
Execute the following command to create the fleet plan from the specification file previously defined
1 | |
If there are no apparent problems with the fleet plan specification file, the RCTL CLI will create the fleet plan and execute it accordingly.
Day 2 Fleet Plan Interaction with RCTL CLI Commands
To interact with a fleet plan using RCTL CLI on Day 2, you can use the following commands:
- Execute a fleet plan:
rctl execute fleetplan <name> - Edit and execute a fleet plan:
rctl apply -f <fleet-plan.yaml> (will edit and execute the fleetplan) - Get the targets for a fleet plan:
rctl gettargets fleetplan <name> <job> - Get the status of jobs that have been run so far in a specific fleet plan:
rctl getjobs fleetplan <name> - Delete a fleet plan:
rctl delete fleetplan <name>
Recap
In this section, you have created a fleet plan for a fleet of clusters, each with its own set of hooks and actions to be run.