Create
Workflow Handlers provide flexibility for customers to adapt the workflow engine to their specific needs. Examples include:
(a) Operating in an air gapped environment - Custom Workflow Handlers allows creation of custom Docker images that includes the necessary components to operate in environments without internet connectivity
(b) There are actions that cannot be directly represented in TF's declarative model and require use of "custom provisioners". An example of this could be a feature/functionality that isn't yet supported in it's TF provider
The workflow engine supports three (3) types of Workflow Handlers for activity execution:
- Container
- HTTP
- Functions
Container Workflow Handler
Container Workflow Handler is designed to execute container images to completion. In this context, a container image is an executable package containing all the essentials for running an application, such as code, runtime, libraries, and system tools. The container Workflow Handler runs as a pod in the cluster by the cd-agent. To deploy this container Workflow Handler as a pod in the cluster, the user can specify details such as CPU limits, memory limits, arguments, commands, environment variables, and files. Leveraging the Container Workflow Handler in the workflow engine enables the definition of activities that include the execution of specific containerized tasks or processes as integral parts of the workflow.
Creating a Custom Terraform Workflow Handler Image
Important
Custom Terraform Workflow Handler Images can only be created by customers who are licensed for Terraform Enterprise or Terraform Cloud
To create a custom Terraform Workflow Handler image, follow these steps:
- Start by obtaining the latest official Terraform Workflow Handler image
- Use the official Terraform Workflow Handler image as the base to build your custom Workflow Handler image. Users can add any additional configurations or customizations required for the custom TF Workflow Handler image
- Ensure that the custom Workflow Handler image either does not have any entrypoints or contains the same entrypoint as the official Terraform Workflow Handler image. This ensures consistency and compatibility with existing workflows
Create a custom terraform Workflow Handler with pre-installed terraform binary
- The terraform binary should always be copied to the /home/terraform/app directory
FROM registry.dev.rafay-edge.net/rafay/terraform-driver:r2.7.0-1

ARG DEFAULT_TF_DOWNLOAD_ENDPOINT="https://releases.hashicorp.com/terraform/1.5.5/terraform_1.5.5_linux_amd64.zip"

USER root

RUN wget -O terraform.zip $DEFAULT_TF_DOWNLOAD_ENDPOINT \
&& unzip terraform.zip \
&& rm terraform.zip \
&& mv terraform /usr/local/bin/terraform

USER terraform
Create a custom terraform Workflow Handler pre-installed terraform provider plugins
FROM --platform=${BUILDPLATFORM} hashicorp/terraform:1.5.7 as terraform
ARG TARGETOS TARGETARCH

RUN mkdir -p /.terraform/plugins
COPY rafay-provider.tf ./rafay-provider.tf
RUN terraform providers mirror -platform=${TARGETOS}_${TARGETARCH} /.terraform/plugins

FROM registry.dev.rafay-edge.net/rafay/terraform-driver:r2.7.0-1

USER root

COPY terraformrc /.terraformrc
ENV TF_CLI_CONFIG_FILE /.terraformrc

RUN mkdir -p /.terraform/plugins && chown -R terraform:terraform /.terraform/plugins

USER terraform

COPY --from=terraform /.terraform/plugins /.terraform/plugins
Below are the Rafay providers terraform configuration
# rafay-provider.tf
terraform {
  required_providers {
    rafay = {
      source = "registry.terraform.io/RafaySystems/rafay"
      version = "= 1.1.22"
    }
  }
}
# terraformrc
provider_installation {
  filesystem_mirror {
    path    = "/.terraform/plugins"
    include = ["registry.terraform.io/rafaysystems/*"]
  }
  direct {
    exclude = ["registry.terraform.io/rafaysystems/*"]
  }
}
Run the below command to create the Workflow Handler image:
docker buildx build --platform=linux/amd64,linux/arm64 --push -f Dockerfile -t demo-driver-image:latest
Creating a Custom OpenTofu Workflow Handler Image
Custom Workflow Handler with pre-installed binary and plugins
- Ensure that the existing Terraform code does not explicitly use the
registry.terraform.iohostname when importing plugins. It is recommended to omit the hostname, allowing OpenTofu to use the defaultregistry.opentofu.orghostname for importing plugins.
https://opentofu.org/docs/language/providers/requirements/#source-addresses
- Create a file called
providers.tfwith all the required providers. Replace the provider version with the exact version being used in the Terraform configuration files. List all the providers that need to be pre-installed in the Workflow Handler in thisproviders.tffile.
https://opentofu.org/docs/language/providers/requirements/#requiring-providers
terraform {
  required_providers {
    aws = {
      source = "hashicorp/aws"
      version = "5.56.1"
    }
    rafay = {
      source = "RafaySystems/rafay"
      version = "1.1.23"
    }
  }
}
tofurc file to instruct OpenTofu to use locally installed plugins instead of downloading them from the internet. This file should contain the names of all the providers that need to be used from the local filesystem mirror.
https://opentofu.org/docs/cli/config/config-file/#explicit-installation-method-configuration
provider_installation {
  filesystem_mirror {
    path    = "/.tofu/plugins"
    include = ["RafaySystems/rafay", "hashicorp/aws"]
  }
  direct {
    exclude = ["RafaySystems/rafay", "hashicorp/aws"]
  }
}
- Write
Dockerfilefor Workflow Handler:
FROM --platform=${BUILDPLATFORM} ghcr.io/opentofu/opentofu:1.6.2 as opentofu
ARG TARGETOS TARGETARCH

RUN mkdir -p /.tofu/plugins
COPY providers.tf ./providers.tf

# mirror the plugins in local directory
RUN tofu providers mirror -platform=${TARGETOS}_${TARGETARCH} /.tofu/plugins

# recommended to use the latest rafay release tag available at the time of driver creation
FROM registry.rafay-edge.net/rafay/opentofu-driver:r2.7.0-1

USER root

# Skip the below 2 commands if you want to download tofu binary at runtime
# use OVERRIDE_OPENTOFU_DOWNLOAD_ENDPOINT env variable to select the custom endpoint to download tofu binary, default is from opentofu github release page.

# replace with any endpoint that hosts the tofu binary
ARG DEFAULT_OPENTOFU_DOWNLOAD_ENDPOINT="https://github.com/opentofu/opentofu/releases/download/v1.6.2/tofu_1.6.2_linux_amd64.zip"

# download, unzip and move the tofu binary to /usr/local/bin, driver expects the binary to be present at this path
RUN wget -O tofu.zip $DEFAULT_OPENTOFU_DOWNLOAD_ENDPOINT \
&& unzip tofu.zip \
&& rm tofu.zip \
&& mv tofu /usr/local/bin/tofu

COPY tofurc /.tofurc
ENV TF_CLI_CONFIG_FILE /.tofurc

RUN mkdir -p /.tofu/plugins

USER opentofu

COPY --from=opentofu /.tofu/plugins /.tofu/plugins
- Ensure the
Dockerfile,tofurc, andproviders.tffiles are in the same directory, and build the Workflow Handler from that directory using the following command:
docker buildx build --platform=linux/amd64,linux/arm64 --push -f Dockerfile -t tofu-driver-preinstalled:v1 .
New Container Workflow Handler
To create a container Workflow Handler, perform the below steps:
- Select Workflow Handlers under the Environments and click New Workflow Handler
- Provide a name for the Workflow Handler. Optionally, enter a description
- Select the Workflow Handler type Container and click Create
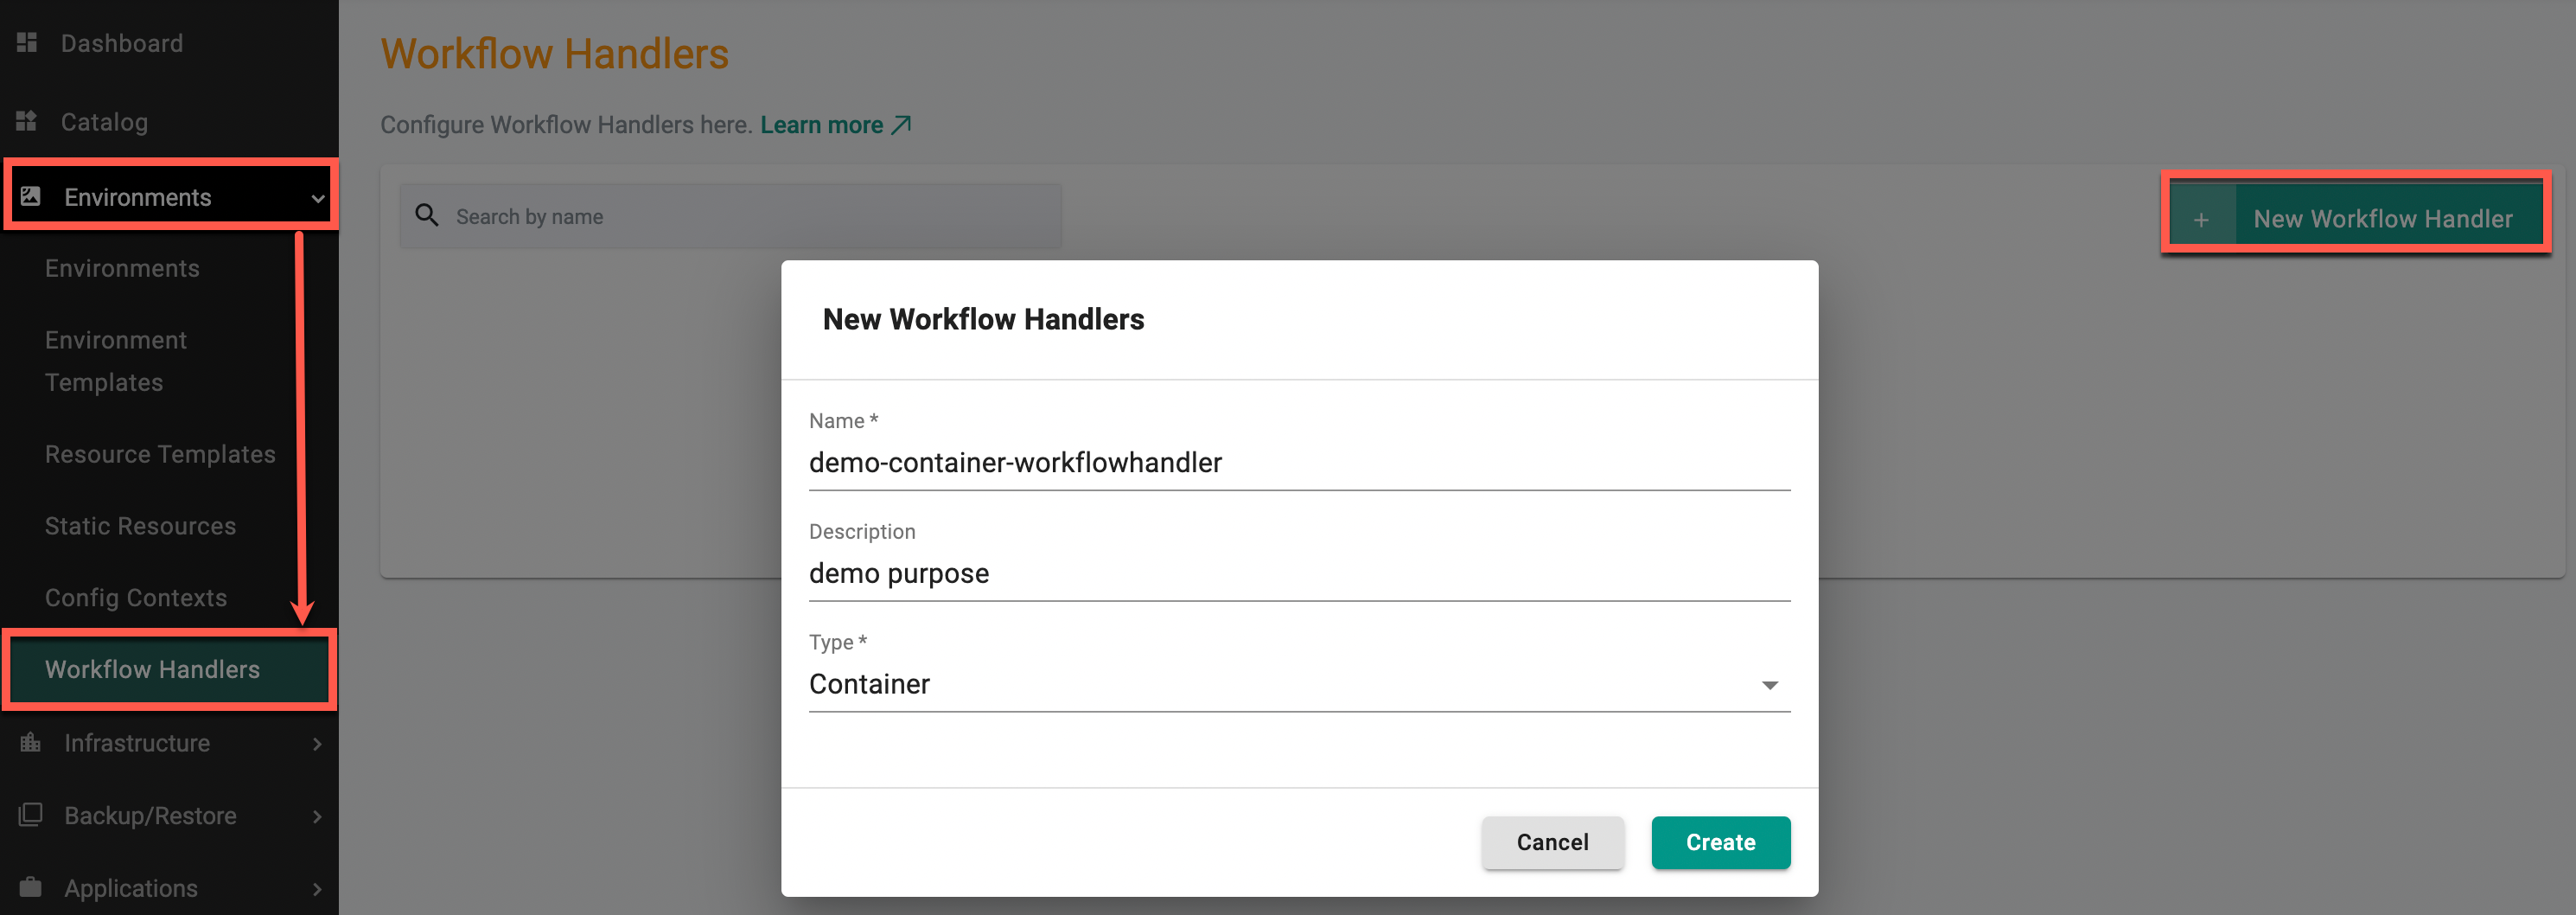
Workflow Handler General Configuration page appears.
Container Configuration
- Select Container and provide the required image
- Optionally, provide CPU and memory limits. This practice contributes to resource isolation, fair sharing, and overall predictability in resource usage. If not provided, default values will be used
- Enter one or more arguments to fine-tune the behavior of containerized applications and troubleshoot issues, contributing to a more flexible and user-friendly containerized environment
- Use commands for container Workflow Handler

Note: If CPU or memory limits are not configured, the system applies the following default values:
- CPU Limit:
100milliCPU- Memory Limit:
256MB
- Provide environment variables to add to the pods. Environment Variables helps to configure and customize containerized applications
- Provide the secret file details to add to the pod. Using secret files in container Workflow Handler is essential for managing sensitive information, such as passwords, API keys, and other confidential data
- Provide the working directory path for the application

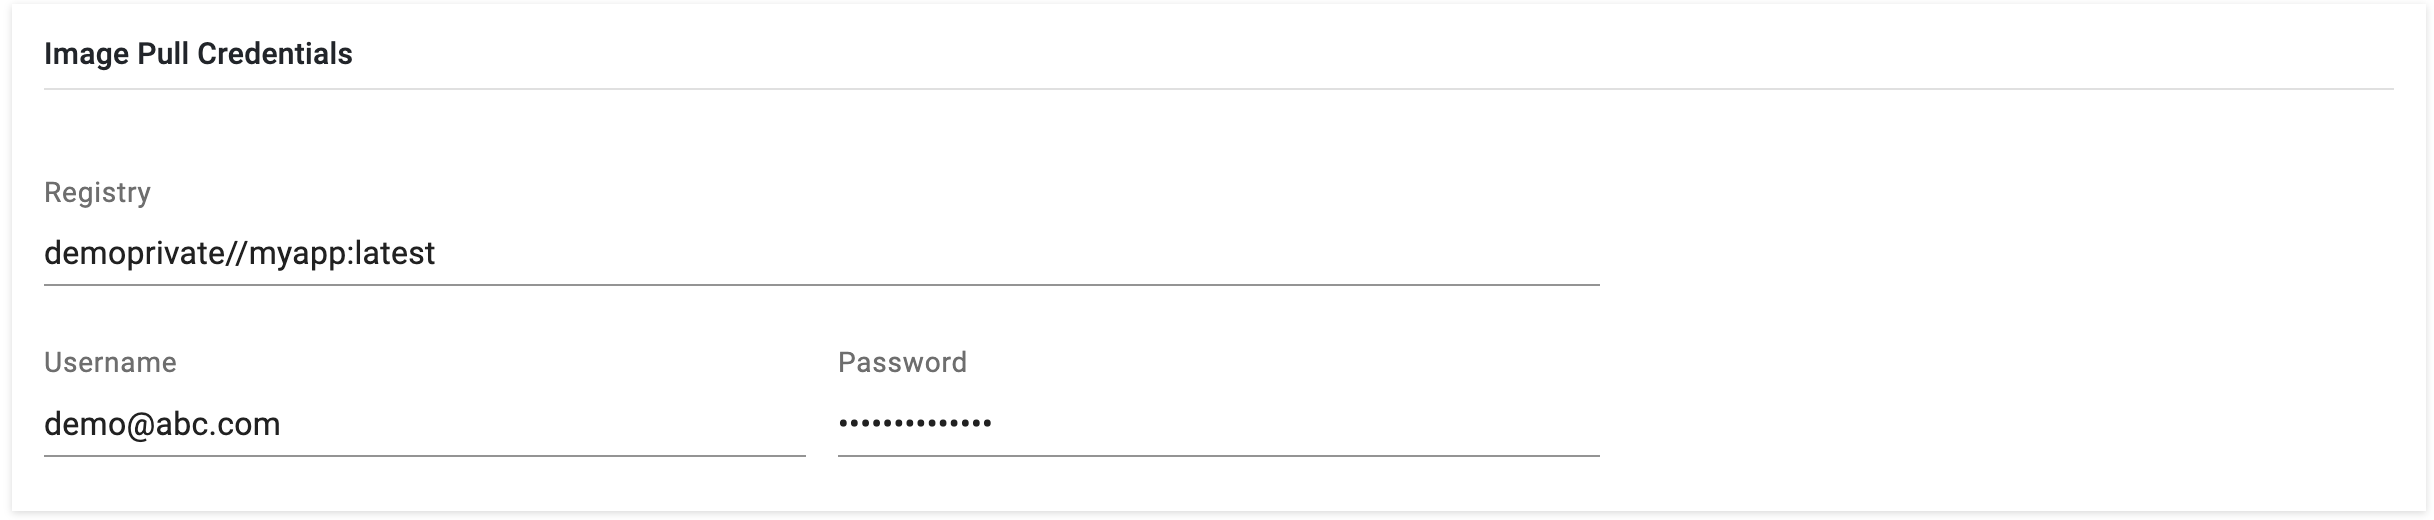
- When utilizing a Private registry, it is mandatory to furnish Image Pull Credentials, encompassing the private registry name, username, and password.
There are two (2) types of registries: Public and Private.
Public Registry
Public container registries host a wide variety of container images that are publicly available for use. Developers may leverage public registries for quick access to commonly used base images or official images of popular software.
Private Registry
Private container registries are restricted to authorized users or specific networks and are not publicly accessible by default. To access a private registry and its application image, users need to provide Image Pull Credentials as shown below.
- Enable the Out of Cluster option under Kube Config Options to run the pods in another cluster where the cd-agent is not running. Kube Config options are used by the agent to determine in which cluster the pod needs to be deployed. Provide the Kube Config of the required cluster in the text box or upload the Kube Config file using the Upload button.

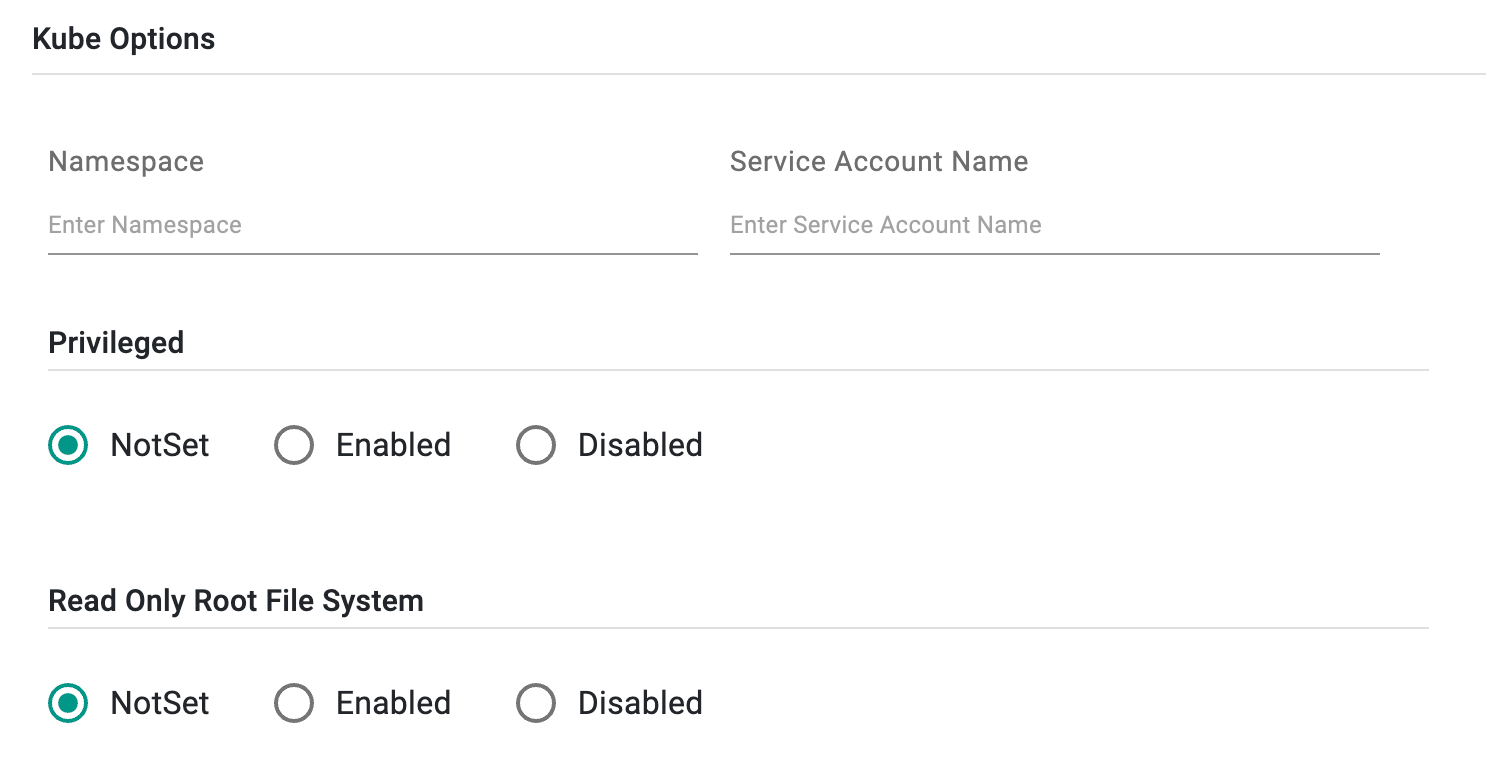
- Under Kube Options, provide the namespace where the user wants to create the pod and enter the Service account name. Using a service account name when creating a container Workflow Handler ensures proper identity, access control, and security practices within an environment
- Enable/disable the Privileged option to grant the container elevated privileges, allowing it to access host devices and perform low-level operations. By default, it is NotSet
- Enable/disable the Read-Only Root File System option to prevent any modifications to the file system within the pod. By default, it is NotSet
-
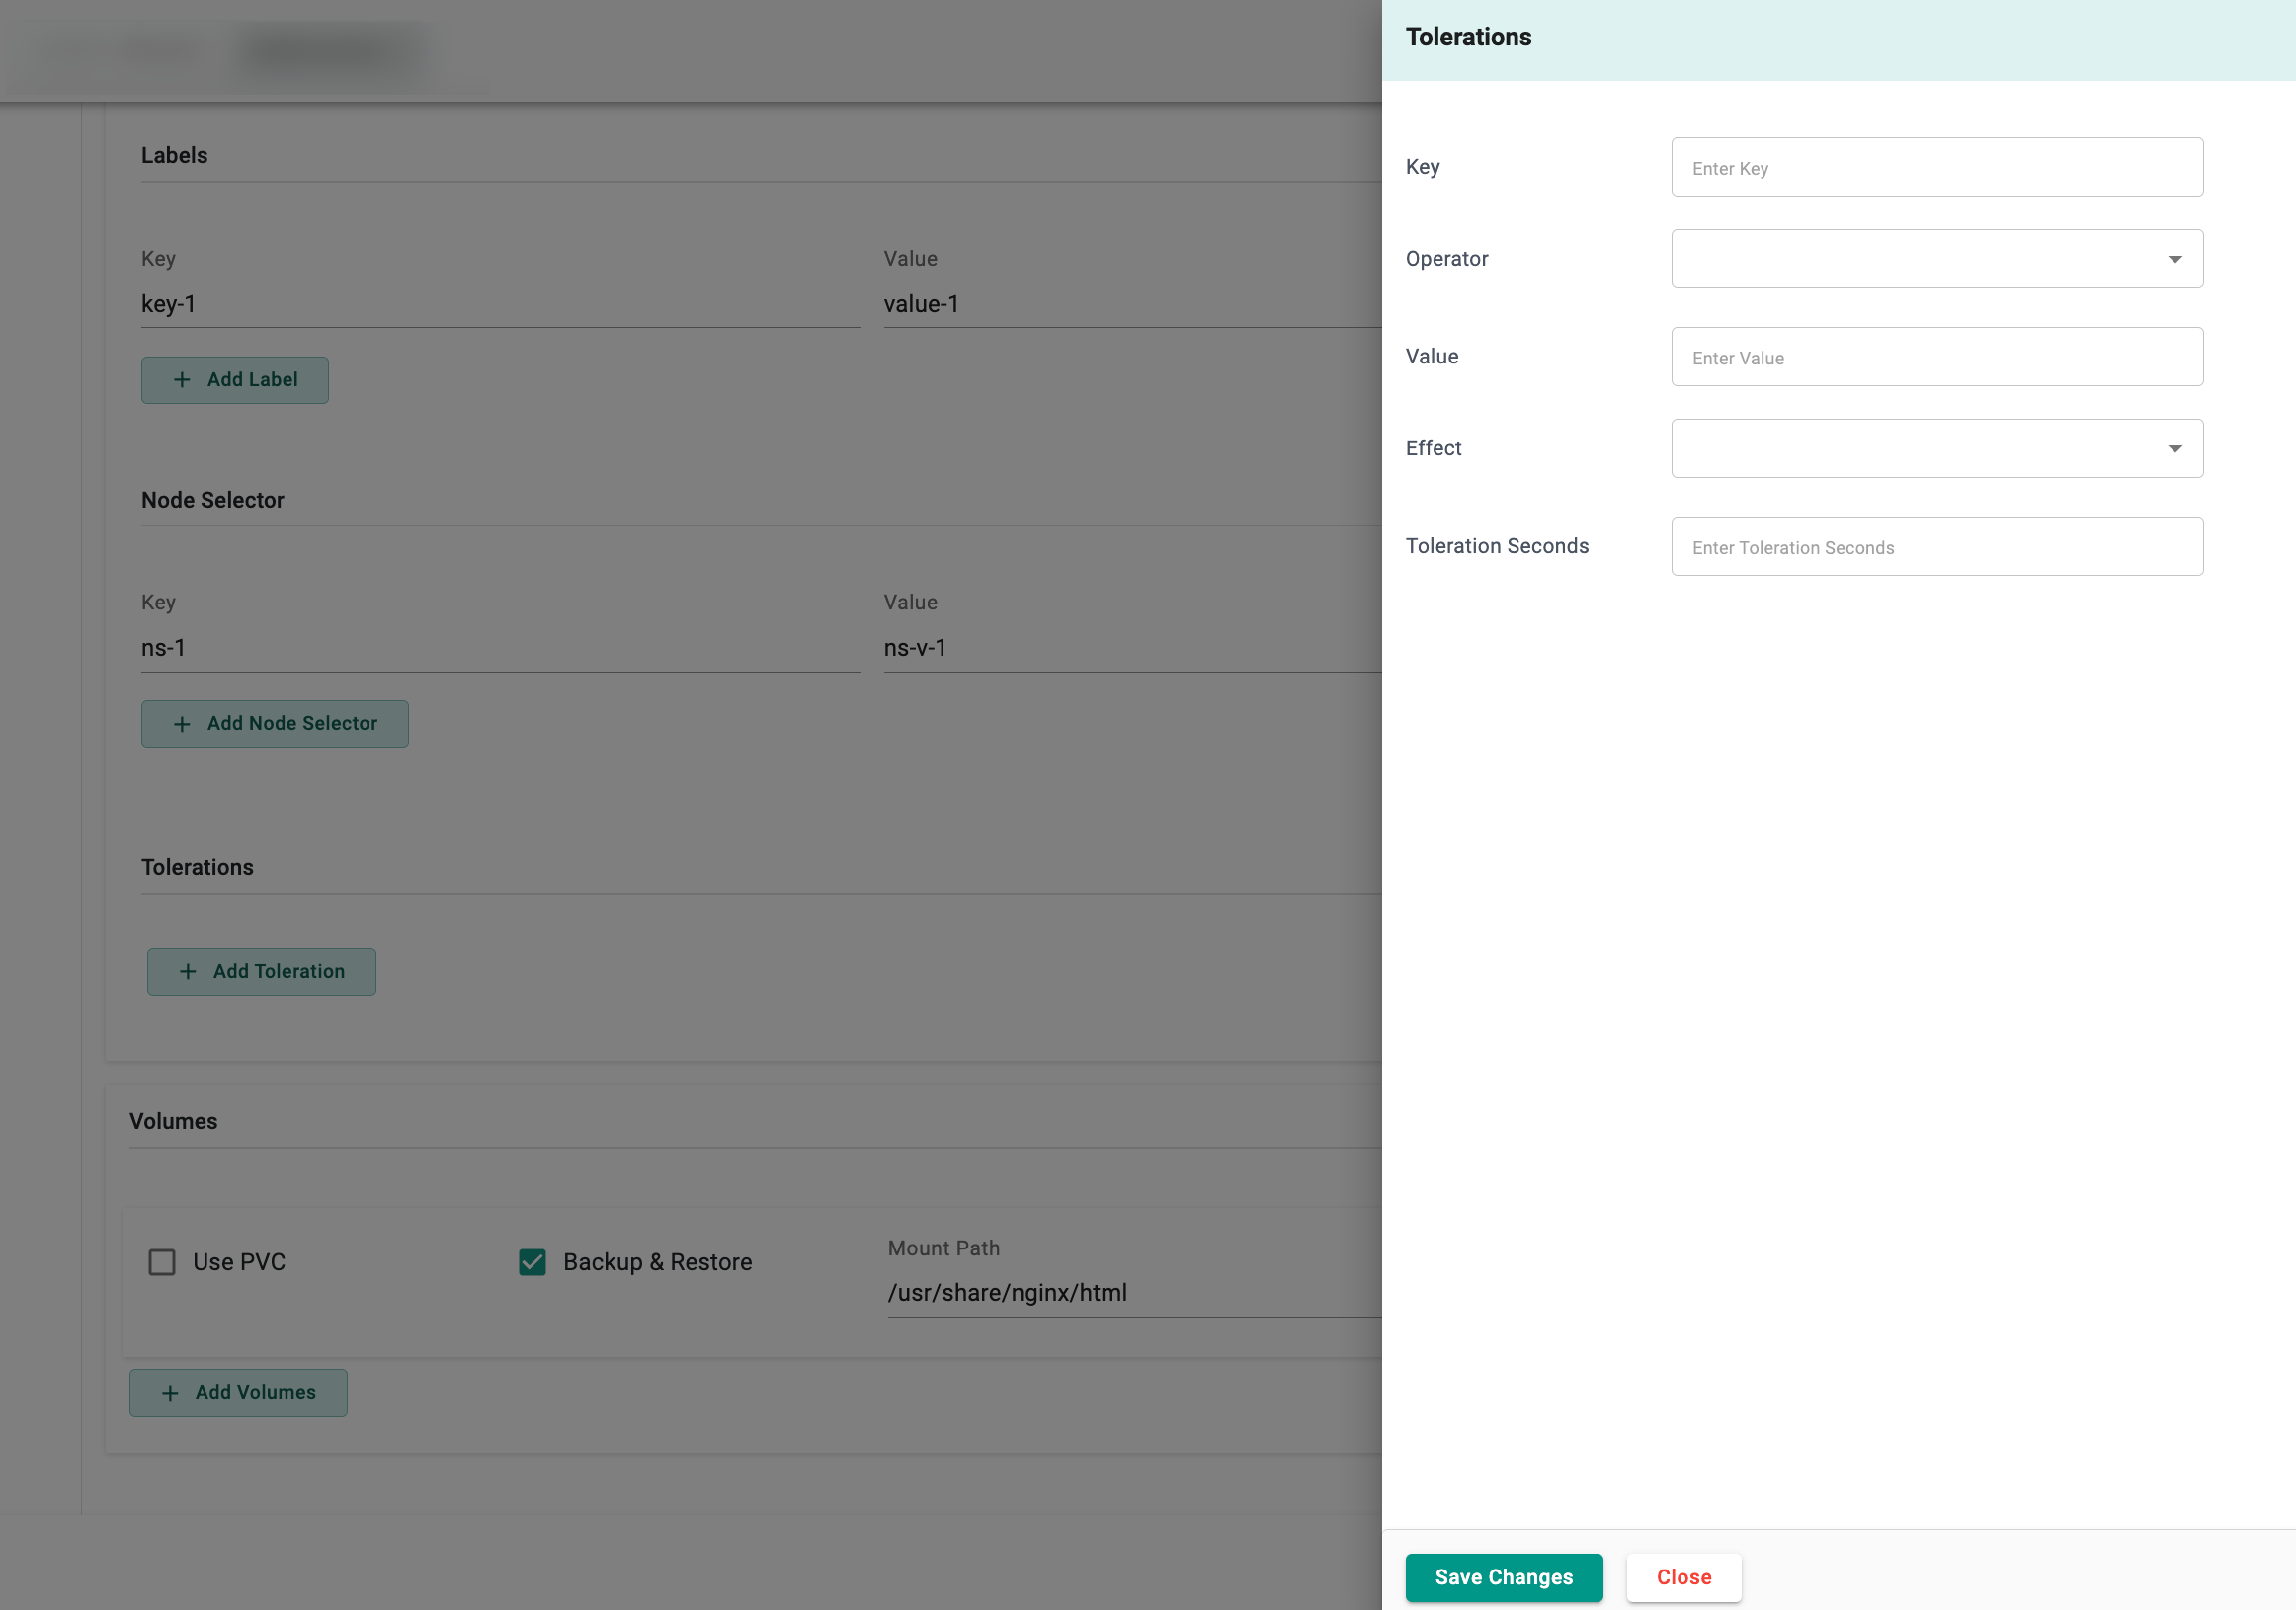
Optionally, add Labels, Node Selector, Tolerration, and Volumes
- Add a label to the resource. Use labels to specify identifying attributes of objects that are meaningful and relevant to users. This is a key-value pair. For example, the key is demo and the value is value1
- Add a node selector to ensure the container runs on Kubernetes nodes with specific requirements, like certain hardware or labels
-
Add a Toleration to a pod to allow it to be scheduled on nodes with specific taints, ensuring placement on nodes with certain attributes or restrictions. For example, a pod with a GPU toleration can be scheduled on a node with a "gpu" taint. This helps control pod placement and resource allocation based on specific requirements and constraints.
- Provide a taint Key to tolerate
- Select a required Operator (Equal or Exists) to specify how the key is compared
- Provide the Value associated with the key. If the
Existsoperator is selected, the value is not required - Select the type of taint to tolerate (NoSchedule, PreferNoSchedule, NoExecute). For
NoExecute, settolerationSecondsand this specifies how long the pod should tolerate the taint before being evicted - Click Save Changes
-
Configure Volume settings, VPC usage (mount path, storage class, and size in GB ) and Backup & Restore (mount path). Users can enable the Backup & Restore during subsequent environment deployments. The volumes will be used in the deploy operation and their content will be restored. When destroying the environment, these volumes will be cleaned up
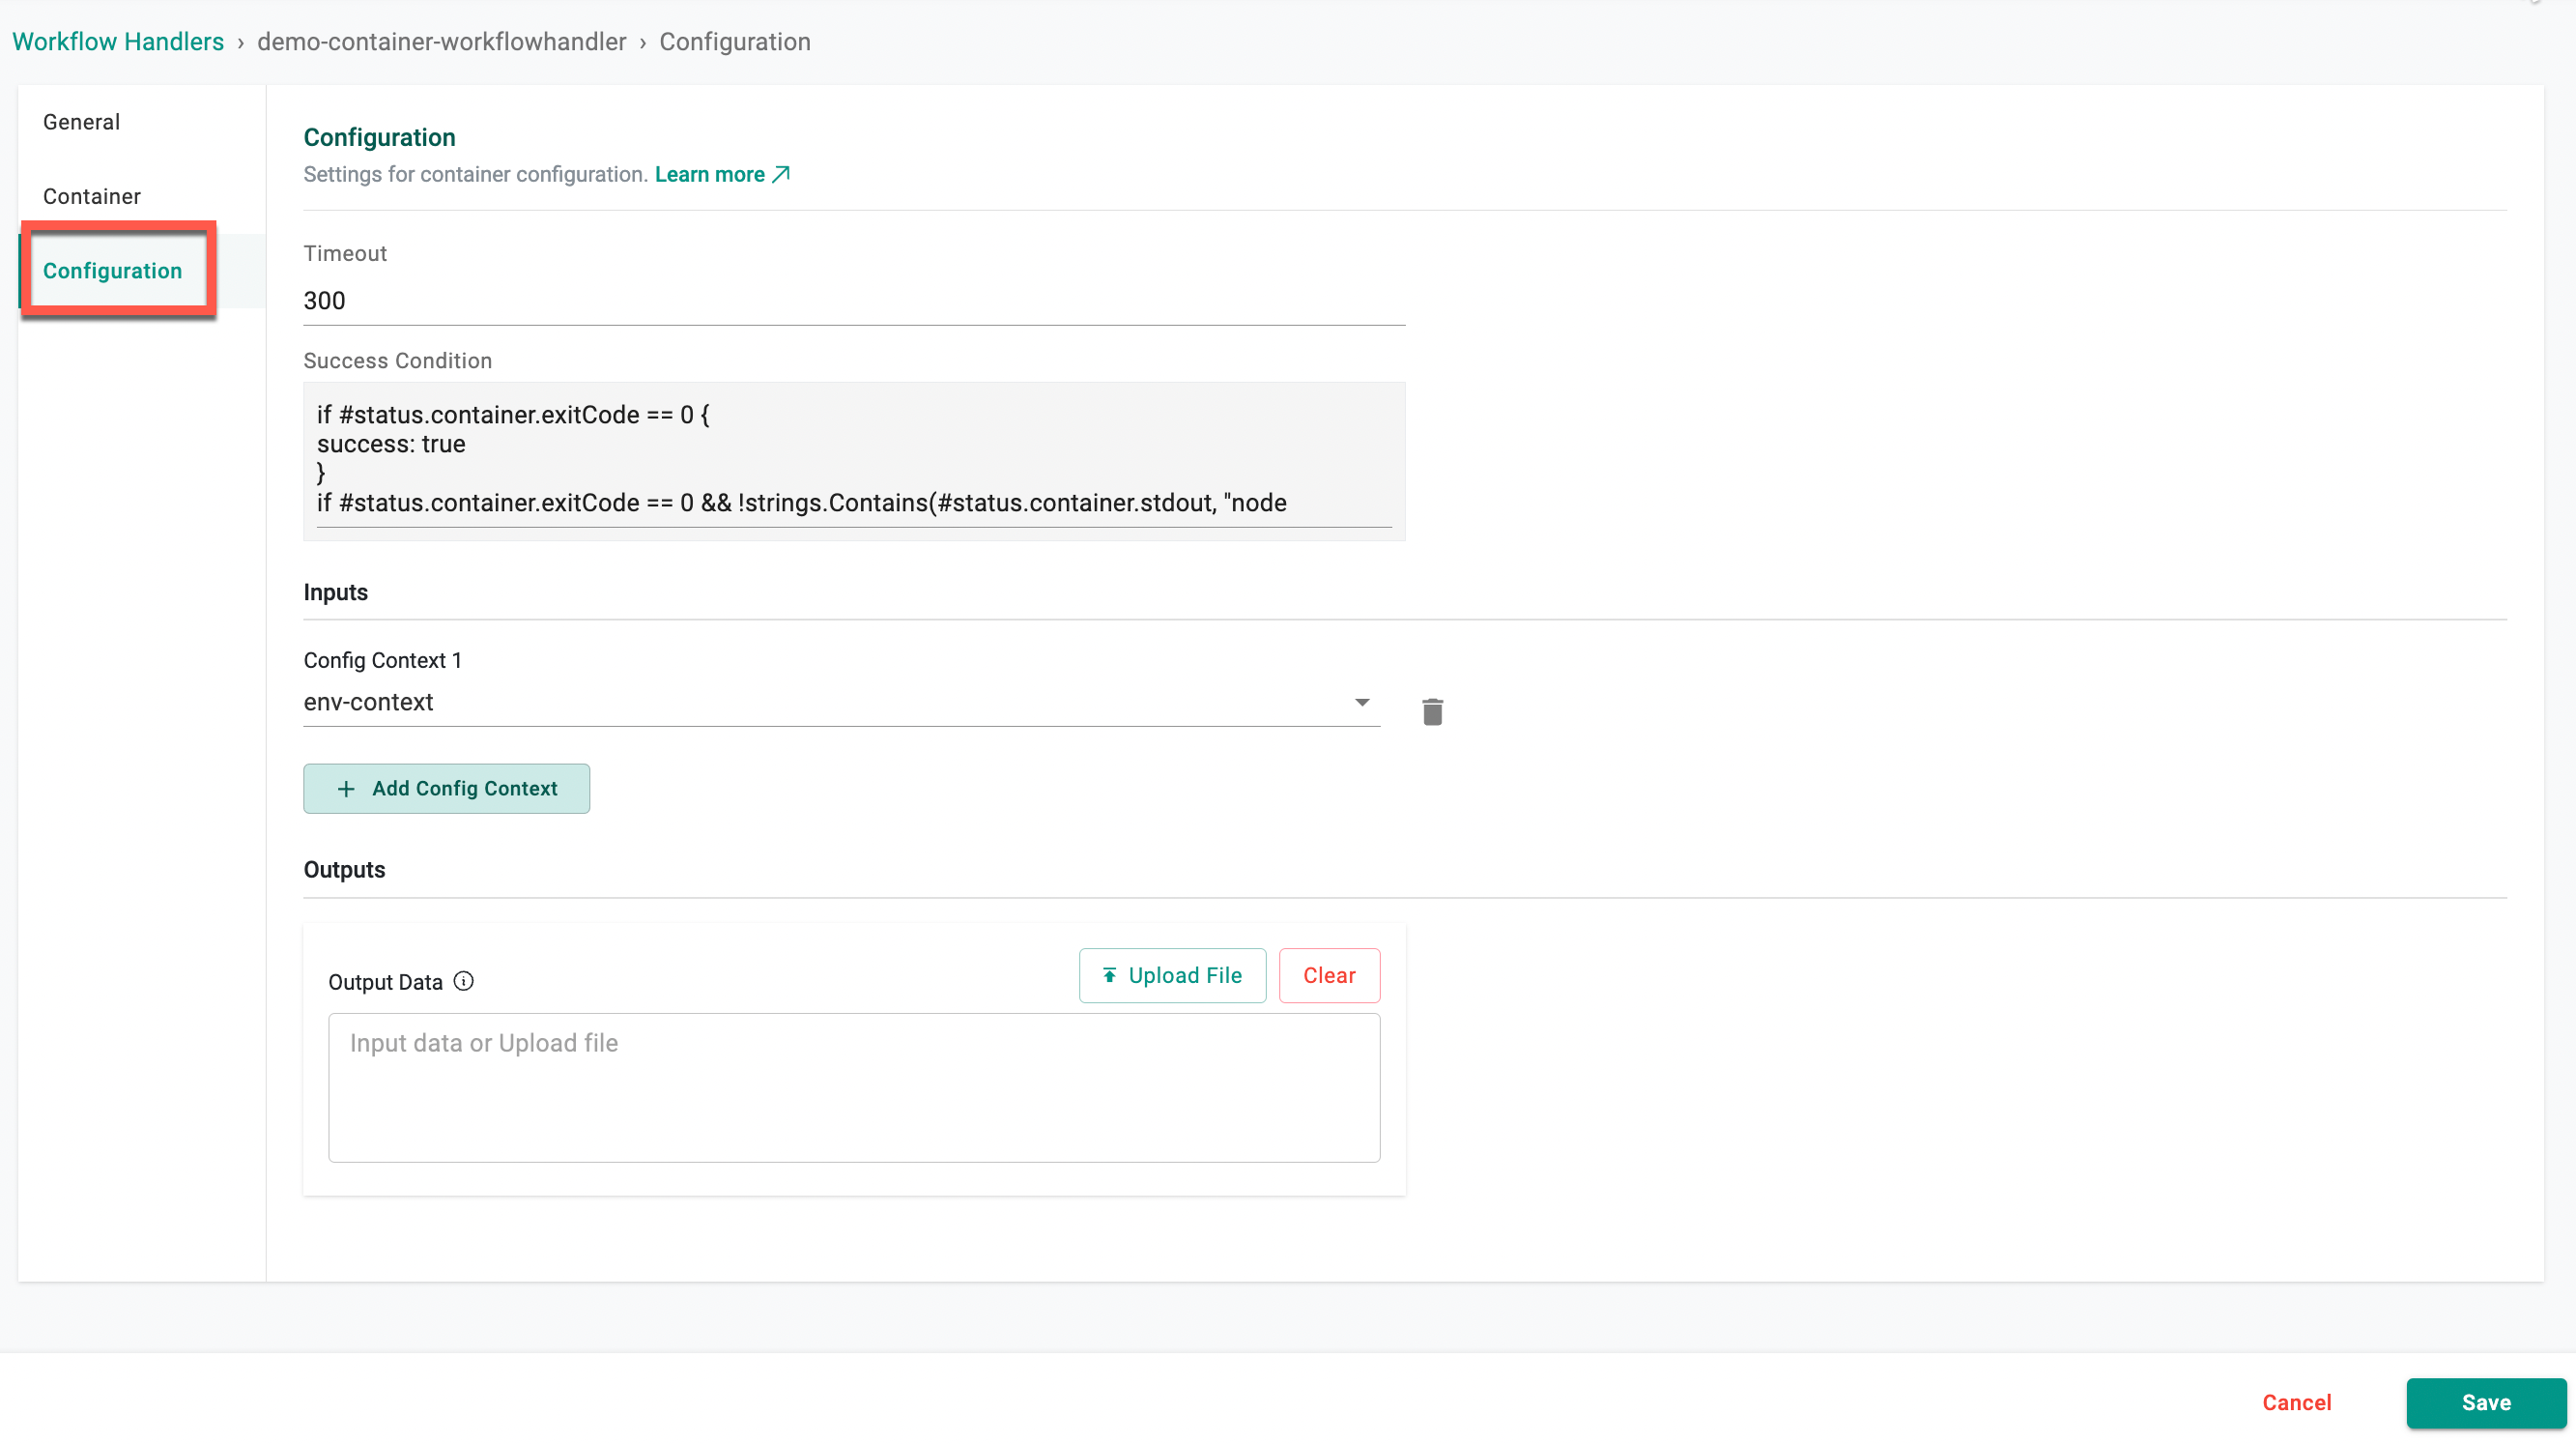
Configuration
- Specify the duration in the Timeout field to indicate how long the pod needs to run. The Environment Manager/kubernetes terminates the pod upon completing this duration.
- Provide the Success Condition. This ensures that the containerized tasks are considered successful only when the provided conditions are met.
- Select the required config context as the Input
- Input data or Upload the output files
Below is an example of a success condition with an explanation:
if #status.container.exitCode == 0 {
    success: true
}
if #status.container.exitCode == 0 && !strings.Contains(#status.container.stdout, "node available") {
    pollAgain: true
}
if #status.container.exitCode != 0 {
    failed: true
    reason: "exit code 1 != 0"
}
- If the exit code of the container is equal to 0, the operation is considered a success
- If the exit code is 0 and the standard output of the container does not contain the substring "node available," it indicates that the operation was successful, but additional polling might be required. In this case, it sets pollAgain to true
- If the exit code of the container is not equal to 0, the operation is considered a failure. The failed flag is set to true, and a reason is provided, indicating that the exit code was not 0.
Click Save
These Containers can be configured in Resource Templates as terraform provider or in any of the hooks.
⚠️ Important: During GitSync:
- If All Resources are selected, only the Workflow Handler will be synced to Git - If All Resources are selected but the Workflow Handler is excluded, the Driver will be synced instead
Managing Artifacts and Output Data Between Resources
Managing data transfer within a development environment requires effectively handling the uploading of output generated from container executions, downloading artifacts, and incorporating these outputs into expressions for subsequent resources. Users can achieve this by creating shell scripts that execute the necessary commands and by generating JSON outputs for upload, ensuring seamless integration into their workflows.
Use Case: Downloading Artifacts and Uploading Outputs from a Container
Here is a demonstration on how to download an artifact, extract it, and then use the output in a subsequent command. This process is essential when you need to work with generated data from container executions.
- Write a shell script within a Dockerfile that executes commands relevant to your use case (e.g., using ls
ls a*or another command). Ensure that the command runs successfully without errors - After running the command, capture the output and construct a JSON file. This JSON can be a list or structured data depending on the requirements.
- Upload this JSON to a specified upload URL
Download Artifacts
- Provide details on how to download artifacts using the script you shared.
- Include the specific expressions for downloading:
- Download Token:
$(resource."rtdependson-0".artifact.workdir.token)$ - Download URL:
$(resource."rtdependson-0".artifact.workdir.url)$
- Download Token:
cd /tmp

# Download the artifact using a helper token
curl -H "X-Engine-Helper-Token:$DOWNLOAD_TOKEN" -o ./job.tar.zst "$DOWNLOAD_URL"

# Decompress the downloaded file
unzstd ./job.tar.zst

# Create a directory for extraction
mkdir terraform

# Extract the tar file to the created directory
tar -xf job.tar -C ./terraform

#Verify the extraction by listing the files.
ls -al ./terraform
Upload Artifacts
To upload the outputs generated from the extracted artifacts, follow these steps:
- Ensure the output file (e.g., a JSON file) is ready for upload.
# Constructs a JSON object with key-value pairs and saves it to output.json for further processing or uploading.
echo '{"key": ["var1", "var2"]}' > output.json
- Depending on the environment, use the appropriate command to upload the output. This could be an API call or a CLI command. For example:
# Uploads the generated JSON file (output.json) to the specified URL using curl.
curl -H "X-Engine-Helper-Token:$UPLOAD_TOKEN" -F [email protected] $UPLOAD_URL
HTTP Workflow Handler
The HTTP Workflow Handler allows the workflow engine to make HTTP requests. This means that as part of the workflow, users can define activities that involve sending HTTP requests to external services or APIs. These requests can be used to interact with other systems, retrieve data, or trigger actions. The HTTP Workflow Handler is likely responsible for handling the communication between the workflow engine and external services over the HTTP protocol.
New HTTP Workflow Handler
To create an HTTP Workflow Handler, perform the below steps:
- Select Workflow Handler under the Environments and click New Workflow Handler
- Provide a name for the Workflow Handler. Optionally, enter a description
- Select the Workflow Handler type HTTP and click Create
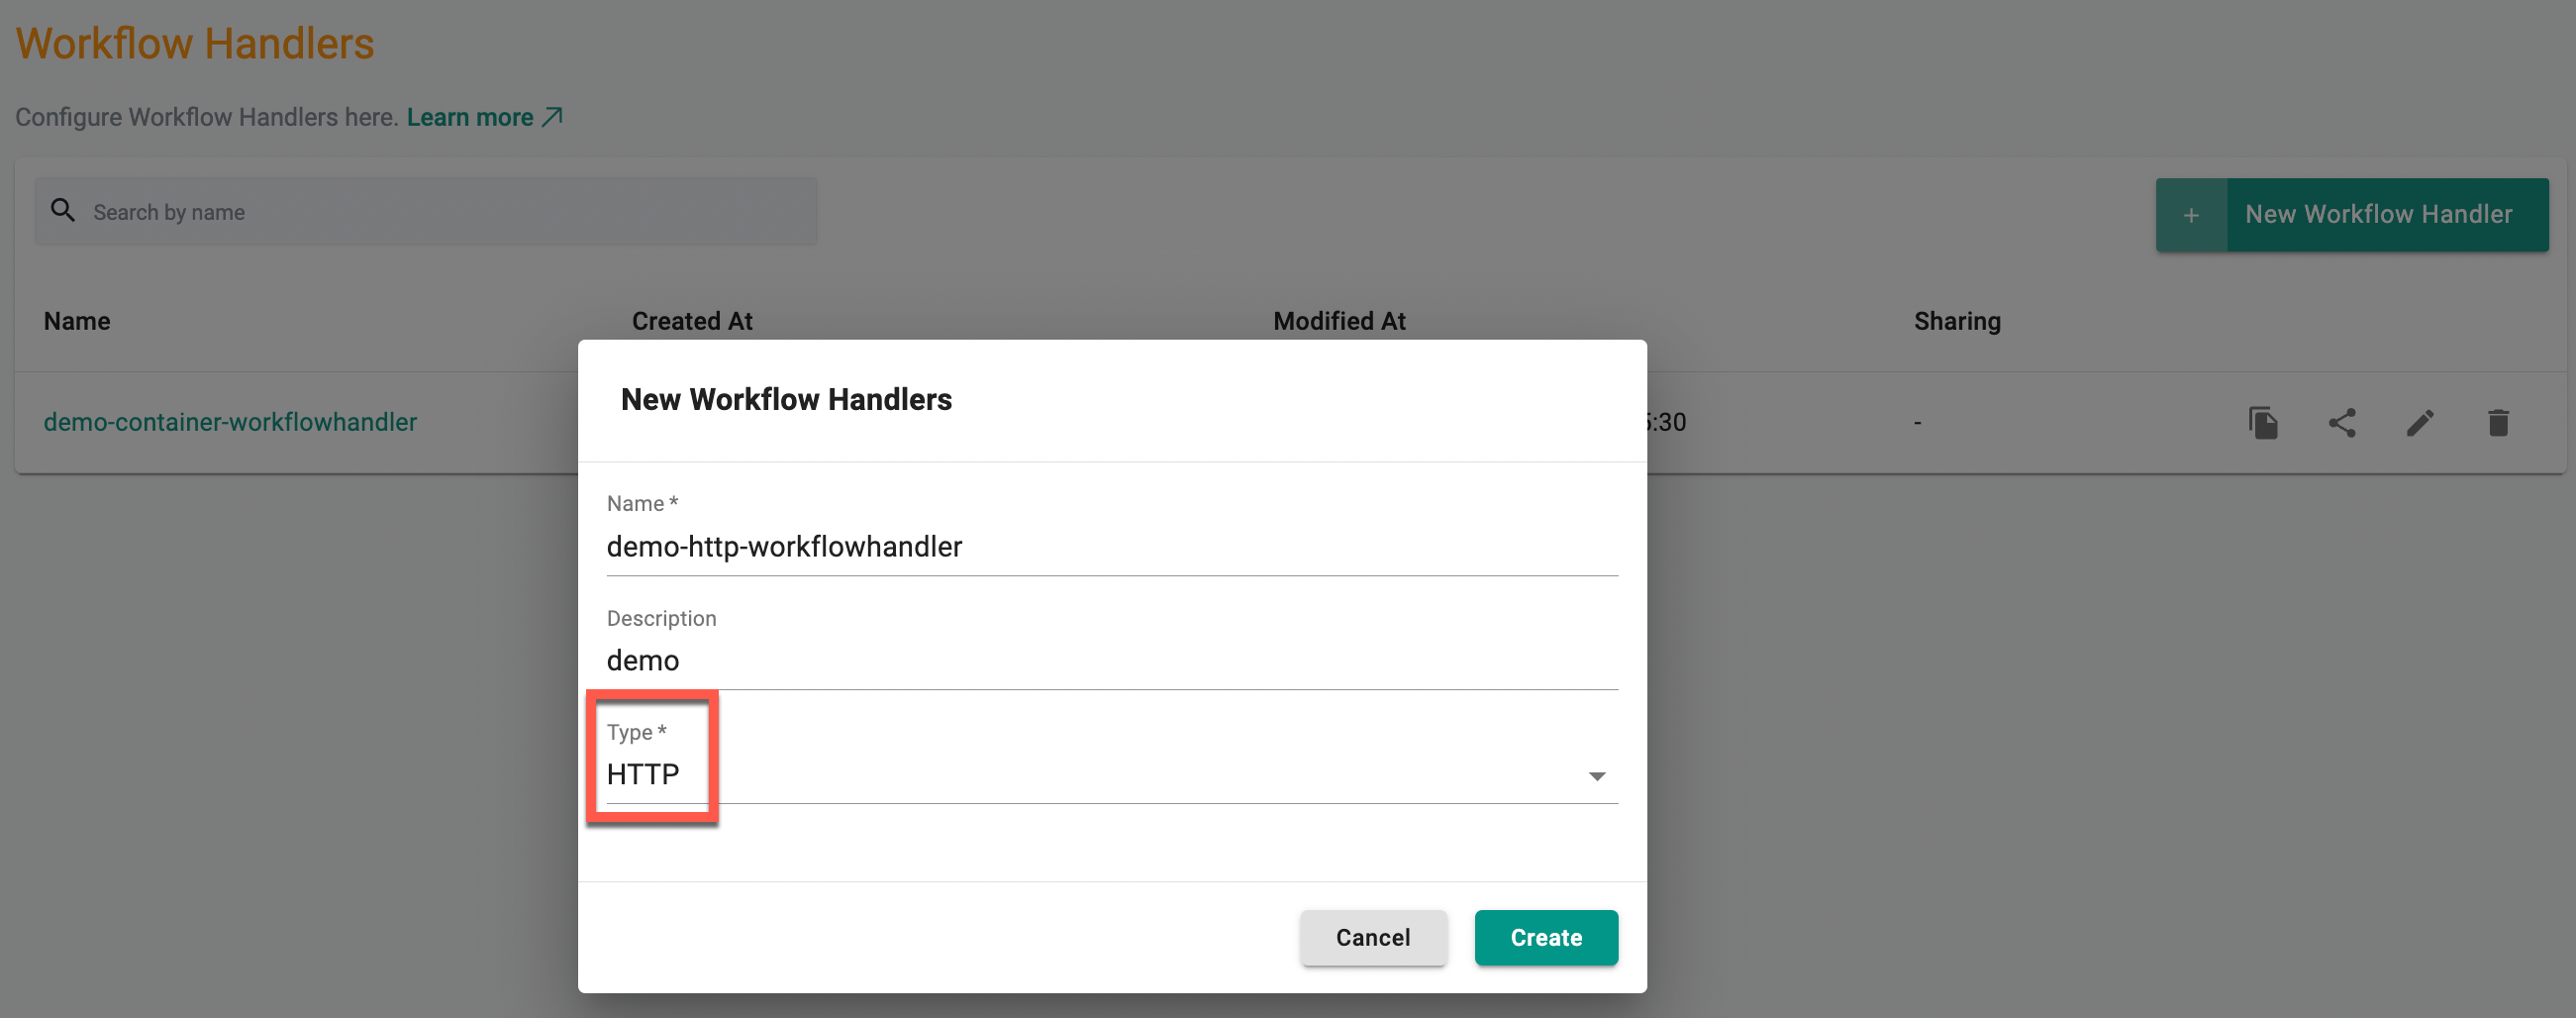
Workflow Handler General Configuration page appears.
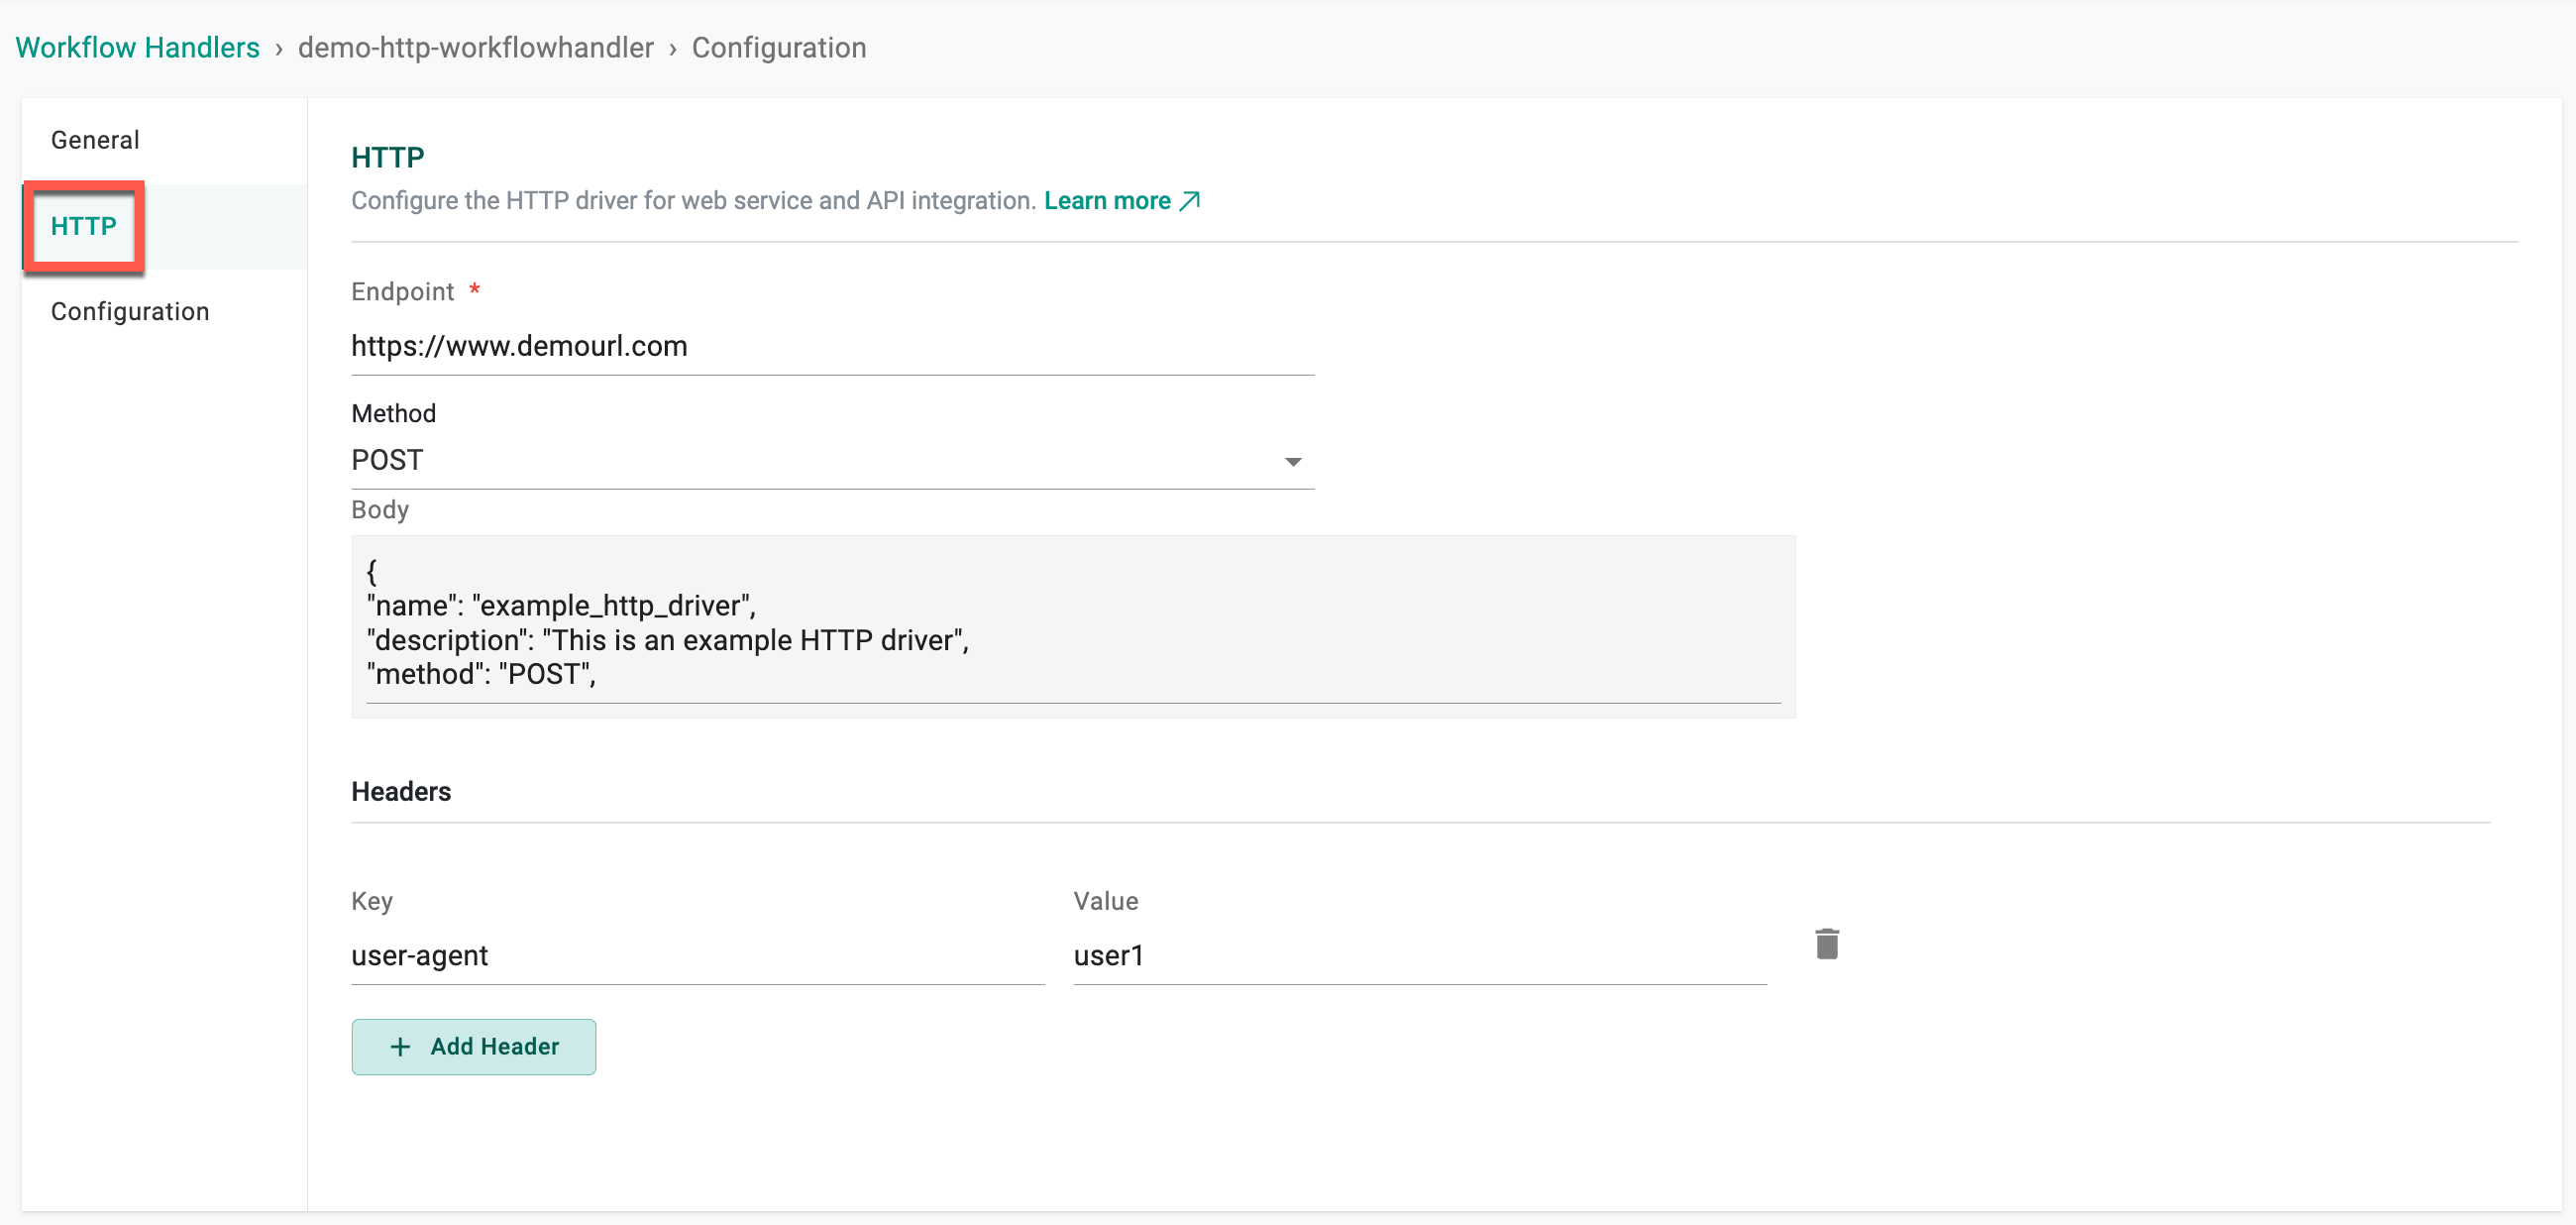
HTTP Configuration
- Select HTTP and provide the Endpoint details
- Provide the Method (Post, Get, Put, Delete, etc.)
- Optionally, provide the Body. When creating an HTTP Workflow Handler, providing a request body in the configuration is essential because it allows the users to specify the details of the HTTP request being made
Example
- The example employs the following components:
- name: A name for the HTTP Workflow Handler
- description: A description for the HTTP Workflow Handler
- method: The HTTP method (e.g., POST)
- url: The URL of the resource you want to interact with
- headers: Any headers required for the request (e.g., Content-Type, Authorization)
- body: The payload or data to be sent in the request body
{
  "name": "example_http_driver",
  "description": "This is an example HTTP driver",
  "method": "POST",
  "url": "https://api.example.com/resource",
  "headers": {
    "Content-Type": "application/json",
    "Authorization": "Bearer YOUR_ACCESS_TOKEN"
  },
  "body": {
    "key1": "value1",
    "key2": "value2"
  }
}
- This allows to customize the behavior of the request based on the requirements of the API or service you are interacting with
Example
- Include a "User-Agent" header to identify a specific user making the request. This is optional but can be useful for analytics or server logs
- Provide a valid token or credentials within the authorization header to include the authorization header for server request authentication
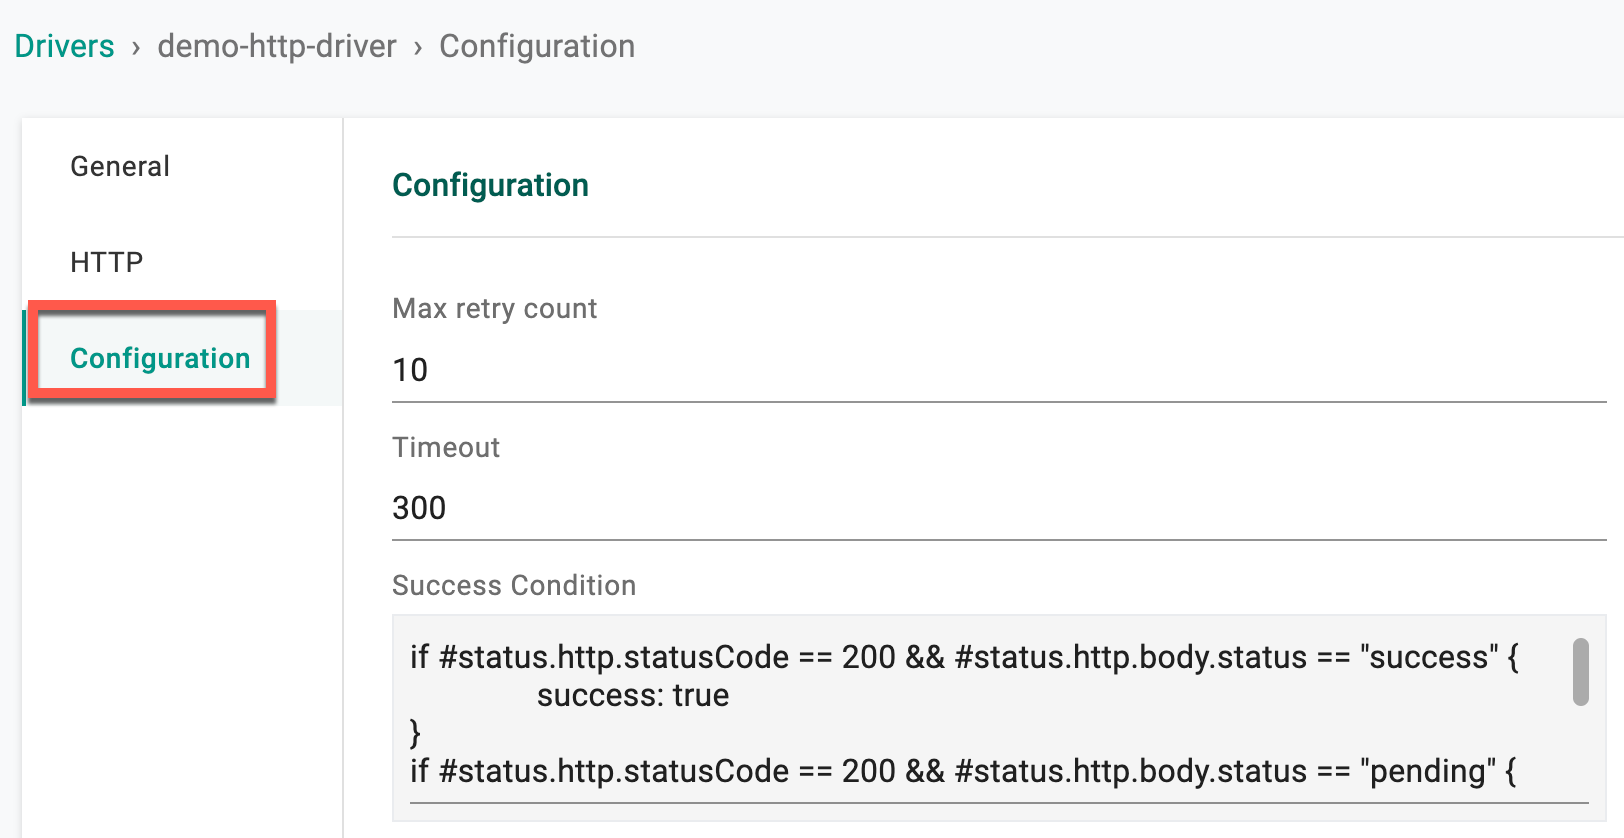
Configuration
- Provide the Max retry count. This indicated the maximum number of times the HTTP Workflow Handler should attempt to retry a failed request
- Specify the duration in the Timeout field. This represents the maximum time allowed for the entire request (including connection, sending the request, and receiving the response) to complete
- Provide the Success Condition. The success condition is defined based on the HTTP status code, where a status code of 200 is considered a successful response. Adjust the success condition based on the specific requirements of the application and the expected outcomes of the HTTP request.
Example
if #status.http.statusCode == 200 && #status.http.body.status == "success" {
        success: true
}
if #status.http.statusCode == 200 && #status.http.body.status == "pending" {
        pollAgain: true
}
if #status.http.statusCode != 200 {
        failed: true
}
- Example explanation
- Condition 1: Checks if the HTTP status code is 200 (OK) and if the value of the "status" field in the response body is "success." If both conditions are true, the operation is considered successful, and the success flag is set to true.
- Condition 2: Checks if the HTTP status code is 200 (OK) and if the value of the "status" field in the response body is "pending." If both conditions are true, it suggests that the operation is in a pending state, and the pollAgain flag is set to true, indicating that additional polling may be needed.
- Condition 3: This condition checks if the HTTP status code is not equal to 200. If the status code is different from 200, the operation is considered a failure, and the failed flag is set to true.
- Click Save
These HTTP Workflow handlers can be configured and used only within hooks to perform actions related to HTTP communication. Users can also generate an HTTP Type Hook on the Environment Templates and Resource Templates page through hook configuration.
Workflow Handlers List
Once the required Workflow Handler is created, the list of Workflow Handler appears in the main page. Edit, delete and share the Workflow Handler using the respective icons as shown below.

Workflow Handler Image Registry Paths
With each new release, updated images are made available and these following a consistent naming convention, as outlined below:
OpenTofu
- Image Path:
registry.rafay-edge.net/rafay/opentofu-driver:r<version#>.0-1 - Example (v3.4 release):
registry.rafay-edge.net/rafay/opentofu-driver:r3.4.0-1
Terraform
- Image Path:
registry.rafay-edge.net/rafay/terraform-driver:r<version#>.0-1 - Example (v3.4 release):
registry.rafay-edge.net/rafay/terraform-driver:r3.4.0-1
Artifact
- Image Path:
registry.rafay-edge.net/rafay/artifact-driver:r<version#>.0-1 - Example (v3.4 release):
registry.rafay-edge.net/rafay/artifact-driver:r3.4.0-1
Function Workflow Handler
Functions enable users to run code in languages like Go and Python directly within workflows, without needing to package them in containers. The framework handles packaging and dependencies, simplifying execution. Users can utilize functions for infrastructure tasks, service integrations (e.g., Jira, ServiceNow), and notifications. It supports synchronous and asynchronous execution, includes error handling and logging tools, and may expand to more languages in the future. This feature streamlines workflows by reducing complexity and improving efficiency.
Refer to the Functions page for more details.