Shared clusters
What Will You Do
In this part of the self-paced exercise, we will focus on the following use case:
Clusters are shared between teams. Platform teams want to enforce governance controls but not at the cost of slowing down application teams.
For this example, we will consider two teams, alpha and beta sharing a cluster, shared-cluster.
sequenceDiagram
  Admin->> Controller: Step 1: Create a "central" project for infrastructure management and to enforce governance (through blueprints etc.)
  Admin->> Controller: Step 2: Create projects for the two teams (e.g. alpha & beta)
  Admin->> Cluster: Step 3: Import the shared cluster to the "central" project by applying the bootstrap
  Admin->> Controller: Step 4: Share the imported cluster with projects, alpha and beta. Apply resource quotas
  Admin->> Cluster: Step 5: Add labels to existing namespaces in the imported cluster to align with the teams that own and operate them
  Admin->> Controller: Step 6: Create a blueprint with "namespace sync on" and apply it to the cluster
  Admin->> Controller: Step 7: Verify that the namespaces are imported to the right projects and are healthy
  Admin->> Controller: Step 8: Create "project specific roles" for users in alpha/beta teams and verify access
Declarative specifications are also provided for this exercise.
Step 1: Create a central project for the platform team
- Login into your Org as an Org Admin
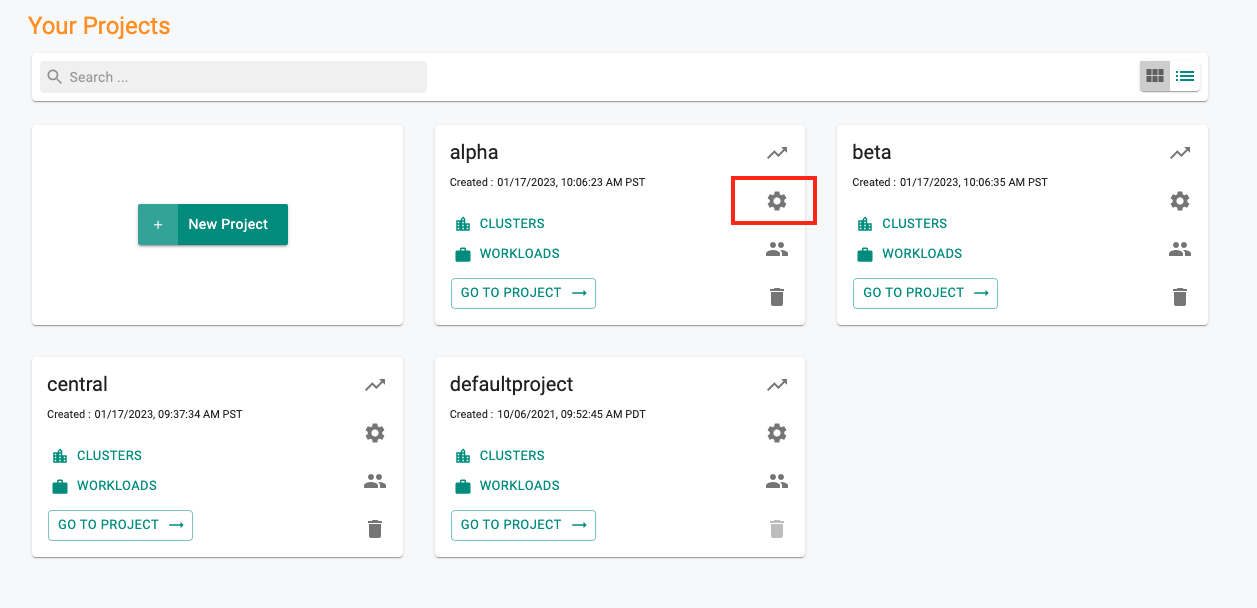
- Click on New Project
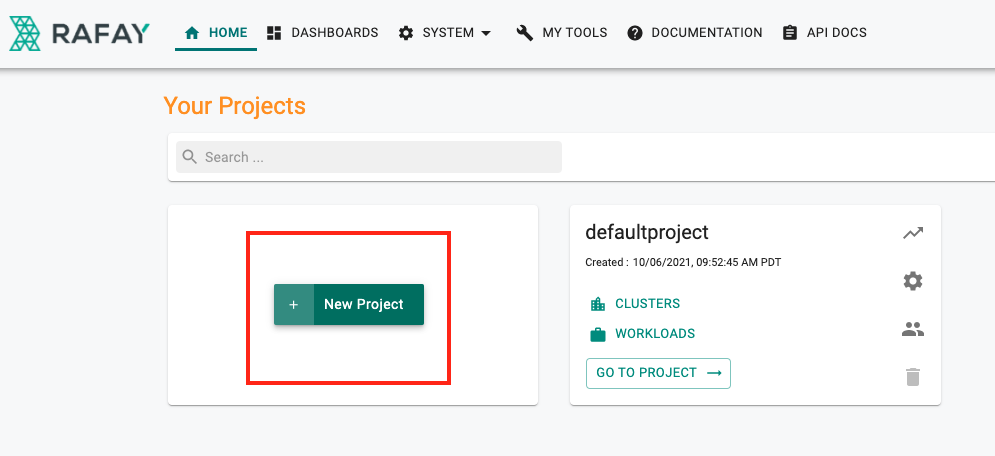
- Provide the name for the project (e.g. central) and a suitable description
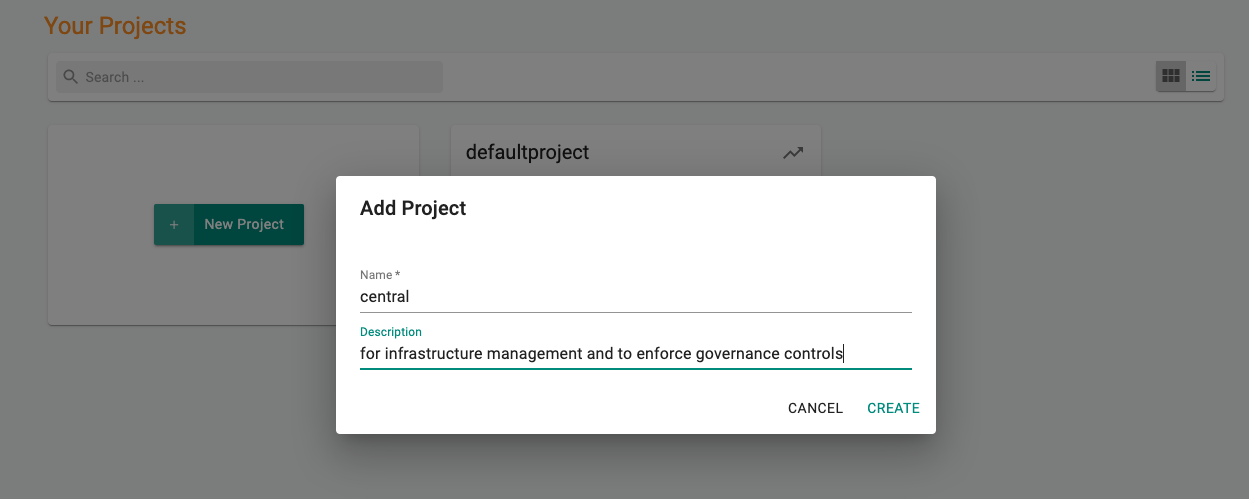
- Click Create
Step 2: Create projects for the two teams
- Click on New Project
- Provide names for the projects (e.g. alpha and beta) and a suitable description
- Click Create
Step 3: Import the shared cluster to the "central" project
- Navigate to project central
- Click on New Cluster
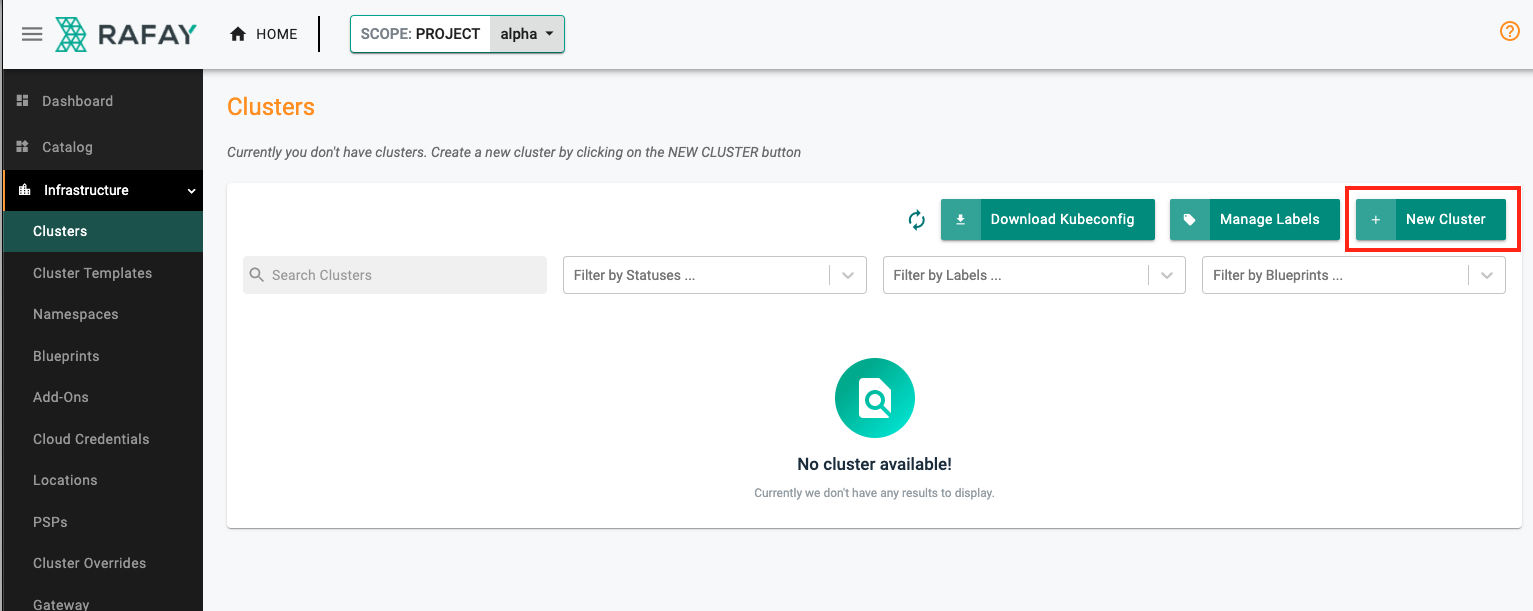
- Select Import Existing Kubernetes Cluster
- Click Continue
- Select Environment and Kubernetes Distribution as appropriate
- Provide a cluster name (e.g. shared-cluster-alpha-beta) and description as needed
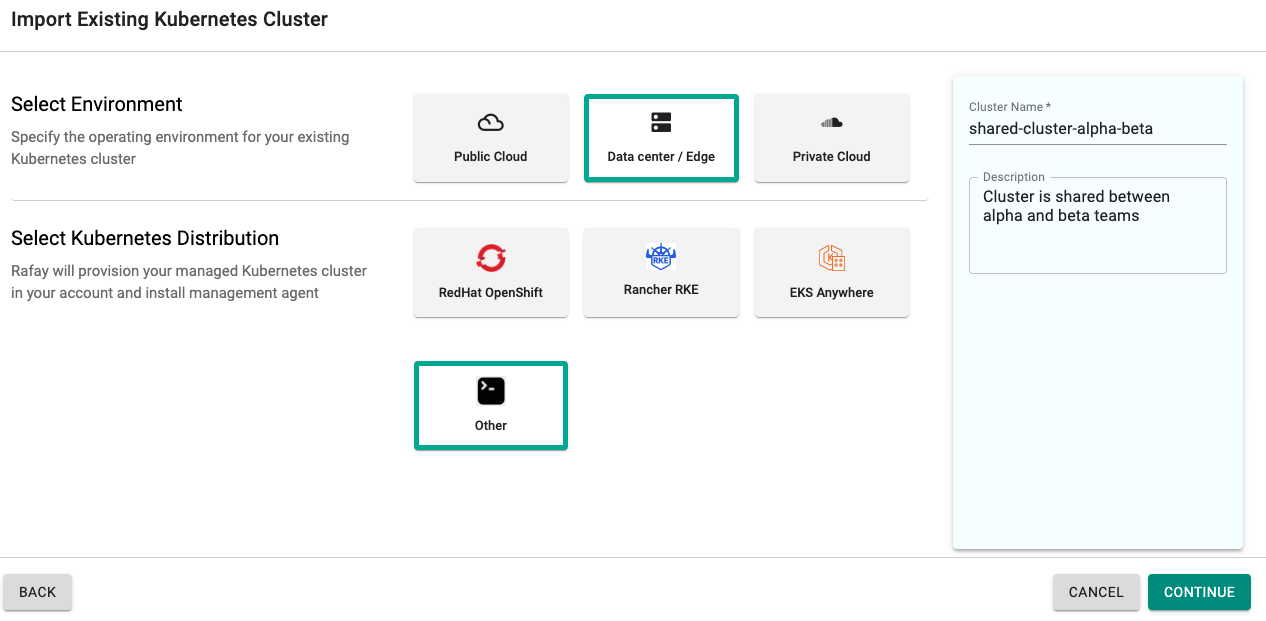
- Click Continue
- We will keep the Blueprint selection as minimal for now, click Continue
- Download the cryptographically unique bootstrap YAML required to register the cluster
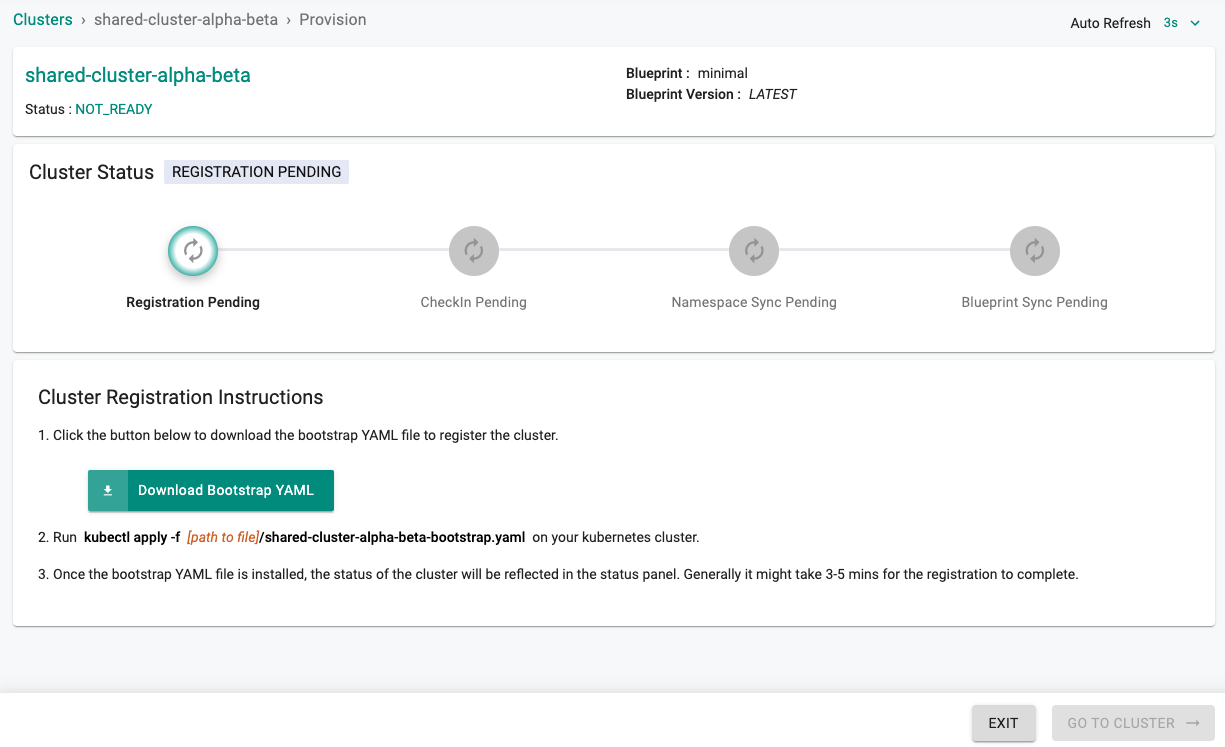
- Apply bootstrap to the clusters to initiate the import process
Use kubectl to apply the "cluster bootstrap" file on your K8s cluster.
kubectl apply -f [path to file]/shared-cluster-alpha-beta-bootstrap.yaml
This will create a namespace for the k8s mgmt operator, download the container images, and register with the controller. This one time import process can take ~2 minutes.
namespace/rafay-system created
serviceaccount/system-sa created
clusterrole.rbac.authorization.k8s.io/rafay:manager created
clusterrolebinding.rbac.authorization.k8s.io/rafay:rafay-system:manager-rolebinding created
clusterrole.rbac.authorization.k8s.io/rafay:proxy-role created
clusterrolebinding.rbac.authorization.k8s.io/rafay:rafay-system:proxy-rolebinding created
priorityclass.scheduling.k8s.io/rafay-cluster-critical created
role.rbac.authorization.k8s.io/rafay:leader-election-role created
rolebinding.rbac.authorization.k8s.io/rafay:leader-election-rolebinding created
customresourcedefinition.apiextensions.k8s.io/namespaces.cluster.rafay.dev created
customresourcedefinition.apiextensions.k8s.io/tasklets.cluster.rafay.dev created
customresourcedefinition.apiextensions.k8s.io/tasks.cluster.rafay.dev created
service/controller-manager-metrics-service-v3 created
deployment.apps/controller-manager-v3 created
configmap/connector-config-v3 created
configmap/proxy-config-v3 created
deployment.apps/rafay-connector-v3 created
service/rafay-drift-v3 created
validatingwebhookconfiguration.admissionregistration.k8s.io/rafay-drift-validate-v3 created
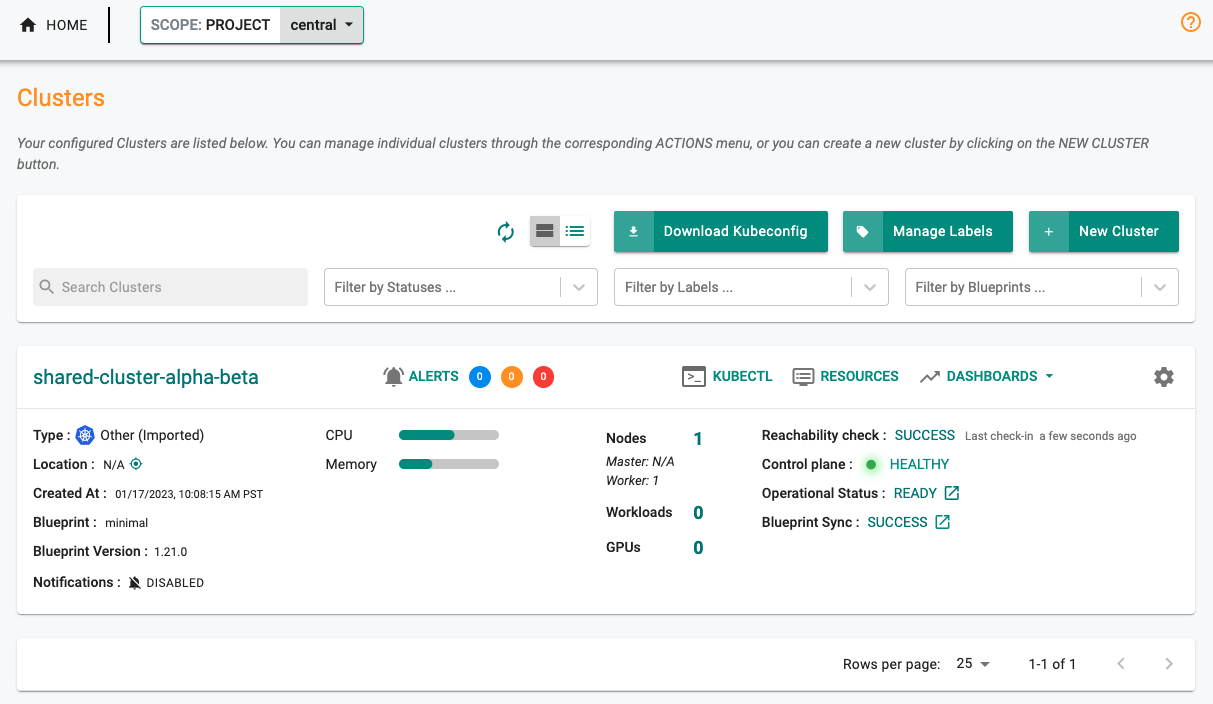
Once the k8s operator is operational, it will "establish and maintain a heartbeat" with the controller.
Step 4: Share the imported cluster and apply resource quotas
Share the imported cluster
- Navigate to central project
- Click on the gear icon next to the shared cluster (e.g. shared-cluster-alpha-beta) and select the Manage Cluster Sharing option from the dropdown
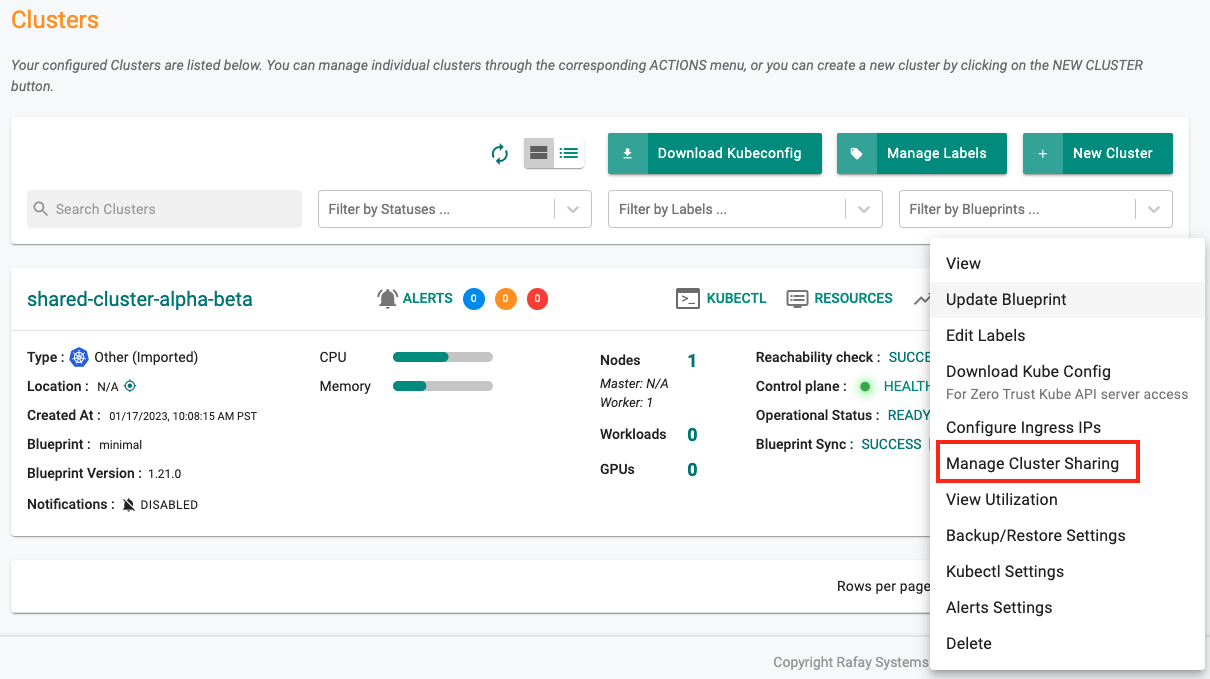
- Select the Specific Projects options for Sharing
- Select alpha and beta from the list
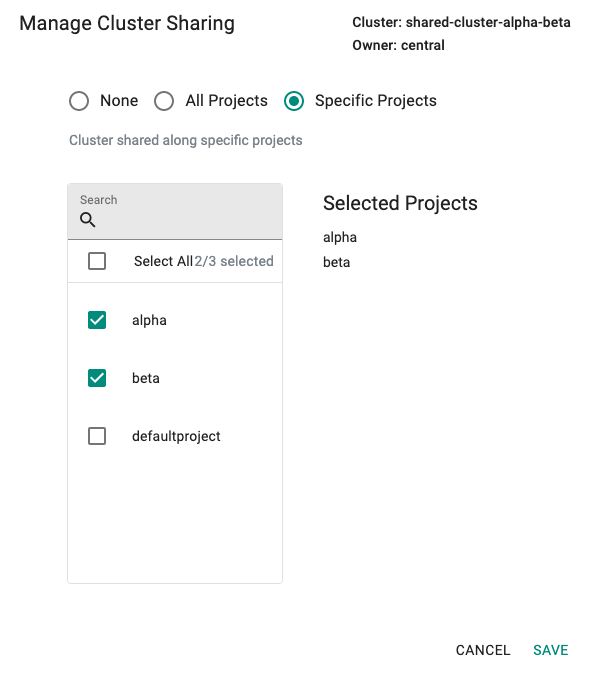
- Click Save
Apply resource quotas
- Click on the gear icon next to project alpha in the listing page
- Click on the Resource Quotas tab
- Configure Project Limit (per cluster limit) and Namespace Limit as appropriate
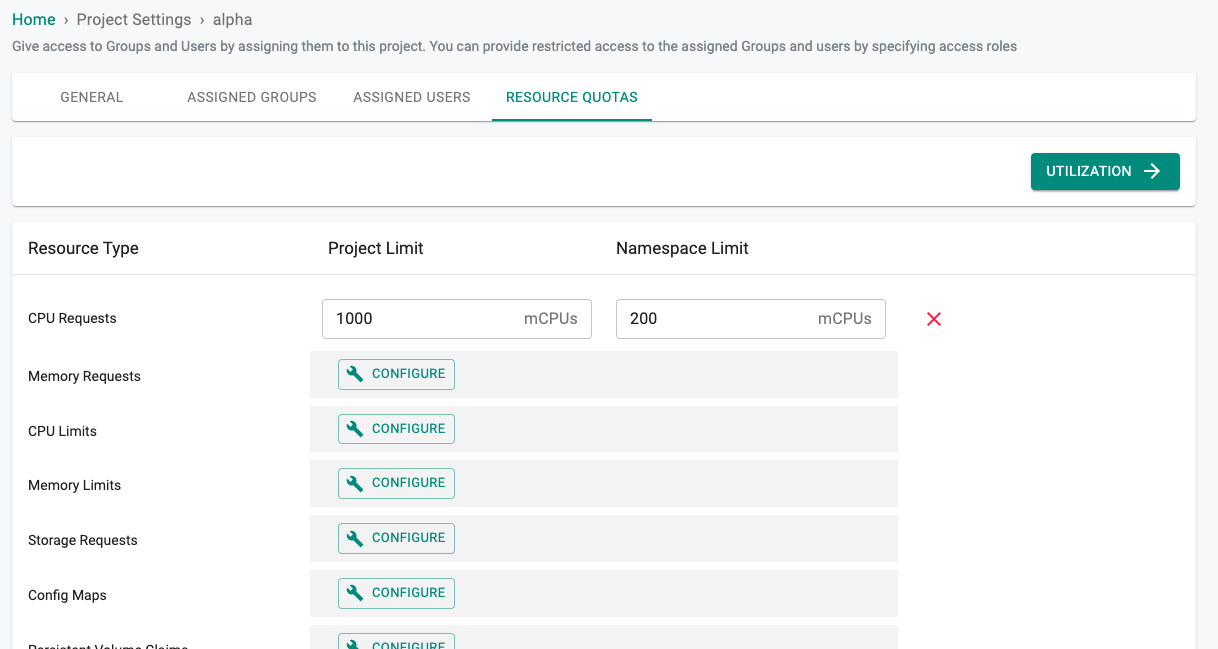
Important
Project Resource quotas ensure that the cluster resource utilization within that specific project context never exceeds the configured limit. This makes sure that teams cannot consume resources (more than what is assigned) and impact other teams with whom the cluster is being shared.
Repeat the same exercise for project beta.
Step 5: Add labels to existing namespaces
In this specific example, we have two existing namespaces (alpha1, alpha2) in the shared cluster that belong to the alpha team and two existing namespaces (beta1, beta2) that belong to the beta team. There is also an "infra" namespace where common services such as security tooling etc. have been installed by the platform.
kubectl get ns
NAME              STATUS   AGE
alpha1            Active   89s
alpha2            Active   86s
beta1             Active   82s
beta2             Active   79s
default           Active   62m
infra             Active   66s
kube-node-lease   Active   62m
kube-public       Active   62m
kube-system       Active   62m
rafay-system      Active   25m
The platform offers a namespace reconciliation feature that can synchronize existing namespaces to the platform and convert them into managed namespaces. As part of this process, we would want to make sure that namespaces alpha1/alpha2 get synchronized to alpha project and namespaces beta1/beta2 and beta project.
In order to do this, add k8smgmt.io/project label with the project name to each of the namespaces.
kubectl label ns alpha1 k8smgmt.io/project=alpha
kubectl label ns alpha2 k8smgmt.io/project=alpha
kubectl label ns beta1 k8smgmt.io/project=beta
kubectl label ns beta2 k8smgmt.io/project=beta
If the label is not added, the namespace gets synchronized to the parent project (which is "central" project in this case). We will not add a label to "infra" namespace, it will be synchronized to the central project.
Step 6: Apply a blueprint with "namespace sync on"
- Navigate to the central project
- Click on New Blueprint
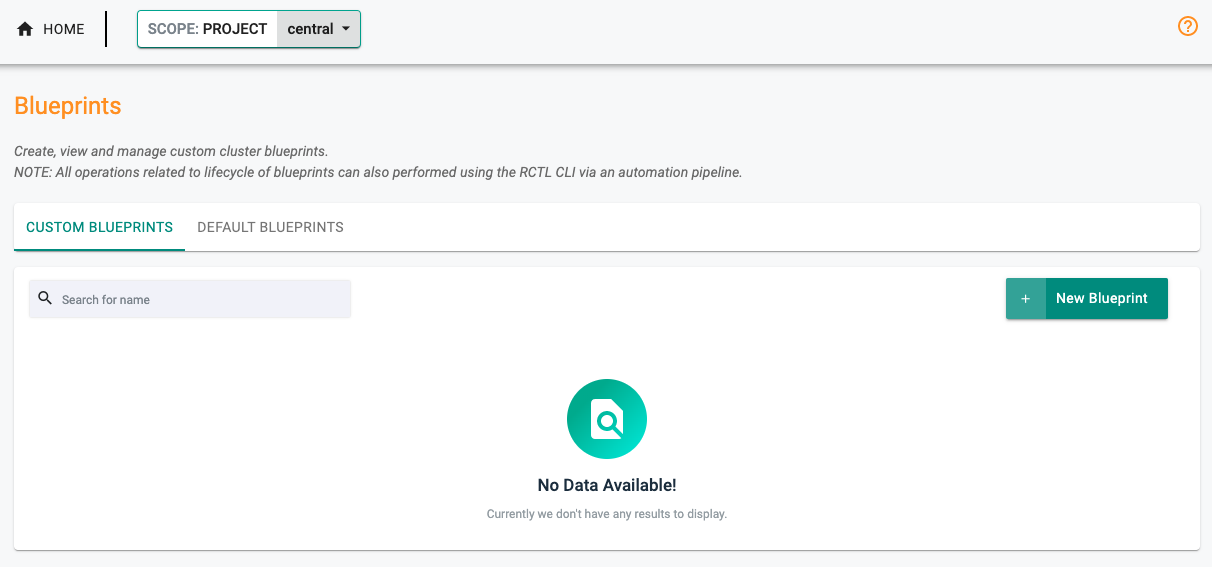
- Provide a name (e.g. central-blueprint) and an appropriate description
- Click Save
- Provide a version name (e.g. v1), select minimal as the base blueprint
- Turn the Enable Namespace Sync on
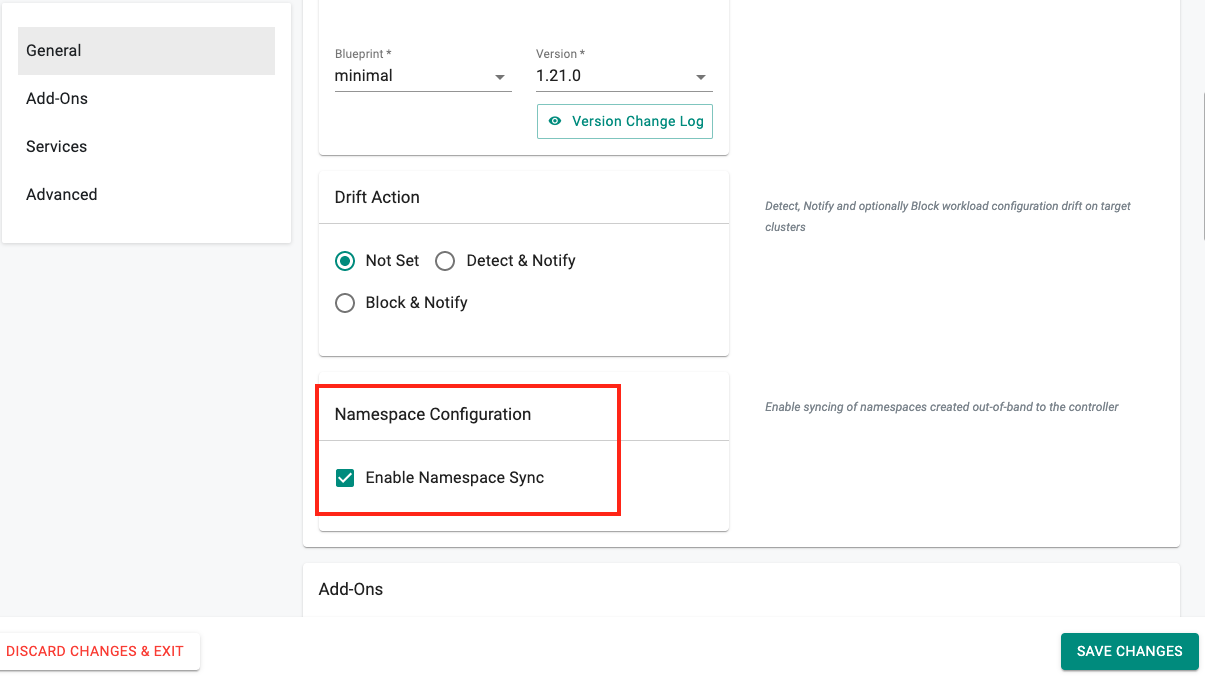
-
Click Save Changes
-
Navigate to the shared cluster (e.g. shared-cluster-alpha-beta)
- Click on the gear icon next to the cluster and select the Update Blueprint option from the dropdown
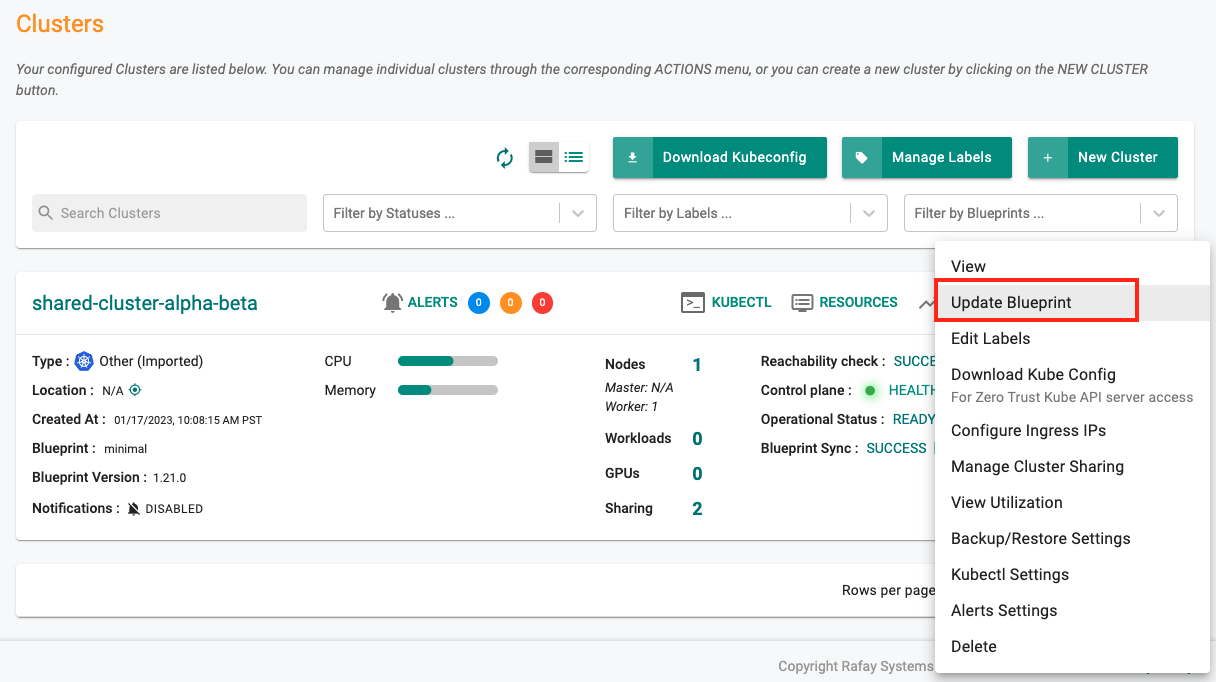
- Select the blueprint and the version (e.g. central-blueprint, v1)
- Click Save and Publish
- Wait for the Blueprint sync process to complete
Step 7: Verify that namespaces are imported to the right projects
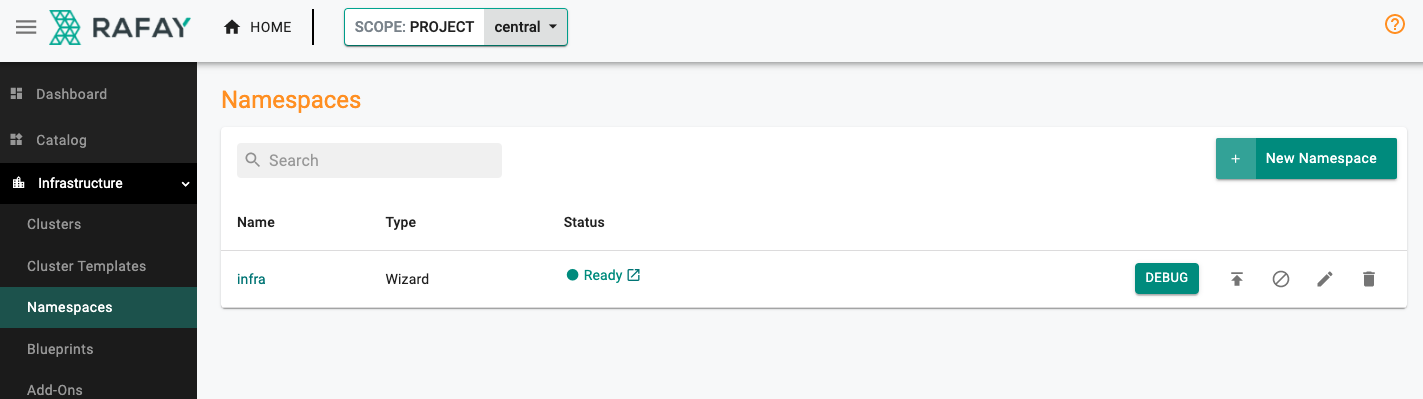
Navigate to the namespaces page in the central project. You should be able to see the "infra" namespace listed within this project context.
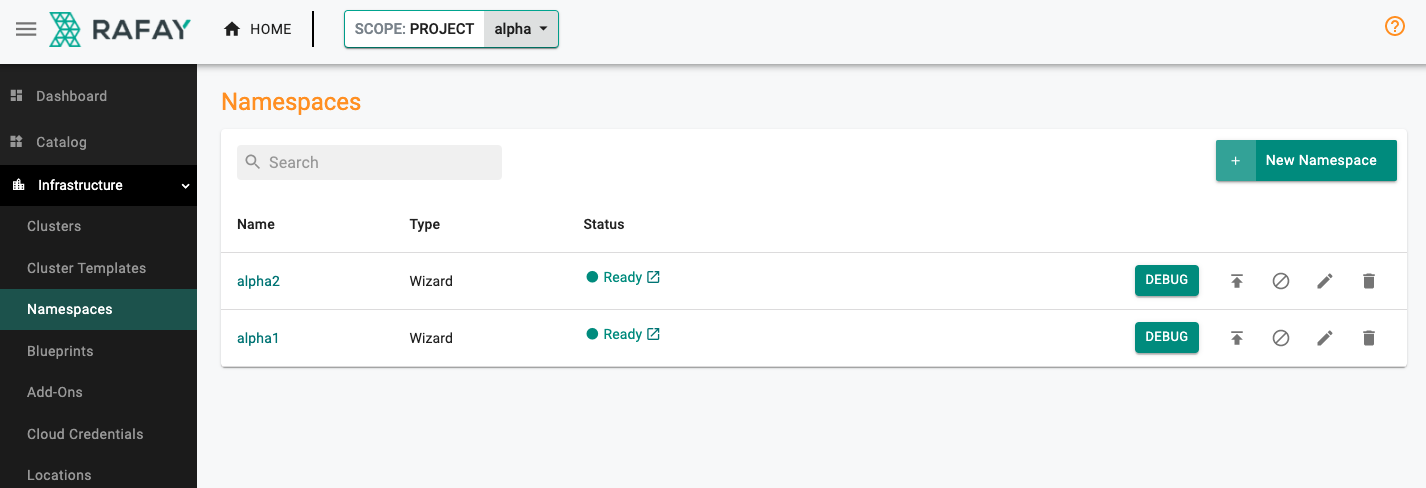
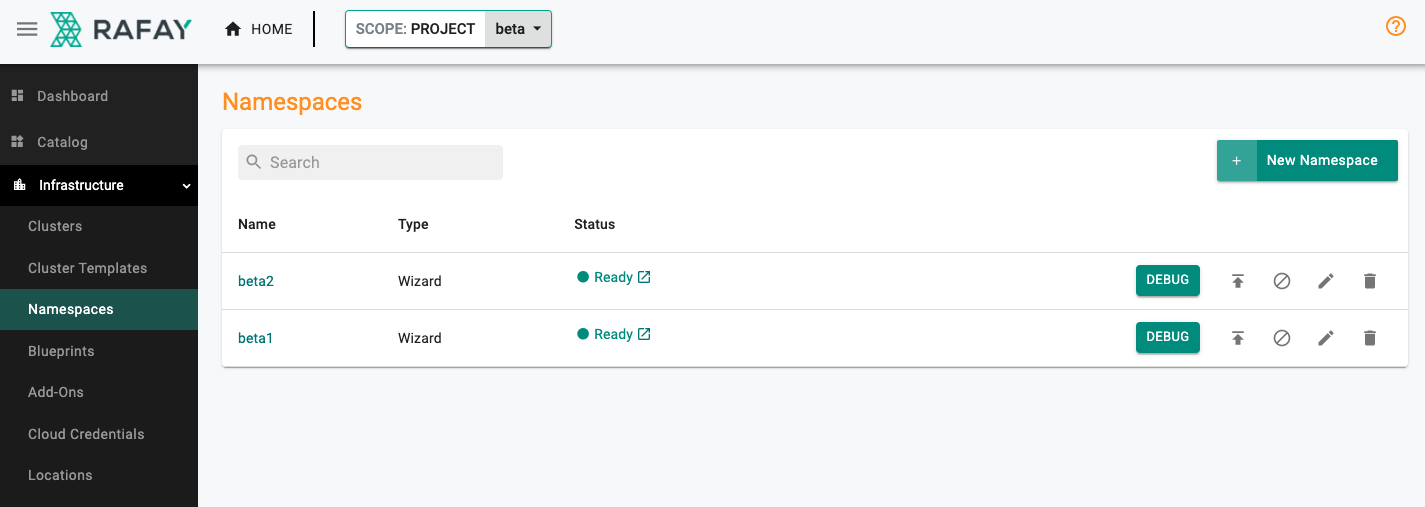
You should be able to similarly see alpha1/alpha2 namespaces in alpha project and beta1/beta2 namespaces in beta project.
Step 8: Create "project specific roles" for users
- Login into your Org as an Org Admin
- Navigate to System -> Users
- Click on New User
- Input appropriate details (do not add any groups as yet)
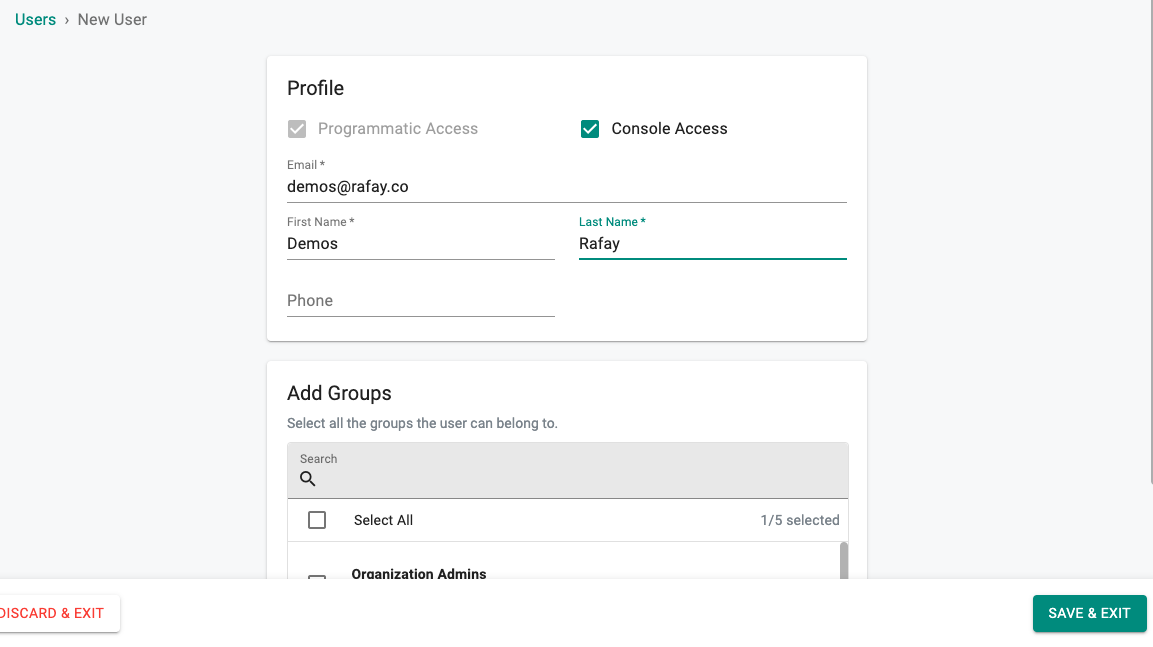
- Click Save & Exit
- You will see a pop-up stating that the user has not been assigned to any groups. Select Yes to continue
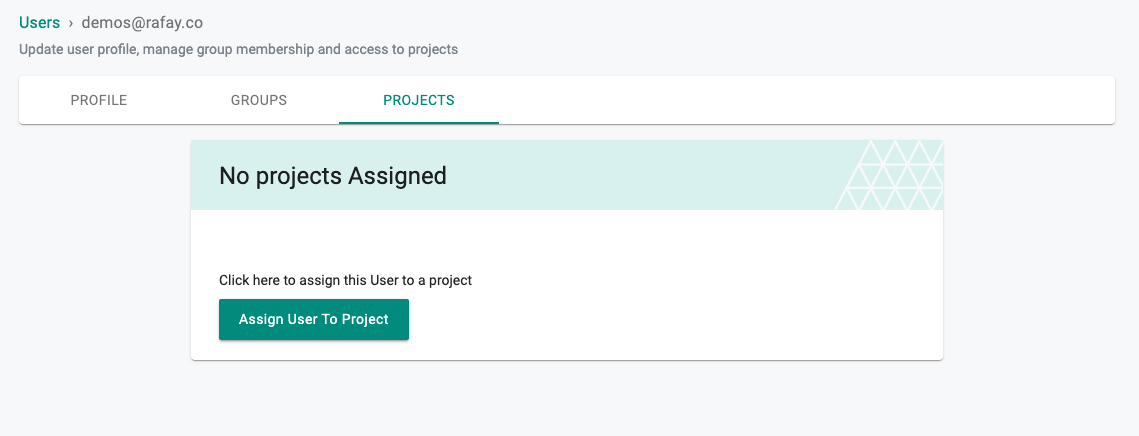
- Select the user that was just created
- Click on the Projects tab
- Select Assign User To Project
- Select alpha project from the dropdown on the left
- Select the Workspace Admin role
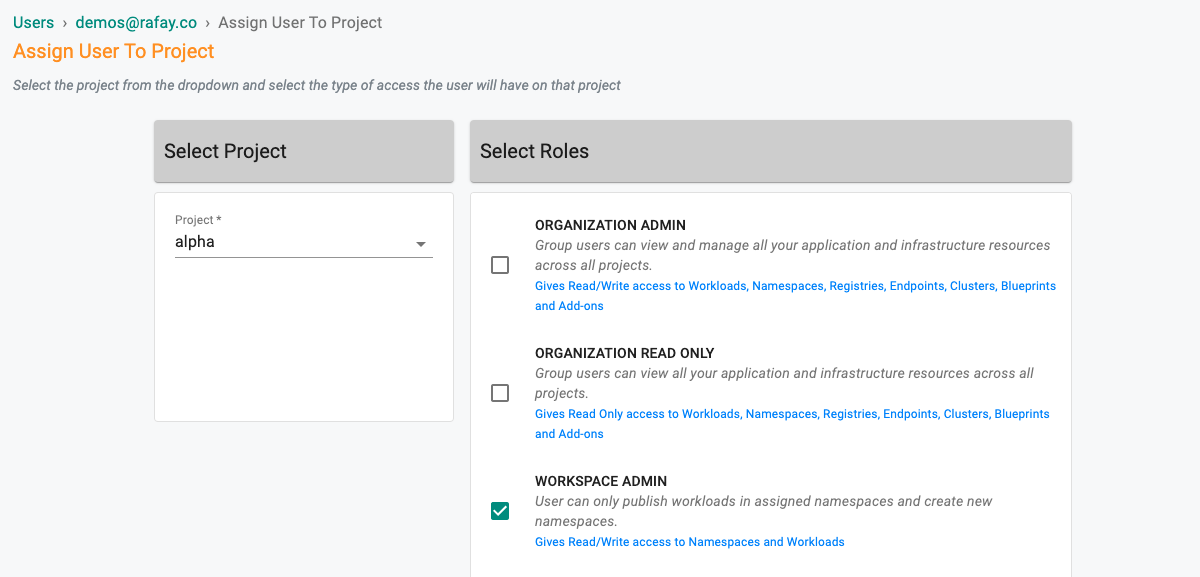
-
Click Save & Exit
-
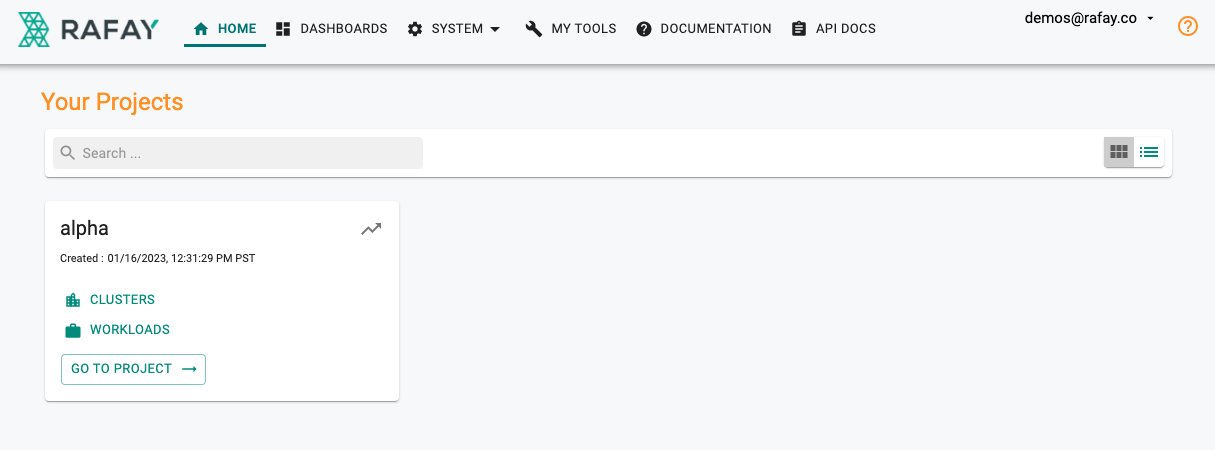
Log out of the console now and log in as the user that was created
- You can now notice that the user only has access to alpha project and cannot view project beta or project central (and the resources in those projects)

The workspace admin role allows the user to:
- Create a new namespace
- Update resource quotas on existing namespaces
- Delete an existing namespace
All of these actions listed above can be performed within their specific project context (i.e. they cannot delete namespaces belong to other teams in the shared cluster etc.) and is also constrained by the governance controls put in place by the platform teams (e.g. creation of a new namespace is blocked if the project resource quota is exceeded).
Recap
Congratulations! At this point, you have successfully leveraged "Projects" and "Workspace as a service" capabilities to achieve isolation between two teams that share a cluster.
Step 1: Create a central project for the platform team
You can alternatively create projects by using the declarative spec. For more information on automation via RCTL CLI, refer here.
apiVersion: system.k8smgmt.io/v3
kind: Project
metadata:
  description: for infrastructure management and to enforce governance controls
  name: central
spec:
  default: false
- Type the command below to create project alpha
rctl apply -f <path-to-filename>.yaml
Step 2: Create projects for the two teams
Create projects (e.g. alpha and beta) for the two teams using the example spec provided as part of Step 1.
Step 3: Import the shared cluster to the "central" project
An illustrative example of the cluster spec YAML file is shown below.
kind: Cluster
metadata:
  name: shared-cluster-alpha-beta
  project: central
spec:
  type: imported
  # location, can be custom or predefined
  location: newyorkcity-us
  blueprint: minimal
- Type the command below to create a cluster entry in project alpha
rctl create cluster -f <path-to-filename>.yaml -p central
- Type the command below to download the cryptographically unique bootstrap YAML required to register the cluster
rctl get clusterbootstrap shared-cluster-alpha-beta -o yaml > <path-to-bootstrap-filename>.yaml -p central
- Apply bootstrap to the clusters to initiate the import process
Use kubectl to apply the "cluster bootstrap" file on your K8s cluster.
kubectl apply -f [path to file]/shared-cluster-alpha-beta-bootstrap.yaml
This will create a namespace for the k8s mgmt operator, download the container images, and register with the controller. This one time import process can take ~2 minutes.
namespace/rafay-system created
serviceaccount/system-sa created
clusterrole.rbac.authorization.k8s.io/rafay:manager created
clusterrolebinding.rbac.authorization.k8s.io/rafay:rafay-system:manager-rolebinding created
clusterrole.rbac.authorization.k8s.io/rafay:proxy-role created
clusterrolebinding.rbac.authorization.k8s.io/rafay:rafay-system:proxy-rolebinding created
priorityclass.scheduling.k8s.io/rafay-cluster-critical created
role.rbac.authorization.k8s.io/rafay:leader-election-role created
rolebinding.rbac.authorization.k8s.io/rafay:leader-election-rolebinding created
customresourcedefinition.apiextensions.k8s.io/namespaces.cluster.rafay.dev created
customresourcedefinition.apiextensions.k8s.io/tasklets.cluster.rafay.dev created
customresourcedefinition.apiextensions.k8s.io/tasks.cluster.rafay.dev created
service/controller-manager-metrics-service-v3 created
deployment.apps/controller-manager-v3 created
configmap/connector-config-v3 created
configmap/proxy-config-v3 created
deployment.apps/rafay-connector-v3 created
service/rafay-drift-v3 created
validatingwebhookconfiguration.admissionregistration.k8s.io/rafay-drift-validate-v3 created
Once the k8s operator is operational, it will "establish and maintain a heartbeat" with the controller.
Step 4: Share the imported cluster and apply resource quotas
Share the imported cluster
- Navigate to central project
- Click on the gear icon next to the shared cluster (e.g. shared-cluster-alpha-beta) and select the Manage Cluster Sharing option from the dropdown
- Select the Specific Projects options for Sharing
- Select alpha and beta from the list
- Click Save
Apply resource quotas
You can alternatively enable "namespace sync" by using the declarative blueprint spec YAML.
  {
  "apiVersion": "system.k8smgmt.io/v3",
  "kind": "Project",
  "metadata": {
    "name": "alpha"
  },
  "spec": {
    "default": false,
    "clusterResourceQuota": {
      "cpuRequests": "1000m",
      "memoryRequests": "1024Mi",
      "cpuLimits": "2000m",
      "memoryLimits": "2048Mi",
      "configMaps": 10,
      "persistentVolumeClaims": 10,
      "secrets": 10,
      "services": 10,
      "servicesLoadBalancers": 10,
      "servicesNodePorts": 10,
      "storageRequests": 10,
      "pods": 10,
      "replicationControllers": 10
    },
    "defaultClusterNamespaceQuota": {
      "cpuRequests": "200m",
      "memoryRequests": "512Mi",
      "cpuLimits": "1000m",
      "memoryLimits": "1024Mi",
      "configMaps": 5,
      "persistentVolumeClaims": 5,
      "secrets": 5,
      "services": 5,
      "servicesLoadBalancers": 5,
      "servicesNodePorts": 5,
      "storageRequests": 5,
      "pods": 5,
      "replicationControllers": 5
    }
  }
}
- Type the command below to apply the configured resource quotas
rctl apply -f <path-to-filename>.yaml -p alpha
- You can verify that the project quotas are configured by using the below command
kubectl get projects.system.k8smgmt.io -o yaml
Important
Project Resource quotas ensure that the cluster resource utilization within that specific project context never exceeds the configured limit. This makes sure that teams cannot consume resources (more than what is assigned) and impact other teams with whom the cluster is being shared.
Repeat the same exercise for project beta.
Step 5: Add labels to existing namespaces
In this specific example, we have two existing namespaces (alpha1, alpha2) in the shared cluster that belong to the alpha team and two existing namespaces (beta1, beta2) that belong to the beta team. There is also an "infra" namespace where common services such as security tooling etc. have been installed by the platform.
kubectl get ns
NAME              STATUS   AGE
alpha1            Active   89s
alpha2            Active   86s
beta1             Active   82s
beta2             Active   79s
default           Active   62m
infra             Active   66s
kube-node-lease   Active   62m
kube-public       Active   62m
kube-system       Active   62m
rafay-system      Active   25m
The platform offers a namespace reconciliation feature that can synchronize existing namespaces to the platform and convert them into managed namespaces. As part of this process, we would want to make sure that namespaces alpha1/alpha2 get synchronized to alpha project and namespaces beta1/beta2 and beta project.
In order to do this, add k8smgmt.io/project label with the project name to each of the namespaces.
kubectl label ns alpha1 k8smgmt.io/project=alpha
kubectl label ns alpha2 k8smgmt.io/project=alpha
kubectl label ns beta1 k8smgmt.io/project=beta
kubectl label ns beta2 k8smgmt.io/project=bet
If the label is not added, the namespace gets synchronized to the parent project (which is "central" project in this case). We will not add a label to "infra" namespace, it will be synchronized to the central project.
Step 6: Apply a blueprint with "namespace sync on"
You can alternatively enable "namespace sync" by using the declarative blueprint spec YAML.
Create Blueprint
apiVersion: infra.k8smgmt.io/v3
kind: Blueprint
metadata:
  name: central-blueprint
  project: central
spec:
  base:
    name: minimal
    version: 1.21.0
  defaultAddons:
    csiSecretStoreConfig:
      providers: {}
    enableIngress: false
    enableLogging: false
    enableMonitoring: false
    enableVM: false
  drift:
    enabled: false
  version: v1
  namespaceConfig:
    enableSync: true
- Type the command below to create the new blueprint
rctl apply -f <path-to-filename>.yaml -p central
- Type the command below to verify creation of the blueprint
rctl get blueprint -v <blueprint_name> -p central
Assign the Blueprint to the cluster
You can alternatively assign the blueprint to the cluster using the RCTL command.
rctl update cluster <cluster_name> -b <blueprint_name> --blueprint-version <version_name> -p central
Type the command below to verify creation of the blueprint
rctl get cluster -v <cluster_name> -p central
Step 7: Verify that namespaces are imported to the right projects
Navigate to the namespaces page in the central project. You should be able to see the "infra" namespace listed within this project context.
Alternatively, you can use the rctl command to verify the same.
rctl get ns -p central
+-------+-------------+------------------------------+---------------------------+---------+-------------------------------------+-------------+
| NAME  | TYPE        | CREATEDAT                    | DEPLOYEDCLUSTERS          | ID      | LABELS                              | ANNOTATIONS |
+-------+-------------+------------------------------+---------------------------+---------+-------------------------------------+-------------+
| infra | RafayWizard | Tue Jan 17 19:08:08 UTC 2023 | shared-cluster-alpha-beta | 24lg9lk | [kubernetes.io/metadata.name:infra] | []          |
+-------+-------------+------------------------------+---------------------------+---------+-------------------------------------+-------------+
You should be able to similarly see alpha1/alpha2 namespaces in alpha project and beta1/beta2 namespaces in beta project.
+--------+-------------+------------------------------+---------------------------+---------+--------+-------------+
| NAME   | TYPE        | CREATEDAT                    | DEPLOYEDCLUSTERS          | ID      | LABELS | ANNOTATIONS |
+--------+-------------+------------------------------+---------------------------+---------+--------+-------------+
| alpha1 | RafayWizard | Tue Jan 17 19:08:06 UTC 2023 | shared-cluster-alpha-beta | 2wywx8k |        |             |
+--------+-------------+------------------------------+---------------------------+---------+--------+-------------+
| alpha2 | RafayWizard | Tue Jan 17 19:08:07 UTC 2023 | shared-cluster-alpha-beta | m15q8ok |        |             |
+--------+-------------+------------------------------+---------------------------+---------+--------+-------------+
+-------+-------------+------------------------------+---------------------------+---------+--------+-------------+
| NAME  | TYPE        | CREATEDAT                    | DEPLOYEDCLUSTERS          | ID      | LABELS | ANNOTATIONS |
+-------+-------------+------------------------------+---------------------------+---------+--------+-------------+
| beta1 | RafayWizard | Tue Jan 17 19:08:07 UTC 2023 | shared-cluster-alpha-beta | k3o1l7k |        |             |
+-------+-------------+------------------------------+---------------------------+---------+--------+-------------+
| beta2 | RafayWizard | Tue Jan 17 19:08:07 UTC 2023 | shared-cluster-alpha-beta | 2qxg9zm |        |             |
+-------+-------------+------------------------------+---------------------------+---------+--------+-------------+
Step 8: Create "project specific roles" for users
- Login into your Org as an Org Admin
- Navigate to System -> Users
- Click on New User
- Input appropriate details (do not add any groups as yet)
- Click Save & Exit
- You will see a pop-up stating that the user has not been assigned to any groups. Select Yes to continue
- Select the user that was just created
- Click on the Projects tab
- Select Assign User To Project
- Select alpha project from the dropdown on the left
- Select the Workspace Admin role
-
Click Save & Exit
-
Log out of the console now and log in as the user that was created
- You can now notice that the user only has access to alpha project and cannot view project beta or project central (and the resources in those projects)
The workspace admin role allows the user to:
- Create a new namespace
- Update resource quotas on existing namespaces
- Delete an existing namespace
All of these actions listed above can be performed within their specific project context (i.e. they cannot delete namespaces belong to other teams in the shared cluster etc.) and is also constrained by the governance controls put in place by the platform teams (e.g. creation of a new namespace is blocked if the project resource quota is exceeded).
Recap
Congratulations! At this point, you have successfully leveraged "Projects" and "Workspace as a service" capabilities to achieve isolation between two teams that share a cluster.