Use
At this point, the developer is ready to request an Amazon ECS cluster. To get access to the environment, note that the developer
- Does not need to have any knowledge of Terraform or other IaC frameworks
- Does not need access to privileged credentials for AWS
- Does not need any help from the Platform team to deploy their environment
Important
Ensure that the developer is assigned to a group that has the "Environment Template User role" in the project. This will provide the developer the ability to create the new namespace based environment via self-service.
Request Cluster
When a developer requests a cluster, a series of steps are automatically performed to fulfil the request. The sequence diagram below describes the high level steps.
Important
Although the recommended workflow assumes and recommends using an Integration with an Identity Provider (IdP) to provide a Single Sign On (SSO) experience, organizations can also use locally managed users.
sequenceDiagram
    participant dev as Developer
    participant rafay as Rafay Platform
    participant csp as AWS

    dev->>rafay: Login (Opt. SSO)
    dev->>rafay: New Environment
    rafay-->>csp: Create VPC
    rafay-->>csp: Create ECS Cluster
    rafay-->>csp: Deploy application to ECS Cluster
    dev-->>Application: Developer uses application
Step 1: Configure Environment
In this step, a developer will configure their "ECS Cluster" based environment using the provided environment template. Once the cluster is created, the developer will be automatically provided with the public endpoint for their application running in the ECS cluster.
- Log into the controller and select your project
- Navigate to Environments -> Environments
- Click New Environment
- Enter a name like ecs-1
- Select the existing ECS environment template
- Select the environment template version
- Click Create
- Navigate to Input Variables
- Click Add Variable
- Enter image_location for the variable name
- Select Text for the value type
- Enter the public registry image location of your application (ex. public.ecr.aws/ecs-sample-image/amazon-ecs-sample:latest)
- Click Add Variable
- Enter container_port for the variable name
- Select Text for the value type
- Enter the container port for which the application will be exposed (ex. 80)
- Click Save
Important
To avoid collisions, a unique name for the AWS resources is created from the environment name in the Rafay platform.
Step 2: Deploy Environment
The developer can now deploy the environment. Environment Manager will automatically create an Amazon ECS cluster and deploy the application image to the cluster.
- Developer logs in and navigates to the project
- Navigate to Environments -> Environments
- Click on the ecs-1 environment
- Click Deploy
The environment will begin to deploy. This step can take ~7 minutes to complete.
Step 3: Access Application
Once the environment has finished deploying, the user can use the environment output to find the application endpoint. The endpoint can be entered into a browser to test the application.
- Log into the controller and select your project
- Navigate to Environments -> Environments
- Click on the ecs-1 environment
- Click Resource
- Expand the aws-ecs resource, you will see a public endpoint
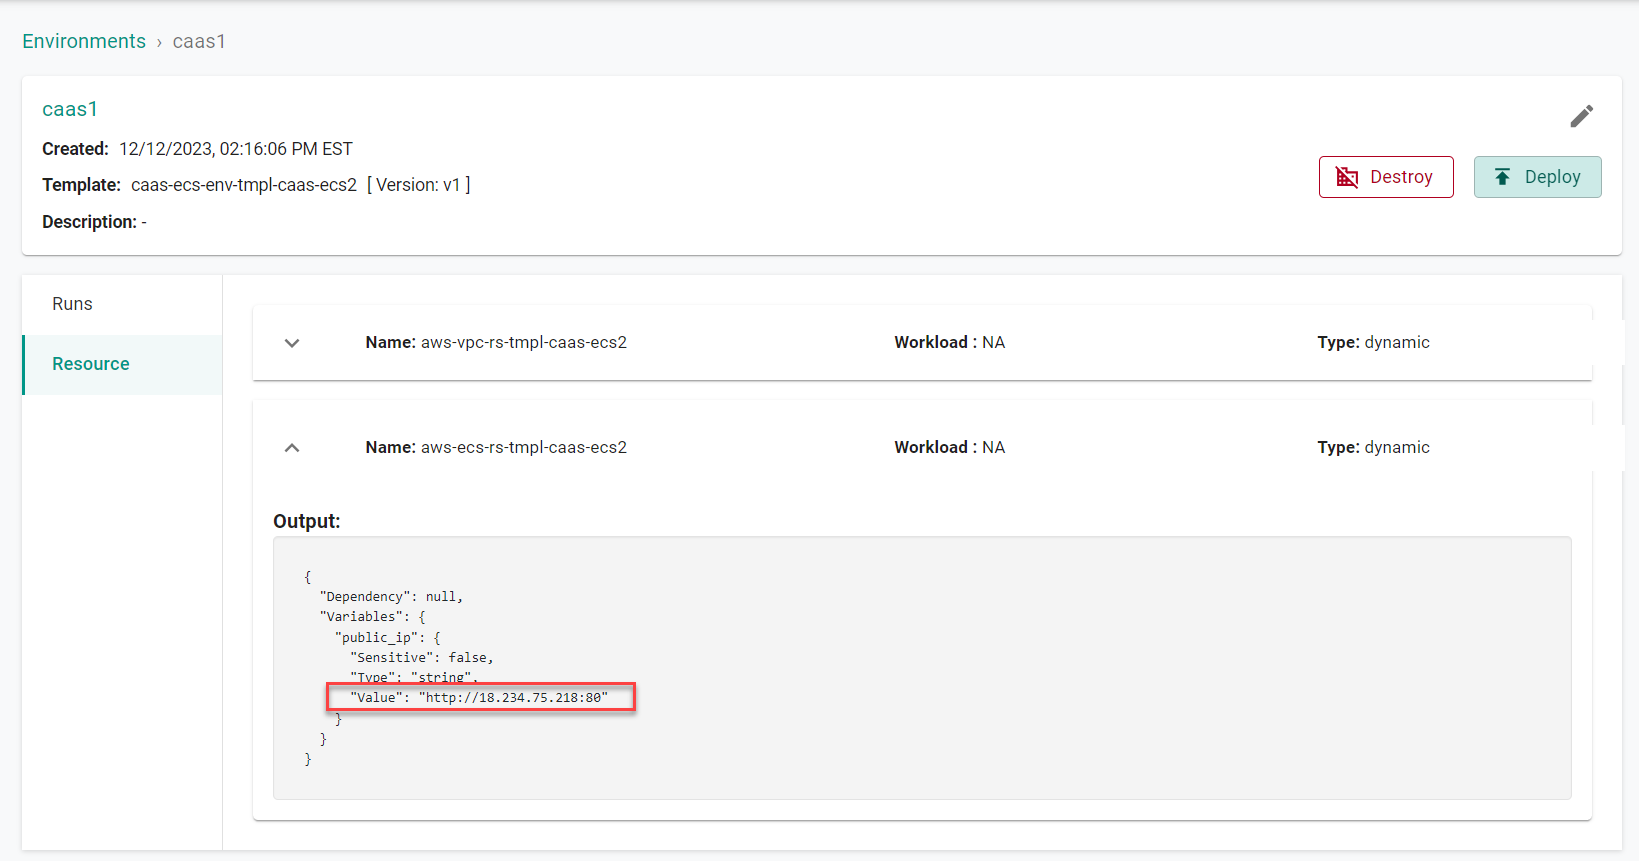
- Copy the endpoint and enter it into a browser
You can now access the application endpoint by pasting the endpoint into a web browser.
Summary
In summary, with Rafay, developers can now develop, deploy and validate their applications on Amazon ECS Clusters in a "self-service" manner.